
Now that we learned about TANGO in general and the architecture of device servers it is time to get our hands dirty. Here is a step-by-step tutorial for making your software remotely accessible as TANGO devices.
We will develop a small C++ class that can provide us the current time and date as a string and then build a device server that makes our functionality available over TANGO to remote clients. Our plain C++ project structure looks like this:
$PROJECT_ROOT/
  CMakeLists.txt
  TimeProvider/
    CMakeLists.txt
    TimeProvider.h
    TimeProvider.cpp
    main.cpp
Here are our CMake build files:
toplevel
project(Time)
cmake_minimum_required(VERSION 2.8)

find_package(PkgConfig)

add_subdirectory(TimeProvider)
and for the TimeProvider
project(TimeProvider)

add_library(time TimeProvider.cpp)

add_executable(timeprovider main.cpp)
target_link_libraries(timeprovider time)
And the C++ sources for our standalone application:
TimeProvider.h
#include <string>

class TimeProvider
{
public:
    TimeProvider() {}

    const std::string now();
};
TimeProvider.cpp
#include "TimeProvider.h"

#include <ctime>

const std::string TimeProvider::now()
{
    time_t now = time(0);
    struct tm time;
    char timeString[100];
    time = *localtime(&now);
    strftime(timeString, sizeof(timeString), "%Y-%m-%d %X", &time);
    return timeString;
}
main.cpp
#include <iostream>
#include "TimeProvider.h"

int main()
{
    TimeProvider tp;
    std::cout << tp.now() << std::endl;
    return 0;
}
Next we create a new subdirectory “TimeDevice” and add it to our toplevel CMakeLists.txt along with the TANGO package lookup:
...
find_package(PkgConfig)
pkg_check_modules(TANGO tango>=7.2.6 REQUIRED)

add_subdirectory(TimeProvider)
add_subdirectory(TimeDevice)
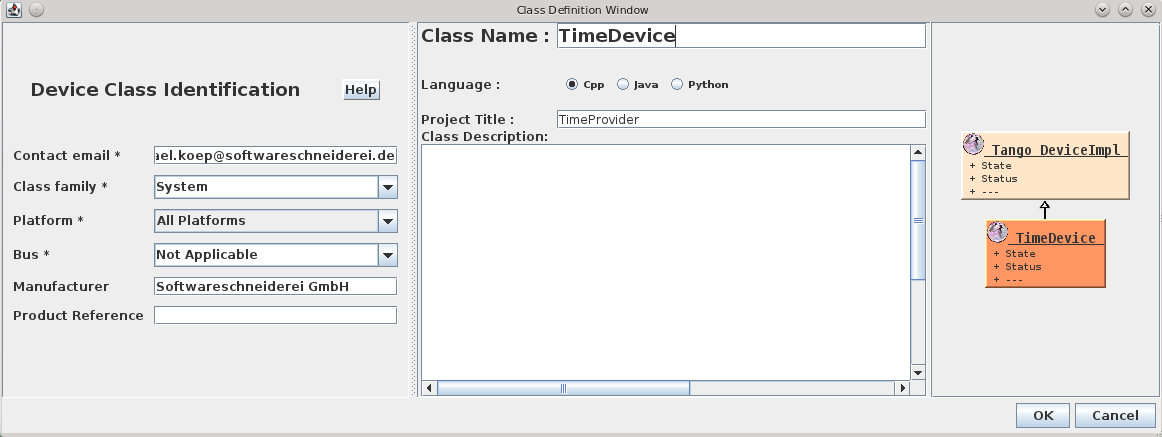
In this newly created directory we now run the Pogo application with pogo TimeDevice from our TANGO installation to generate our device server skeleton:
 and add the Attribute:
 so the result looks like:

Now we need to add the generated sources to our CMake build like this:
project(TimeDevice)

set(SOURCES
    ${PROJECT_NAME}.cpp
    ${PROJECT_NAME}Class.cpp
    ${PROJECT_NAME}StateMachine.cpp
    ClassFactory.cpp
    main.cpp
)

# this is needed because of wrong generation of include statements
# you may correct them in generated code because they are in protected regions
include_directories(.)

include_directories(
    ${TimeProvider_SOURCE_DIR}
    ${TANGO_INCLUDE_DIRS}
)

add_definitions("-std=c++11")

add_executable(time_device_server ${SOURCES})
target_link_libraries(time_device_server
    time
    ${TANGO_LIBRARIES}
)
As the last step, we implement the code for the CurrentTime attribute like this:
void TimeDevice::read_CurrentTime(Tango::Attribute &attr)
{
	DEBUG_STREAM << "TimeDevice::read_CurrentTime(Tango::Attribute &attr) entering... " << endl;
	/*----- PROTECTED REGION ID(TimeDevice::read_CurrentTime) ENABLED START -----*/

    attr_CurrentTime_read = new Tango::DevString;
    TimeProvider timeProvider;
    *attr_CurrentTime_read = Tango::string_dup(timeProvider.now().c_str());
    //	Set the attribute value
    attr.set_value(attr_CurrentTime_read, 1, 0, true);

	/*----- PROTECTED REGION END -----*/	//	TimeDevice::read_CurrentTime
}
For other correct implementations of string attributes see the documentation on the TANGO website.
Now we should end up with a ready to run TANGO device server executable.
Conclusion
If you structure your project with hindsight you can integrate your drivers or services in your TANGO control system with very low effort. In the next post we we will show how to add a device server to a TANGO database and use its facilities like device properties for configuration or jive for inspection of a device.
Feel free to download the full source code of this tutorial.

One thought on “TANGO device server step-by-step tutorial”