How I accidentally cut my audio-files in half

A couple of weeks ago, I asked my brother to test out my new game You Are Circle (please wishlist it and check out the demo, if that’s up your alley!) and among lots of other valuable feedback, he mentioned that the explosion sound effects had a weird click sound at the end that he could only hear with his headphones on. For those of you not familiar with audio signal processing, those click or pop sounds usually appear when the ‘curvy’ audio signal is abruptly cut off1. I did not notice it on my setup, but he has a lot of experience with audio mixing, so I trusted his hearing. Immediately, I looked at the source files in audacity:

They looked fine, really. The sound slowly fades out, which is the exact thing you need to do to prevent clicks & pops. Suspecting the problem might be on the playback side of his particular setup, I asked him to record the sound on his computer the next time he tested and then kind of forgot about it for a bit.

Fast-forward a couple of days. Neither of us had followed up on the little clicky noise thing. While doing some video captures with OBS, I noticed that the sound was kind of terrible in some places, the explosions in particular. Maybe that was related?

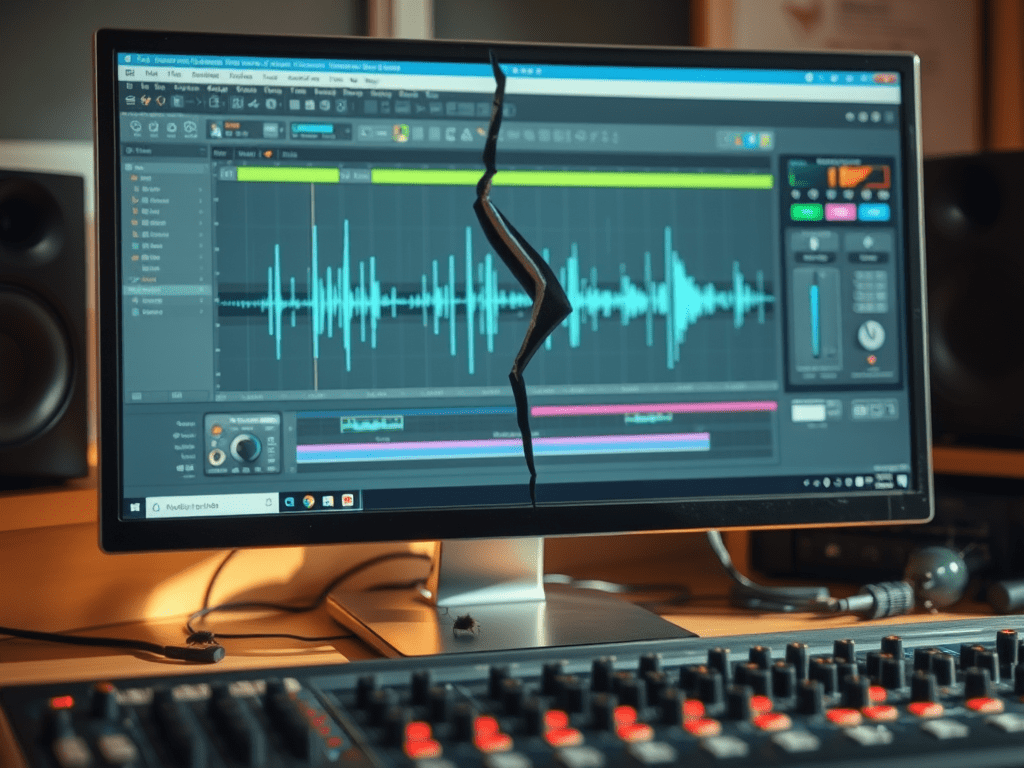
While building a new version of my game, Compiling resources... showed up in my console and it suddenly dawned on me: What if my home-brew resource compiler somehow broke the audio files? I use it to encode all the .wav originals into Ogg Vorbis for deployment. Maybe a badly configured encoding setup caused the weird audio in OBS and for my brother? So I looked at the corresponding .ogg files, and to my surprise, it indeed had a small abrupt cut-off at the end. How could that happen? Only when I put both the original and the processed file next to each other, did I see what was actually going on:

It’s only half the file! How did that happen? And what made this specific file so special for it to happen? This is one of many files that I also convert from stereo to mono in preprocessing. So I hypothesized that might be the problem. No way I missed all of those files being cut in half though, or did I? So I checked the other files that were converted from stereo to mono. Apparently, I did miss it. They were all cut in half. So I took a look at the code. It looked something like this:

while (keep_encoding)
{
  auto samples_in_block = std::min(BLOCK_SIZE, input.sample_count() - sample_offset);
  if (samples_in_block != 0)
  {
    auto samples_per_channel = samples_in_block / channel_count;
    auto channel_buffer = vorbis_analysis_buffer(&dsp_state, BLOCK_SIZE);
    auto input_samples = input.samples() + sample_offset;

    if (convert_to_mono)
    {
      for (int sample = 0; sample < samples_in_block; sample += 2)
      {
        int sample_in_channel = sample / channel_count;
        channel_buffer[0][sample_in_channel] = (input_samples[sample] + input_samples[sample + 1]) / (2.f * 32768.f);
      }
    }
    else
    {
      for (int sample = 0; sample < samples_in_block; ++sample)
      {
        int channel = sample % channel_count;
        int sample_in_channel = sample / channel_count;
        channel_buffer[channel][sample_in_channel] = input_samples[sample] / 32768.f;
      }
    }

    vorbis_analysis_wrote(&dsp_state, samples_per_channel);
    sample_offset += samples_in_block;
  }
  else
  {
    vorbis_analysis_wrote(&dsp_state, 0);
  }

  /* more stuff to encode the block using the ogg/vorbis API... */
}

Not my best work, as far as clarity and deep nesting goes. After staring at it for a while, I couldn’t really figure out what was wrong with it. So I built a small test program to debug into, and only then did I see what was wrong.

It was terminating the loop after half the file, which now seems pretty obvious given the outcome. But why? Turns out it wasn’t the convert_to_mono at all, but the whole loop. What’s really the problem here is mismatched and imprecise terminology.

What is a sample? The audio signal is usually sampled several thousand times (44.1kHz, 48kHz or 96kHz are common) per second to record the audio waves. One data point is called a sample. But that is only enough of a definition if the sound has a single channel. But all those with convert_to_mono==true were stereo, and that’s exactly were the confusion is in this code. One part of the code thinks in single-channel samples, i.e. a single sampling time-point has two samples in a stereo file, while the other part things in multi-channel samples, i.e. a single sampling time-point has only one stereo sample, that consists of multiple numbers. Specifically this line:

auto samples_in_block = std::min(BLOCK_SIZE, input.sample_count() - sample_offset);

samples_in_block and sample_offset use the former definition, while input.sample_count() uses the latter. The fix was simple: replace input.sample_count() with input.sample_count() * channel_count.

But that meant all my stereo sounds, even the longer music files, were missing the latter half. And this was not a new bug. The code was in there since the very beginning of the git history. I just didn’t hear its effects. For the sound files, many of them have a pretty long fade out in the second half, so I can kind of get why it was not obvious. But the music was pretty surprising. My game music loops, and apparently, it also loops if you cut it in half. I did not notice.

So what did I learn from this? Many of my assumptions while hunting down this bug were wrong:

  • My brother’s setup did not have anything to do with it.
  • Just because the original source file looked fine, I thought the file I was playing back was good as well.
  • The bad audio in OBS did not have anything to do with this, it was just recorded too loud.
  • The ogg/vorbis encoding was not badly configured.
  • The convert_to_mono switch or the special averaging code did not cause the problem.
  • I thought I would have noticed that almost all my sounds were broken for almost two years. But I did not.

What really cause the problem was an old programming nemesis, famously one of the two hard things in computer science: Naming things. There you have it. Domain language is hard.

  1. I think this is because this sudden signal drop equates to a ‘burst’ in the frequency domain, but that is just an educated guess. If you know, please do tell. ↩︎

Your Placeholder Data Still Conveys Meaning – Part I

There is a long-standing tradition to fill unknown text fields with placeholder data. In graphic design, these texts are called “dummy text”. In the german language, the word is “Blindtext”, which translates directly as “blind text”. The word means that while some text is there, the meaning of it can’t be seen.

A popular dummy text is the latin sounding “Lorem ipsum dolor sit amet”, which isn’t actually valid latin. It has no meaning other than being text and taking up space.

While developing software user interfaces, we often deal with smaller input areas like textfields (instead of text areas that could hold a sizeable portion of “lorem ipsum”) or combo boxes. If we don’t know the actual content yet, we tend to fill it with placeholder data that tries to reflect the software’s domain. And by doing that, we can make many mistakes that seem small because they can easily be fixed – just change the text – but might have negative effects that can just as easily be avoided. But you need to be aware of the subtle messages your placeholders send to the reader.

In this series, we will look at a specific domain example: digital invoices. The mistakes and solutions aren’t bound to any domain, though. And we will look at user interfaces and the corresponding source code, because you can fool yourself or your fellow developers with placeholder data just as easily as your customer.

We start with a relatively simple mistake: Letting your placeholder data appear to be real.

The digital (or electronic) invoice is a long-running effort to reduce actual paper document usage in the economy. With the introduction of the european norm EN 16931, there is a chance of a unified digital format used in one major economic region. Several national interpretations of the norm exist, but the essential parts are identical. You can view invoices following the format with a specialized viewer application like the Quba viewer. One section of the data is the information about the invoice originator, or the “seller” in domain terms:

You can see the defined fields of the norm (I omitted a few for simplicity – a mistake we will discuss later in detail) and a seemingly correct set of values. It appears to be the address of my company, the Softwareschneiderei GmbH.

If you take a quick look at the imprint of our home page, you can already spot some differences. The street is obviously wrong and the postal code is a near miss. But other data is seemingly correct: The company name is real, the country code is valid and my name has no spelling error.

And then, there are those placeholder texts that appear to be correct, but really aren’t. I don’t encourage you to dial the phone number, because it is a real number. But it won’t connect to a phone, because it is routed to our fax machine (we don’t actually have a “machine” for that, it’s a piece of software that will act like a fax). Even more tricky is the e-mail address. It could very well be routed, but actually isn’t.

Both placeholder texts serve the purpose of “showing it like it might be”, but appear to be so real and finalized that they lose the “placeholder” characteristics. If you show the seller data to me, I will immediately spot the wrong street and probably the wrong postal code, but accept the phone number as “real”. But is isn’t real, it is just very similar to the real one.

How can you avoid placeholders that look too real?

One possibility is to fake the data completely until given the real values:

These texts have the same “look and feel” and the same lengths as the near-miss entries, but are readily recognizable as made-up values.

There is only one problem: If you mix real and made-up values, you present your readers a guessing game for each entry: real or placeholder? If it is no big deal to change the placeholders later on, resist the urge to be “as real as possible”. You can change things like the company name from “Softwareschneiderei GmbH” to “Your Company Name Here Inc.” or something similar and it won’t befuddle anybody because the other texts are placeholders, too. You convey the information that this section is still “under construction”. There is no “80% done” for these things. The section is fully real or not. Introducing situations like “the company name and the place are already real, but the street, postal code and anything else isn’t” doesn’t clear anything and only makes things more complicated.

But I want to give you another possibility to make the placeholders look less real:

Add a prefix or suffix that communicates that the entry is in a state of flux:

That way, you can communicate that you know, guess or propose a value for the field, but it still needs approval from the customer. Another benefit is that you can search for “TODO” and list all the decisions that are pending.

If, for some reason, it is not possible to include the prefix or suffix with a separator, try to include it as visible (and searchable) as possible:

This are the two ways I make my placeholder text convey the information that they are, indeed, just placeholders and not the real thing yet.

Maybe there are other possibilities that you know of? Describe them in a comment below!

In the first part of this series, we looked at two mistakes:

  1. Your placeholders look too real
  2. You mix real data with placeholders

And we discussed three solutions:

  1. Make your placeholders unmistakably fake
  2. Give your placeholders a “TODO” prefix or suffix
  3. Demote your real data to placeholders as long as there is still an open question

In the next part of this series, we will look at the code side of the problem and discover that we can make our lives easier there as well.

Highlight Your Assumptions With a Test

There are many good reasons to write unit tests for your code. Most of them are abstract enough that it might be hard to see the connection to your current work:

  • Increase the test coverage
  • Find bugs
  • Guide future changes
  • Explain the code
  • etc.

I’m not saying that these goals aren’t worth it. But they can feel remote and not imperative enough. If your test coverage is high enough for the (mostly arbitrary) threshold, can’t we let the tests slip a bit this time? If I don’t know about future changes, how can I write guidelining tests for them? Better wait until I actually know what I need to know.

Just like that, the tests don’t get written or not written in time. Writing them after the fact feels cumbersome and yields subpar tests.

Finding motivation by stating your motivation

One thing I do to improve my testing habit is to state my motivation why I’m writing the test in the first place. It seemed to boil down to two main motivations:

  • #Requirement: The test ensures that an explicit goal is reached, like a business rule that is spelled out in the requirement text. If my customer wants the value added tax of a price to be 19 % for baby food and 7 % for animal food, that’s a direct requirement that I can write unit tests for.
  • #Bugfix: The test ensures the perpetual absence of a bug that was found in production (or in development and would be devastating in production). These tests are “tests that should have been there sooner”. But at least, they are there now and protect you from making the same mistake twice.

A code example for a #Requirement test looks like this:

/**
 * #Requirement: https://ticket.system/TICKET-132
 */
@Test
void reduced_VAT_for_animal_food() {
    var actual = VAT.addTo(
        new NetPrice(10.00),
        TaxCategory.animalFood
    );
    assertEquals(
        new GrossPrice(10.70),
        actual
    );
}

If you want an example for a #Bugfix test, it might look like this:

/**
 * #Bugfix: https://ticket.system/TICKET-218
 */
@Test
void no_exception_for_zero_price() {
    try {
        var actual = VAT.addTo(
            NetPrice.zero,
            TaxCategory.general
        );
        assertEquals(
            GrossPrice.zero,
            actual
        );
    } catch (ArithmeticException e) {
        fail(
            "You messed up the tax calculation for zero prices (again).",
            e
        );
    }
}

In my mind, these motivations correlate with the second rule of the “ATRIP rules for good unit tests” from the book “Pragmatic Unit Testing” (first edition), which is named “Thorough”. It can be summarized like this:

  • all mission critical functionality needs to be tested
  • for every occuring bug, there needs to be an additional test that ensures that the bug cannot happen again

The first bullet point leads to #Requirement-tests, the second one to #Bugfix-tests.

An overshadowed motivation

But recently, we discovered a third motivation that can easily be overshadowed by #Requirement:

  • #Assumption: The test ensures a fact that is not stated explicitly by the requirement. The code author used domain knowledge and common sense to infer the most probable behaviour of the functionality, but it is a guess to fill a gap in the requirement text.

This is not directly related to the ATRIP rules. Maybe, if one needs to fit it into the ruleset, it might be part of the fifth rule: “Professional”. The rule states that test code should be crafted with care and tidyness, that it is relevant even if it doesn’t get shipped to the customer. But this correlation is my personal opinion and I don’t want my interpretation to stop you from finding your own justification why testing assumptions is worth it.

How is an assumption different from a requirement? The requirement is written down somewhere else, too and not just in the code. The assumption is necessary for the code to run and exhibit the requirements, but it’s only in the code. In the mind of the developer, the assumption is a logical extrapolation from the given requirements. “It can’t be anything else!” is a typical thought about it. But it is only “written down” in the mind of the developer, nowhere else.

And this is a perfect motivation for a targeted unit test that “states the obvious”. If you tag it with #Assumption, it makes it clear for the next developer that the actual content of the corresponding coded fact is more likely to change than other facts, because it wasn’t required directly.

So if you come across an unit test that looks like this:

/**
 * #Assumption: https://ticket.system/TICKET-132
 */
@Test
void normal_VAT_for_clothing() {
    var actual = VAT.addTo(
        new NetPrice(10.00),
        TaxCategory.clothing
    );
    assertEquals(
        new GrossPrice(11.90),
        actual
    );
}

you know that the original author made an educated guess about the expected functionality, but wasn’t explicitly told and is not totally sure about it.

This is a nice way to make it clear that some of your code is not as rigid or expected as other code that was directly required by a ticket. And by writing an unit test for it, you also make sure that if anybody changes that assumed fact, they know what they are doing and are not just guessing, too.

Using GENERATED AS IDENTITY Instead of SERIAL in PostgreSQL

In PostgreSQL, the SERIAL keyword is commonly used to create auto-incrementing primary keys. While it remains supported and functional, newer versions of PostgreSQL (version 10 and later) offer a more standardized and flexible alternative: the GENERATED … AS IDENTITY syntax.

Limitations of SERIAL

When you define a column as SERIAL, PostgreSQL automatically creates and links a sequence to that column behind the scenes. But this linkage is not explicitly part of the table definition. This can complicate schema management and make the behavior of the column less transparent.

The SERIAL keyword is also not part of the official SQL standard, which may be a concern in environments where cross-database compatibility is important. Additionally, the column remains writable, meaning it’s possible to insert values manually, potentially leading to inconsistencies or conflicts.

Identity Columns

The GENERATED … AS IDENTITY syntax addresses these concerns by making the auto-increment behavior explicit and standards-compliant. An identity column is defined as follows:

CREATE TABLE users (
  id INT GENERATED ALWAYS AS IDENTITY PRIMARY KEY,
  username TEXT NOT NULL
);

This syntax makes it clear that the column is managed by the system. PostgreSQL offers two modes for identity columns:

GENERATED ALWAYS: PostgreSQL always generates a value. Manual insertion requires an override.

GENERATED BY DEFAULT: The application can supply a value, or PostgreSQL will use the next sequence value automatically.

To insert a value manually into an ALWAYS identity column, you must use the OVERRIDING SYSTEM VALUE clause:

INSERT INTO users (id, username)
  VALUES (999, 'admin') OVERRIDING SYSTEM VALUE;

Managing Sequences

Since identity columns integrate the sequence into the column definition, managing them is more straightforward. For example, to reset the sequence:

ALTER TABLE users ALTER COLUMN id RESTART WITH 1000;

The sequence is tied to the column, making it easier to inspect, back up, and restore using tools like pg_dump. This helps avoid issues that can arise with the implicit sequences used by SERIAL.

Conclusion

The GENERATED AS IDENTITY syntax offers clearer semantics, better standards compliance, and more predictable behavior than SERIAL. For new database designs, it is generally the preferred choice. While SERIAL continues to be supported, identity columns provide more transparency and control, especially in environments where portability and schema clarity are important.