Automated unit tests are the grassroot foundation of a healthy test suite. But they aren’t the only type of automated tests that we need to write in order to test a system thoroughly enough to be confident about its production readiness.
There are things like end-to-end or even GUI based tests that have completely different testing mechanics that unit tests. It is clear just from looking at the test code that they aren’t unit tests.
But for the wide range of integration tests, there is a subtle and nearly impercetible transition from unit test to integration test that is hard to explain. It doesn’t really matter on which side of the diving line between the two test types you are as long as you are close to it. But as tests evolve, you need to apply different advancement strategies to the different types of tests. One goal is to keep unit tests from becoming integration tests over time, which is prevalent when factoring out system parts that were small at first.
When things are hard to explain, we search for indicators that can serve as objective counselors and help with making the decision. For the distinction between unit and integration tests, one such indicator is the distance between motor point and reaction point. Let me explain the concepts:
Let’s pretend we need to test the implementation of a baker (or a baking machine):
@Testvoid can_produce_bread() { Baker target = new Baker(); Bread actual = target.bake(); Bread expected = new Bread(); assertEquals( expected, actual );}
This is a straight-forward unit test in the AAA (arrange, act, assert) structure:
- Arrange: We build the “test world” or the slice of the system that should be tested. We call it the “target” (some call it the “cut”, from “code under test”, which corresponds nicely with the “slice of the system”).
- The target contains the motor point, the specific entry point where the code under test is “irritated” by calling a method. It is this irritation that causes the code under test to exhibit a certain behaviour that produces an observable result. The point where this result can be observed is the reaction point.
- Act: We enable the motor point by calling the bake() method on our target baker. The code under test works its magic and gives us the result, which we call “actual”. The return value of the bake() method is the reaction point. It has two roles in the context of our test:
- It provides the observable result of the code under test.
- It serves as the last step of the code under test. The test framework leaves the code under test by returning the result. The exit point and the reaction point of the code under test are at the same spot (the distance between them is zero).
- Assert: We compare the actual result of the code under test with our expected result. In our case, that’s a bit silly because we just want to have a bread, without any further attributes to it. But this blog post is not about the art of assertion, so we keep it simple and silly.
Let’s review the positions of the three named points:
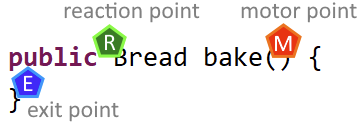
If you read from top to bottom and left to right, the reaction point seems to be placed before the motor point. If you read it like a programmer should, you see that the point are positioned in their execution order: motor point, exit point, reaction point.
You also see that the distance between the points is very small and in the case of exit and reaction point only distinguishable if you look very closely.
That’s the indicator for writing an unit test: If your entrance to the code under test (the motor point) is effectively the same position as your exit from the code under test and the place where you get your actual result (the reaction point), you are unequivocally writing an unit test.
If the distances between the three points get larger, you are drifting away from unit tests and entering the big realm of integration tests. That is not necessarily a bad thing, sometimes it’s a necessity, but it should be a deliberate decision on your part and not an unnoticed accident.
Let’s look at an example where the distances between the points are larger:
@Testvoid can_sell_prepared_goods() { Baker given = new Baker(); Bakery target = new Bakery( given ); target.prepareGoods(1); assertEquals( Optional.of(new Bread()), target.sell() ); assertEquals( Optional.empty(), target.sell() );}
In this case, our baker now owns his own bakery where he can sell his breads to make a living. But baking breads “just in time” a customer requests one is not a sustainable business model, so the bakery has to prepare in advance and sell from the supply.
To test that we can fill up the supply and it gets emptied correctly, this test (in combination with other tests not shown here) does the AAA structure again:
We arrange our test world by inventing a baker and giving him to the bakery, which is the target in our case. We want to test the functionality of the bakery and a baker is required to do so. We already asserted that the baker knows his trade.
Then we act on our target. This is the motor point moment: We call the code under test to elicit a behaviour. But as you can see, we don’t receive a result right away. The effect seems to happen internally and we need to observe it from a different angle. Our reaction point has moved away from the motor point. And we have several exit points on our test journey. This is getting complicated!
In order to assert that the bakery’s supply holds one bread when told to prepare only one, we just buy two breads consecutively and see what happens. If there is only one bread in supply, we should get a bread the first time and nothing for our second purchase. The reaction point is now the sell() method, a good distance away from the prepareGoods() method we used as the motor point. Both points are (hopefully) connected by internal machinery in the bakery. We don’t want to assert the internal machinery, we want to assert its outcome. This requires the distance between motor point (“pressing a button up here”) and reaction point (“getting a product down here”).
You might argue that this example is still an unit test and I would agree. But we already see mechanics that occur predominantly in integration tests:
- Elaborate arrange steps
- act step without a return value (“actual” is missing)
- Multiple assertions, telling a story with their order
When you imagine that the breads need to be of different kinds (dark bread, wholemeal bread, the whole german bread culture), you can probably see how the small unit test we just wrote kind of explodes with secondary complexity.
A realiable indicator that an automated test is going to be complicated is the distance between motor point and reaction point. Once you know about the concept, you can incorporate it into your testing intuition.
I hope it helps you write better tests or write good tests more deliberately. If you have thoughts about the concept, share them in a comment!