When writing PyTango device servers, it is common to implement one Python class per Tango device class. For small projects, this approach is simple and easy to understand. However, it becomes cumbersome when the set of available devices is not known at development time.
Consider a device server that should be entirely driven by a configuration file. Instead of hard-coding every supported device class, the server reads the device definitions at startup and creates the required Tango device classes automatically.
The goal is to write a generic PyTango server that does not need to be modified whenever a new device class is added. If a new entry appears in the configuration file, the server should simply create the corresponding Tango device class.
Python type
At first glance, this sounds unusual. After all, Python classes are typically defined using the familiar class keyword:
class Motor(Device):
    pass
Most Python developers stop here and never think about how classes are actually created. Under the hood, however, classes are objects themselves, and Python provides a built-in mechanism to construct them dynamically.
The function responsible for this is type().
Most of us use it in its simplest form to inspect the type of an object:
print(type(42))
# <class 'int'>
Less well known is its three-argument form:
type(name, bases, attributes)
The arguments are:
name: the name of the new class.
bases: a tuple of parent classes.
attributes: a dictionary containing class attributes and methods.
This means that the following definition is equivalent to the above class definition.
Motor = type(
    "Motor",
    (Device,),
    {},
)
The resulting object is exactly the same: a Python class that can be instantiated or registered with PyTango.
The third argument of type() becomes particularly interesting when more than just the class name should be configurable. The attributes dictionary allows methods, properties, or other class members to be added dynamically. This can be useful when Tango attributes or commands are also described in the configuration file.
Motor = type(
    "Motor",
    (Device,),
    {
        "some_property": 42,
    },
)

a = Motor()
print(a.some_property)
# 42
Conclusion
For our use case, creating classes dynamically becomes straightforward. Reading the configuration file and creating the required classes can be done in a simple loop. From PyTango’s perspective, there is no difference between a statically defined class and one created dynamically using type(). Both behave like ordinary Python classes.
Rails partials are a great way to reuse view code, but they have traditionally suffered from one weakness: their interface is implicit.
When opening a partial written by another developer, it is often unclear which locals are required, which are optional, and whether all of them are still used. IDEs typically cannot help much either, often showing warnings about unresolved variables because they cannot determine where the values come from.
The problem becomes even more apparent as an application grows and partials are rendered from multiple places.
If a local is forgotten by call, the error only appears when the template is rendered:
undefined local variable or method `missing_local'
If an extra local is passed, Rails traditionally ignores it.
Over time this creates a situation where the real API of the partial exists only in the heads of the developers maintaining it.
Rails Strict Locals
Rails provides a feature called strict locals that allows a partial to declare its expected interface:
<%# locals: (title:, highlight: false) %>
The declaration resembles Ruby keyword arguments and is placed at the top of the template.
A local like title without a default value is required. Locals like highlight with default values become optional
The partial now documents and enforce its own API. If a required local is missing, Rails raises an exception instead of failing later when the variable is accessed. Likewise, if a caller provides a local that is not declared, Rails rejects it.
Conclusion
Strict locals do not fundamentally change how partials work, but they make them easier to understand and maintain.
By declaring the expected locals directly in the template, partials become self-documenting and gain an explicit contract with their callers. Missing locals are detected early, obsolete locals are rejected, and developers no longer have to search through controllers, parent templates, and render calls to understand where variables come from.
An additional benefit is improved tooling support. Once the interface of a partial is explicit, IDEs can understand the available variables much better. Your IDE becomes a helpful companion again rather than a source of noise.
Every developer has personal formatting preferences. Brace placement, line wrapping, imports, tabs vs. spaces — everybody has an opinion, and most of them are reasonable.
The problem starts when all these styles meet in one repository.
The cost of “personal style”
A codebase written by ten developers can easily look like ten different applications stitched together. Suddenly, pull requests are full of formatting changes. Git diffs become noisy. Merge conflicts appear because one developer reformatted a file differently than another. Code reviews drift into discussions about whitespaces instead of actual functionality.
Even worse: inconsistent code slows down reading.
Humans recognize patterns quickly. When code follows the same visual structure everywhere, the brain spends less effort parsing syntax and more effort understanding intent.
Consistent formatting reduces cognitive load.
A shared style is less about aesthetics and more about reducing friction. But how to solve this problem?
Shared Project Style
In IDEs like IntelliJ, you can define a code style and automatically reformat code according to those rules. This helps you keep your own code consistent. However, if every developer uses a different style, it does not help the project as a whole.
You can configure the style under:
Settings -> Editor -> Code Style
and save it as a project-level configuration. IntelliJ will then create a codeStyles folder with XML files inside the .idea directory.
The solution for sharing one configuration across the whole project is to commit these files to Git. This way, every developer working on the project uses the same code style configuration.
The IDE can then help enforce the agreed style by reformatting code before commit or even automatically on save.
Consistency beats preference
The important thing is not finding the perfect style. The important thing is agreeing on one.
A consistent codebase is easier to read, easier to review, and easier to maintain. Pull requests become smaller and cleaner because they contain actual changes instead of formatting noise.
Good formatting should be boring and automatic. That leaves more time for discussions that actually matter.
Recently I ran into a problem that only showed up outside the development environment.
I had a small script that needed to iterate over all records in the database and load blobs.
Document.all.eachdo |doc|
process(doc.blob)
end
With a small dataset everything worked as expected. With production-sized data, however, the job was terminated by the runtime with an out-of-memory error.
This behaviour is not surprising once you look at what all.each actually does.
How all.each works
When calling all.each ActiveRecord is loading the complete result set into memory before the iteration starts. For large tables this means that thousands or even millions of Ruby objects are instantiated at once.
If each record also references additional data — for example blobs, attachments, or associations — the memory usage grows quickly.
Loading Records with find_each
ActiveRecord provides find_each for exactly this scenario:
Document.find_eachdo |doc|
process(doc.blob)
end
In contrast to each, this method does not load all records at once. Instead, records are fetched in batches and yielded one by one.
Conceptually the process looks like this:
Load a limited number of records
Yield them to the block
Discard them
Load the next batch
By default, find_each loads records in batches of 1000. The batch size can be configured:
Document.find_each(batch_size:100) do |doc|
process(doc.blob)
end
find_each always iterates in primary key order. This means the model must have a primary key that is orderable like integer or string. Any explicit ordering will be ignored.
If more control is required, find_in_batches can be used instead. It requires manual iteration over the batches.
Conclusion
Iterating over large tables with all.each is easy to write but can lead to excessive memory usage once the dataset grows.
For batch processing tasks, find_each is usually the safer default because it limits the number of instantiated records and keeps memory usage predictable.
Anyone who has ever gone through a public tender knows the feeling: forms on forms, references to other forms, appendices that depend on annexes, and fields that must be filled exactly as specified somewhere on page 37 of a different document. This is not a task; it is a paper war.
Trying to fight this war alone is a mistake.
We learned that the most effective way to survive such bureaucratic battles is to treat them like a team sport. Not a big team—three people are enough—but with clearly defined roles.
The Problem with the Lone Warrior
The naive approach is simple: one person sits down, opens all documents, and starts filling things out.
This person must:
understand the overall structure of the process,
search for the right documents and sections,
enter data correctly and consistently,
double-check everything afterward.
That is a lot of cognitive load. The result is usually slow progress, rising frustration, and errors that only show up when it’s already too late.
The paper war doesn’t reward heroics. It rewards coordination.
A Three-Person Setup
We had much better results by splitting the work into three distinct roles, all active at the same time.
1. The EXECUTOR
The executor is the only person who actually enters data into the forms.
This role is deliberately narrow:
type exactly what is agreed upon,
do not search,
do not interpret,
do not “improve” anything on the fly.
The executor’s job is flow. By removing all other responsibilities, they can focus on speed and accuracy.
2. The Navigator
The navigator owns the overview.
They know:
which document is relevant right now,
where a specific field is defined,
which appendix explains which requirement.
While the executor is typing, the navigator is already preparing the next reference: “Next field is in document B, section 4.2, and it depends on the value we used earlier in A.3.”
This prevents context switching for the executor and keeps the process moving forward.
3. The Checker
The checker validates everything live.
They verify:
numbers,
names,
dates,
consistency with previous entries,
alignment with external sources (contracts, invoices, registers).
This is crucial: checking after the fact is expensive. Checking while data is entered is cheap. Errors are caught immediately, while the context is still fresh.
Like a Car Driving Lesson
This setup is not unfamiliar if you think about a car driving lesson.
The executor is the driver. They focus entirely on operating the vehicle: steering, braking, accelerating. They don’t decide where to go next; they just execute cleanly and safely.
The navigator is the driving instructor sitting in the passenger seat. They know the route, anticipate upcoming turns, and give timely instructions so the driver can react without stress.
The checker plays the role of the driving examiner in the back seat. Quiet but attentive, they observe everything, immediately spotting mistakes, inconsistencies, or rule violations before they become real problems.
Just like in a driving lesson, separating these roles creates confidence, flow, and control—exactly what you need when navigating bureaucratic traffic.
Why This Works
This setup mirrors patterns we already know from software development:
separation of concerns,
reducing cognitive load,
fast feedback loops.
Each person has a clear responsibility, and overlaps are intentional but limited. Nobody is idle, and nobody is overwhelmed.
Most importantly, the process becomes predictable. Instead of a chaotic scramble through documents, you get a steady, almost mechanical flow from field to field.
Paper Wars Won’t Disappear
Bureaucratic processes are unlikely to become simpler anytime soon. Digital forms often just move the paper war onto a screen without changing its nature.
But how we approach them can change.
Treating a public tender as a collaborative, real-time effort instead of a solitary endurance test turns frustration into something manageable—and sometimes even efficient.
You may not win the war forever. But at least you’ll win this battle.
Monorepos or “collection repositories” tend to grow over time. At some point, a part of them deserves its own life: independent deployments, a dedicated team, or separate release cycles.
The tricky part is obvious: How do you split out a subproject without losing its Git history?
The answer is a powerful tool called git-filter-repo.
Step 1: Clone the Repository into a New Directory
Do not work in your existing checkout. Instead, clone the repository into a fresh directory by running the following commands in Git Bash:
git clone ssh://git@github.com/project/Collection.git
cd Collection
We avoid working directly on origin and create a temporary branch:
git checkout -b split
This provides a safety net while rewriting history.
Step 2: Filter the Repository
Now comes the crucial step. Using git-filter-repo, we keep only the desired path and move it to the repository root.
Finally, push the rewritten history to the new repository:
git push -u origin main
That’s it — the new repository is ready, complete with a clean and meaningful history.
Conclusion
git-filter-repo makes it possible to split repositories precisely. Instead of copying files and losing context, you preserve history — which is invaluable for git blame, audits, and understanding how the code evolved.
When refactoring at repository level, history is not baggage. It’s documentation.
When dividing decimal numbers in Java, some values—like 1 divided by 3—result in an infinite decimal expansion. In this blog post, I’ll show how such a calculation behaves using BigDecimal and BigFraction.
BigDecimal
Since this cannot be represented exactly in memory, performing such a division with BigDecimal without specifying a rounding mode leads to an “java.lang.ArithmeticException: Non-terminating decimal expansion; no exact representable decimal result”. Even when using MathContext.UNLIMITED or an effectively unlimited scale, the same exception is thrown, because Java still cannot produce a finite result.
BigDecimal a = new BigDecimal("1");
BigDecimal b = new BigDecimal("3");
BigDecimal c = a.divide(b);
By providing a scale – not MathContext.UNLIMITED – and a rounding mode, Java can approximate the result instead of failing. However, this also means the value is no longer mathematically exact. As shown in the second example, multiplying the rounded result back can introduce small inaccuracies due to the approximation.
BigDecimal a = new BigDecimal("1");
BigDecimal b = new BigDecimal("3");
BigDecimal c = a.divide(b, 100, RoundingMode.HALF_UP); // 0.3333333...
BigDecimal a2 = c.multiply(b);  // 0.9999999...
When working with BigDecimal, it’s important to think carefully about the scale you actually need. Every additional decimal place increases both computation time and memory usage, because BigDecimal stores each digit and carries out arithmetic with arbitrary precision.
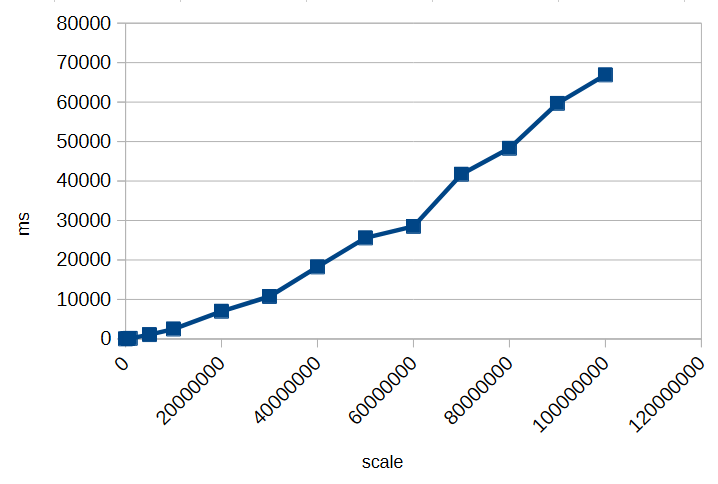
To illustrate this, here’s a small timing test for calculating 1/3 with different scales:
As you can see, increasing the scale significantly impacts performance. Choosing an unnecessarily high scale can slow down calculations and consume more memory without providing meaningful benefits. Always select a scale that balances precision requirements with efficiency.
However, as we’ve seen, decimal types like BigDecimal can only approximate many numbers when their fractional part is infinite or very long. Even with rounding modes, repeated calculations can introduce small inaccuracies.
But how can you perform calculations exactly if decimal representations can’t be stored with infinite precision?
BigFraction
To achieve truly exact calculations without losing precision, you can use fractional representations instead of decimal numbers. The BigFraction class from Apache Commons Numbers stores values as a numerator and denominator, allowing it to represent numbers like 1/3 precisely, without rounding.
import org.apache.commons.numbers.fraction.BigFraction;

BigFraction a = BigFraction.ONE;
BigFraction b = BigFraction.of(3);
BigFraction c = a.divide(b);    // 1 / 3
BigFraction a2 = c.multiply(b); // 1
In this example, dividing 1 by 3 produces the exact fraction 1/3, and multiplying it by 3 returns exactly 1. Since no decimal expansion is involved, all operations remain mathematically accurate, making BigFraction a suitable choice when exact arithmetic is required.
BigFraction and Decimals
But what happens if you want to create a BigFraction from an existing decimal number?
At first glance, everything looks fine: you pass in a precise decimal value, BigFraction accepts it, and you get a fraction back. So far, so good. But if you look closely at the result, something unexpected happens—the number you get out is not the same as the one you put in. The difference is subtle, hiding far to the right of the decimal point—but it’s there. And there’s a simple reason for it: the constructor takes a double.
A double cannot represent most decimal numbers exactly. The moment your decimal value is passed into BigFraction.from(double), it is already approximated by the binary floating-point format of double. BigFraction then captures that approximation perfectly, but the damage has already been done.
Even worse: BigFraction offers no alternative constructor that accepts a BigDecimal directly. So whenever you start from a decimal number instead of integer-based fractions, you inevitably lose precision before BigFraction even gets involved. What makes this especially frustrating is that BigFraction exists precisely to allow exact arithmetic.
Creating a BigFraction from a BigDecimal correctly
To preserve exactness when converting a BigDecimal to a BigFraction, you cannot rely on BigFraction.from(double). Instead, you can use the unscaled value and scale of the BigDecimal directly:
In this case, BigFraction automatically reduces the fraction to its simplest form, storing it as short as possible. Even though the original numerator and denominator may be huge, BigFraction divides out common factors to minimize their size while preserving exactness.
BigFraction and Performance
Performing fractional or rational calculations in this exact manner can quickly consume enormous amounts of time and memory, especially when many operations generate very large numerators and denominators. Exact arithmetic should only be used when truly necessary, and computations should be minimized to avoid performance issues. For a deeper discussion, see The Great Rational Explosion.
Conclusion
When working with numbers in Java, both BigDecimal and BigFraction have their strengths and limitations. BigDecimal allows precise decimal arithmetic up to a chosen scale, but it cannot represent numbers with infinite decimal expansions exactly, and high scales increase memory and computation time. BigFraction, on the other hand, can represent rational numbers exactly as fractions, preserving mathematical precision—but only if constructed carefully, for example from integer numerators and denominators or from a BigDecimal using its unscaled value and scale.
In all cases, it is crucial to be aware of these limitations and potential pitfalls. Understanding how each type stores and calculates numbers helps you make informed decisions and avoid subtle errors in your calculations.
Java Streams are like clean, connected pipes: data flows from one end to the other, getting filtered and transformed along the way. Everything works beautifully — as long as the pipe stays intact.
But what happens if you cut the pipe? Or if you throw rocks into it?
Both stop the flow, though in different ways. Let’s look at what that means for Java Streams.
Exceptions — Cutting the Pipe in Half
A stream is designed for pure functions. The same input gives the same output without side effects. Each element passes through a sequence of operations like map, filter, sorted. But when one of these operations throws an exception, that flow is destroyed. Exceptions are side effects.
Throwing an exception in a stream is like cutting the pipe right in the middle: some water (data) might have already passed through, but nothing else reaches the end. The pipeline is broken.
Example:
var result = items.stream()
    .map(i -> {
        if(i==0) {
            throw new InvalidParameterException();
        }
        return 10 / i;
    })
    .toList();
If you throws the exception, the entire stream stops. The remaining elements never get processed.
Uncertain Operations — Throwing Rocks into the Pipe
Now imagine you don’t cut the pipe — you just throw rocks into it.
Some rocks are small enough to pass. Some are too big and block the flow. Some hit the walls and break the pipe completely.
That’s what happens when you perform uncertain operations inside a stream that might fail in expected ways — for example, file reads, JSON parsing, or database lookups.
Most of the time it works, but when one file can’t be read, you suddenly have a broken flow. Your clean pipeline turns into a source of unpredictable errors.
The compiler does not allow checked exceptions like IOException in streams. Unchecked exceptions, such as RuntimeException, are not detected by the compiler. That’s why this example shows a common “solution” of catching the checked exception and converting it into an unchecked exception. However, this approach doesn’t actually solve the underlying problem; it just makes the compiler blind to it.
Uncertain operations are like rocks in the pipe — they don’t belong inside. You never know whether they’ll pass, get stuck, or destroy the stream.
How to Keep the Stream Flowing
There are some strategies to keep your stream unbroken and predictable.
Prevent problems before they happen
If the failure is functional or domain-specific, handle it before the risky operation enters the stream.
Example: division by zero — a purely data-related, predictable issue.
var result = items.stream()
    .filter(i -> i != 0)
    .map(i -> 10 / i)
    .toList();
Keep the flow pure by preparing valid data up front.
Represent expected failures as data
This also applies to functional or domain-specific failures. If a result should be provided for each element even when the operation cannot proceed, use Optional instead of throwing exceptions.
var result = items.stream()
    .collect(Collectors.toMap(
        i -> i,
        i -> {
            if(i == 0) {
                return Optional.empty();
            }
            return Optional.of(10 / i);
        }
    ));
Now failures are part of the data. The stream continues.
Keep Uncertain Operations Outside the Stream
This solution is for technical failures that cannot be prevent — perform it before starting the stream.
Fetch or prepare data in a separate step that can handle retries or logging. Once you have stable data, feed it into a clean, functional pipeline.
var responses = fetchAllSafely(ids); // handle exceptions here

responses.stream()
    .map(this::transform)
    .toList();
That way, your stream remains pure and deterministic — the way it was intended.
Conclusion
A busted pipe smells awful in the basement, and exceptions in Java Streams smell just as bad. So keep your pipes clean and your streams pure.
Materialized views are powerful. They give us precomputed, queryable snapshots of expensive joins and aggregations. But the moment you start layering other views on top of them, you enter tricky territory.
The Scenario
You define a materialized view to speed up a reporting query. Soon after, others discover it and start building new views on top of it. The structure spreads.
Now imagine: you need to extend the base materialized view. Maybe add a column, or adjust its definition. That’s when the trouble starts.
The Problem
Unlike regular views, materialized views don’t offer a convenient CREATE OR REPLACE. You can’t just adjust the definition in place. Oracle also doesn’t allow a simple ALTER to add a column or tweak the structure—recreating the materialized views is often the only option.
Things get even more complicated when other views depend on your materialized view. In that case, Oracle won’t even let you drop it. Instead, you’re greeted with an error about dependent objects, leaving you stuck in a dependency lock-in.
The more dependencies there are, the more brittle the setup becomes. What started as a performance optimization can lock you into a rigid structure that resists change.
As a short example, let’s look at how other databases handle this scenario. In Postgres, you can drop a materialized view even if other views depend on it. The dependent views temporarily lose their base and will fail if queried, but you won’t get an error on the drop. Once you recreate the materialized view with the same name and structure, the dependent views automatically start working again.
What to Do?
That is the hard question. Sometimes you can try to hide materialized views behind stable views. Or you take the SQL of all dependent views, drop them, change the materialized view, and then recreate all dependent views— a process that can be a huge pain.
How do you manage changes to materialized views that already have dependent views stacked on top? Do you design around it, fight with rebuild scripts every time, or have another solution?
Following up on “The Dimensions of Navigation in Object-Oriented Code” this post explores how Eclipse, one of the most mature IDEs for Java development, supports navigating across different dimensions of code: hierarchy, behavior, validation and utilities.
Let’s walk through these dimensions and see how Eclipse helps us travel through code with precision.
1. Hierarchy Navigation
Hierarchy navigation reveals the structure of code through inheritance, interfaces and abstract classes.
Open Type Hierarchy (F4): Select a class or interface, then press F4. This opens a dedicated view that shows both the supertype and subtype hierarchies.
Quick Type Hierarchy (Ctrl + T): When your cursor is on a type (like a class, interface name), this shortcut brings up a popover showing where it fits in the hierarchy—without disrupting your current layout.
Open Implementation (Ctrl + T on method): Especially useful when dealing with interfaces or abstract methods, this shortcut lists all concrete implementations of the selected method.
2. Behavioral Navigation
Behavioral navigation tells you what methods call what, and how data flows through the application.
Open Declaration (F3 or Ctrl + Click): When your cursor is on a method call, pressing F3 or pressing Ctrl and click on the method jumps directly to its definition.
Call Hierarchy (Ctrl + Alt + H): This is a powerful tool that opens a tree view showing all callers and callees of a given method. You can expand both directions to get a full picture of where your method fits in the system’s behavior.
Search Usages in Project (Ctrl + Shift + G): Find where a method, field, or class is used across your entire project. This complements call hierarchy by offering a flat list of usages.
3. Validation Navigation
Validation navigation is the movement between your business logic and its corresponding tests. Eclipse doesn’t support this navigation out of the box. However, the MoreUnit plugin adds clickable icons next to classes and tests, allowing you to switch between them easily.
4. Utility Navigation
This is a collection of additional navigation features and productivity shortcuts.
Quick Outline (Ctrl + O): Pops up a quick structure view of the current class. Start typing a method name to jump straight to it.
Search in All Files (Ctrl + H): The search dialog allows you to search across projects, file types, or working sets.
Content Assist (Ctrl + Space): This is Eclipse’s autocomplete—offering method suggestions, parameter hints, and even auto-imports.
Generate Code (Alt + Shift + S): Use this to bring up the “Source” menu, which allows you to generate constructors, getters/setters, toString(), or even delegate methods.
Format Code (Ctrl + Shift + F): Helps you clean up messy files or align unfamiliar code to your formatting preferences.
Organize Imports (Ctrl + Shift + O): Automatically removes unused imports and adds any missing ones based on what’s used in the file.
Markers View (Window → Show View → Markers): Shows compiler warnings, TODOs, and FIXME comments—helps prioritize navigation through unfinished or problematic code.