The state of functional testing in Flex

Functional testing of UIs is an important and often neglected way of ensuring quality and prevent regression. The Flex world of functional tests seems at the very beginning. We evaluated some of the tools available and used the following criterias:

  • OS independence
    the tool and the created test scripts should run on at least every platform the Flex SDK and the Flash platform are available
  • Tool changes
    how much we need to change or adapt the tool to suit our needs
  • Code pollution
    how much the actual code needs to be polluted to support this testing tool
  • Capture/Replay
    the tool needs at least an option to capture and replay test scripts
  • Additional License Costs
    if we need to pay additional (besides the tool) license costs for things like the FlexBuilder Pro
OS ind. Tool changes Code pollution Capture / Replay Add. costs
Automation based tools + 0 +
SeleniumFlex + 0 + 0 +
FunFx 0 + 0
Fluorida + + +

Automation based tools (like FlexMonkey, QTP and RIATest) use the Flex automation API and have additional costs for FlexBuilderPro (700$ per license). For custom components you have to add automation code to them (pollution) and introduce them and their events in FlexMonkeys event map (tool changes).
SeleniumFlex uses the JavascriptBridge (ExternalInterface) of the FlashPlayer and needs you to add the custom components and events to this external interface which resides in the tool/test code (therefore a 0 at tool changes). You can use the Selenium plugin for spy (the ids)/replay but the capture option isn’t working yet (0 for capture/replay).
FunFx also uses the ExternalInterface and is written in Ruby but runs only on Windows (- for OS independence) because it connects to the Flex application via Win32OLE. I found no capture/replay (-) and the website says you need FlexBuilder (I don’t know why therefore a 0 for license costs, we use IntelliJ IDEA for Flex development)
Fluorida seems to be at the beginning and there is very little documentation so it looks like to need an investment (- for tool changes). It has no capture/replay (-).

Conclusion

So our tool of choice is SeleniumFlex and we hope to get capture/replay working in the near future.
What experience have you made with functional testing in Flex? Which one do you use?

Structuring CppUnit Tests

How to structure cppunit tests in non-trivial software systems so that they can be easily executed selectively during code-compile-test cycle and at the same time are easy to execute as a whole by your continuous integration system.

While unit testing in Java is dominated by JUnit, C++ developers can choose between a variety of frameworks. See here for a comprehensive list. Here you can find a nice comparison of the biggest players in the game.

Being probably one of the oldest frameworks CppUnit sure has some usability issues but is still widely used. It is criticised mostly because you have to do a lot of boilerplate typing to add new tests. In the following I will not repeat how tests can be written in CppUnit as this is described already exhaustively (e.g. here or here). Instead I will concentrate on the task of how to structure CppUnit tests in bigger projects. “Bigger” in this case means at least a few architectually independent parts which are compiled independently, i.e. into different libraries.

Having independently compiled parts in your project means that you want to compile their unit tests independently, too. The goal is then to structure the tests so that they can easily be executed selectively during development time by the programmer and at the same time are easy to execute as a whole during CI time (CI meaning Continuous Integration, of course).

As C++ has no reflection or other meta programming elements like the Java Annotations, things like automatic test discovery and how to add new tests become a whole topic of its own. See the CppUnit cookbook for how to do that with CppUnit . In my projects I only use the TestFactoryRegistry approach because it provides the most automatics in this regard.

Let’s begin with a simplest setup, the Link-Time Trap (see example source code): Test runner and result reporter are setup in the “main” function that is compiled into an executable. The actual unit tests are compiled in separate libraries and are all linked to the executable that contains the main function. While this solution works well for small projects it does not scale. This is simply because every time you change something during the code-compile-test cycle the unit test executable has to be relinked, which can take a considerable amount of time the bigger the project gets. You fall into the Link Time Trap!

The solution I use in many projects is as follows: Like in the simple approach, there is one test main function which is compiled into a test executable. All unit tests are compiled into libraries according to their place in the system architecture. To avoid the Link-Time-Trap, they are not linked to the test executable but instead are automatically discovered and loaded during test execution.

1. Automatic Discovery

Applying a little convention-over-configuration all testing libraries end with the suffix “_tests.so”. The testing main function can then simply walk over the directory tree of the project and find all shared libraries that contain unit test classes.

2. Loading

If a “.._test.so” library has been found, it simply gets loaded using dlopen (under Unix/Linux). When the library is loaded the unit tests are automatically registered with the TestFactoryRegistry.

3. Execution

After all unit test libraries has been found and loaded text execution is the same as in the simple approach above.

Here my enhanced testmain.cpp (see example source code).

#include ... 

using namespace boost::filesystem; 
using namespace std; 

void loadPlugins(const std::string& rootPath) 
{
  directory_iterator end_itr; 
  for (directory_iterator itr(rootPath); itr != end_itr; ++itr) { 
    if (is_directory(*itr)) {
      string leaf = (*itr).leaf(); 
      if (leaf[0] != '.') { 
        loadPlugins((*itr).string()); 
      } 
      continue; 
    } 
    const string fileName = (*itr).string();
    if (fileName.find("_tests.so") == string::npos) { 
      continue;
    }
    void * handle = 
      dlopen (fileName.c_str(), RTLD_NOW | RTLD_GLOBAL); 
    cout << "Opening : " << fileName.c_str() << endl; 
    if (!handle) { 
      cout << "Error: " << dlerror() << endl; 
      exit (1); 
    } 
  } 
} 

int main ( int argc, char ** argv ) { 
  string rootPath = "./"; 
  if (argc > 1) { 
    rootPath = static_cast<const char*>(argv[1]); 
  } 
  cout << "Loading all test libs under " << rootPath << endl; 
  string runArg = std::string ( "All Tests" ); 
  // get registry 
  CppUnit::TestFactoryRegistry& registry = 
    CppUnit::TestFactoryRegistry::getRegistry();
  
  loadPlugins(rootPath); 
  // Create the event manager and test controller 
  CppUnit::TestResult controller; 

  // Add a listener that collects test result 
  CppUnit::TestResultCollector result; 
  controller.addListener ( &result ); 
  CppUnit::TextUi::TestRunner *runner = 
    new CppUnit::TextUi::TestRunner; 

  std::ofstream xmlout ( "testresultout.xml" ); 
  CppUnit::XmlOutputter xmlOutputter ( &result, xmlout ); 
  CppUnit::TextOutputter consoleOutputter ( &result, std::cout ); 

  runner->addTest ( registry.makeTest() ); 
  runner->run ( controller, runArg.c_str() ); 

  xmlOutputter.write(); 
  consoleOutputter.write(); 

  return result.wasSuccessful() ? 0 : 1; 
}

As you can see the loadPlugins function uses the Boost.Filesystem library to walk over the directory tree.

It also takes a rootPath argument which you can give as parameter when you call the test main executable. This solves our goal stated above. When you want to execute unit tests selectively during development you can give the path of the corresponding testing library as parameter. Like so:

./testmain path/to/specific/testing/library

In your CI environment on the other hand you can execute all tests at once by giving the root path of the project, or the path where all testing libraries have been installed to.

./testmain project/root

CMake Builder Plugin for Hudson

Update: Check out my post introducing the newest version of the plugin.

Today I’m pleased to announce the first version of the cmakebuilder plugin for Hudson. It can be used to build cmake based projects without having to write a shell script (see my previous blog post). Using the scratch-my-own-itch approach I started out implementing only those features that I needed for my cmake projects which are mostly Linux/g++ based so far.

Let’s do a quick walk through the configuration:

1. CMake Path:
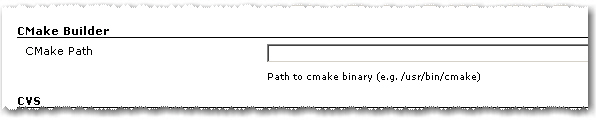
If the cmake executable is not in your $PATH variable you can set its path in the global Hudson configuration page.

2. Build Configuration:

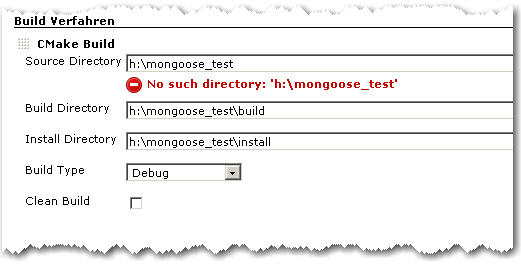
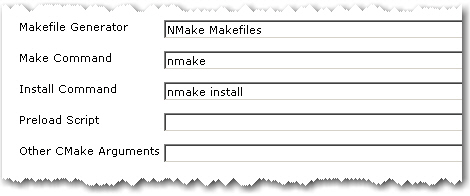
To use the cmake builder in your Free-style project, just add “CMake Build” to your build steps. The configuration is pretty straight forward. You just have to set some basic directories and the build type.

cmakebuilder demo config

The demo config above results in the following behavior (shell pseudocode):

if $WORKSPACE/build_dir does not exist
   mkdir $WORKSPACE/build_dir
end if

cd $WORKSPACE/build_dir
cmake $WORKSPACE/src -DCMAKE_BUILD_TYPE=Debug -DCMAKE_INSTALL_PREFIX=$WORKSPACE/install_dir
make
make install

That’s it. Feedback is very much appreciated!!

Originally the plan was to have the plugin downloadable from the hudson plugins site by now but I still have some publishing problems to overcome. So if you are interested, make sure to check out the plugins site again in a few days. I will also post an update here as soon as the plugin can be downloaded.

Update: After fixing some maven settings I was finally able to publish the plugin. Check it out!

Visualizations with Flare/Prefuse

Recently we were in need of visualizing lots of data in networks. We started with a Javascript based version using RaphaelJS. RaphaelJS uses SVG/VML as the underlying graphics API. Drawing lots of nodes and edges in different shapes and colors worked like a breeze. But we quickly got performance problems when animating the transitions between different states of the network. So we had to look to an alternative technology which is performant enough and pragmatic to use. Reading a lot about Flex and its promising animation capabilities we gave it a try.
Shortly after we stumbled upon Flare/Prefuse and the stunning demos convinced us. It is very easy to use and gives remarkable results in a short time. We integrated it into our web app but suddenly the visualizations weren’t drawn upon startup. Everything went fine when the visualization was ready before the Flex app was fully completed but when the data was visualized after that the edges and nodes weren’t shown. Debugging our app and reading the Flex Sprite API wasn’t much helpful. But one comment in a superclass of all the Flare sprites solved out problem:

Internally, the DirtySprite class maintains a static list of all "dirty" sprites, and redraws each sprite in the list when a Event.RENDER event is issued. Typically, this process is performed automatically. In a few cases, erratic behavior has been observed due to a Flash Player bug that results in RENDER events not being properly issued. As a fallback, the static renderDirty() method can be invoked to manually force each dirty sprite to be redrawn.

These few cases were the default behaviour of our app, so invoking renderDirty solved all our drawing issues. I found no blog entry or hint in the docs and the demos run perfectly since all data is there before the app is shown. So the lesson here is:

  • retest your assumptions (we thought the Flare sprites were all DataSprites and the next superclass is the Flex API Sprite and forgot about the DirtySprite)
  • besides the demos and tutorials/docs read the API docs carefully, often there are implementation/technology specific hints

Make friends with your compiler

Suppose you are a C++ programmer on a project and you have the best intentions to write really good code. The one fellow that you better make friends with is your compiler. He will support you in your efforts whenever he can. Unless you don’t let him. One sure way to reject his help is to switch off all compiler warnings. I know it should be well-known by now that compiling at high warning levels is something to do always and anytime but it seems that many people just don’t do it.
Taking g++ as example, high warning levels do not mean just having “-Wall” switched on. Even if its name suggests otherwise, “-Wall” is just the minimum there. If you just spend like 5 minutes or so to look at the man page of g++ you find many many more helpful and reasonable -W… switches. For example (g++-4.3.2):


-Wctor-dtor-privacy: Warn when a class seems unusable because all the constructors or destructors in that class are private, and it has neither friends nor public static member functions.

Cool stuff! Let’s what else is there:


-Woverloaded-virtual: Warn when a function declaration hides virtual functions from a base class. Example:

class Base
{
public:
virtual void myFunction();
};

class Subclass : public Base
{
public:
void myFunction() const;
};

I would certainly like to be warned about that, but may be that’s just me.


-Weffc++: Warn about violations of the following style guidelines from Scott Meyers’ Effective C++ book

This is certainly one of the most “effective” weapons in your fight for bug-free software. It causes the compiler to spit out warnings about code issues that can lead to subtle and hard-to-find bugs but also about things that are considered good programming practice.

So suppose you read the g++ man page, you enabled all warning switches additional to “-Wall” that seem reasonable to you and you plan to compile your project cleanly without warnings. Unfortunately, chances are quite high that your effort will be instantly thwarted by third-party libraries that your code includes. Because even if your code is clean and shiny, header files of third-pary library may be not. Especially with “-Weffc++” this could result in a massive amount of warning messages in code that you have no control of. Even with the otherwise powerful, easy-to-use and supposedly mature Qt library you run into that problem. Compiling code that includes Qt headers like <QComboBox>with “-Weffc++” switched on is just unbearable.

Leaving aside the fact that my confidence in Qt has declined considerably since I noticed this, the question remains what to do ignore the shortcomings of other peoples code. With GCC you can for example add pragmas around offending includes as desribed here. Or you can create wrapper headers for third-party includes that contain


#pragma GCC system_header

AFAIK Microsoft’s compilers have similar pragmas:


#pragma warning(push, 1)
#include
#include
#pragma warning(pop)

Warning switches are a powerful tool to increase your code quality. You just have to use them!

Drawing your background with Javascript

Having complex backgrounds (like radial gradients) or even dynamic backgrounds in a web page is not an easy task using only images. Javascript helps here and the SVG/VML support in modern browsers makes drawing a reality. Looking around in the Javascript library world there are some which have APIs for crossbrowser drawing or charting. But if you are looking for a small and easy to learn on you have to search. We found raphaeljs, a project which started as a 20%er at Atlassian. It has an API which is close to SVG but also supports non SVG browsers like IE. How to make animations and complex drawings is easy to learn. The examples give a hint of what is possible.
We needed a radial gradient to have a smooth background, looking at the docs and the SVG spec, it was a four liner:

var Paper = Raphael("canvas", width, height);
var b = Paper.circle(width / 2, height / 2, Math.max(width, height));
var gradient = {type: "radial", dots: [{color: "#FFFFFF"}, {color: "#D5D5D5"}], vector: [0, 0, 0, "100%"]};
b.attr({"gradient": gradient});

Industry Standard C++

The other day I was browsing through the C++ API code of a third-party library. I was not much surprised to see stuff like

#define MAX(a, b) ( (a) >= (b) ? (a) : (b))
#define MIN(a, b) ( (a) <= (b) ? (a) : (b))

because despite the fact that std::min, std::max together with the rest of the C++ standard library is around for quite a while now, you still come across old fashioned code like above frequently. But things got worse:

#define FALSE 0
#define TRUE 1

and later:

...
bool someVariable = TRUE;

As if they learned only half the story about the bool type in C++. But there was more to come:

class ListItem
{
   ListItem* next;
   ListItem* previous;
   ...
};

class List : private ListItem
{
...
};

Yes, that’s right, the API guys created their own linked-list implementation. And a pretty weird one, too, mixing templates with void* pointers to hold the contents. Now, why on earth would you do that when you could just use std::list or std::vector? Makes you wonder about the quality of the rest of the code. Especially with C++ where there are so many little pitfalls and details which can burn you. Hey, if you have no clue about the very basics of a language, leave it alone!

Unfortunately, the above example is not exceptional in industry software. It seems that the C++ world these days is actually split into two worlds. In one, people like Andrei Alexandrescu write great books about Modern C++ design, Scott Meyers gives talks about Effective C++ and the boost guys introduce the next library using even more creative operator overloading that in the spirit library (which is pretty cool stuff, btw).

In the other world, you could easily call it industry reality, people barely know the STL, don’t use templates at all, or fall for misleading and dangerous c++ features like the throw() clause in method signatures. Or they ban certain c++ features because they are supposedly not easy to understand for the new guy on the project or are less readable in general. Take for example the Google C++ Style Guide. They don’t even allow exceptions, or the use of std::auto_ptr. Their take on the boost library is that “some of the libraries encourage … an excessively “functional” style of programming”. What exactly is bad about piece of functional programming used as the right tool in the right place? And what communicates ownership issues better than e.g. returning a heap allocated object using a std::auto_ptr?

The no-exceptions rule is also only partly understandable. Sure enough, exceptions increase code complexity in C++ more than in other languages (read Items 18 and 19 of Herb Sutter’s Exceptional C++ as an eye-opener. Or look here). But IMHO their advantages still outweigh their downsides.

With the upcoming new C++0X standard my guess is that the situation will not get any better, to put it mildly. Most likely, things like type inference with the new auto keyword will sell big because they save typing effort. Same thing with the long overdue feature of constructor delegation. But why would people who find functional programming less readable start to use lambda functions? As little known as the explicit keyword is now, how many people will know about or actually use the new “= delete” keyword, let alone “= default“? Maybe I’m a little too pessimistic here but I will certainly put a mark in my calender on the day I encounter the first concept definition in some piece of industry C++ software.

Update: Concepts have been removed from C++0X so that mark in my calender will not come any time soon…

A DSL for deploying grails apps

Everytime I deploy my grails app I do the same steps over and over again:

  • get the latest build from our Hudson CI
  • extract the war file from the CI archive
  • scp the war to a gateway server
  • scp the war to the target server
  • run stop.sh to shutdown the jetty
  • run update.sh to update the web app in the jetty webapps dir
  • run start.sh to start the jetty

Reading the Productive Programmer I thought: “This should be automated”. Looking at the Rails world I found a tool named Capistrano which looked like a script library for deploying Rails apps. Using builders in groovy and JSch for SSH/scp I wrote a small script to do the tedious work using a self defined DSL for deploying grails apps:

Grapes grapes = new Grapes()
def script = grapes.script {
    set gateway: "gateway-server"
    set username: "schneide"
    set password: "************"
    set project: "my_ci_project"
    set ciType: "hudson"
    set target: "deploy_target.com"
    set ci_server: "hudson-schneide"
    set files: ["webapp.war"]

    task("deploy") {
        grab from: "ci"
        scp to: "target"
        ssh "stop.sh"
        ssh "update.sh"
        ssh "start.sh"
    }
}

script.tasks.deploy.execute()

This is far from being finished but a starting point and I think about open sourcing it. What do you think: may it help you? What are your experiences with deploying grails apps?

Make it visible: The Project Cockpit

How to use a whiteboard as information radiator for project management, showing progress, importance, urgency and volume of projects.

We are a project shop with numerous customers booking software development projects as they see fit, so we always work on several projects concurrently in various sub-teams.

We always strive for a working experience that provides more productivity and delight. One major concept of achieving it is “make it visible”. This idea is perfectly described in the awesome book “Behind Closed Doors” by Johanna Rothman and Esther Derby from the Pragmatic Bookshelf. Lets see how we applied the concept to the task of managing our project load.

What is the Project Cockpit?

The Project Cockpit is a whiteboard with titled index cards and separated regions. If you glance at it, you might be reminded of a scrum board. In effect, it serves the same purpose: Tracking progress (of whole projects) and making it visible.

Here is a photo of our Project Cockpit (with actual project names obscured for obvious reasons):

cockpit1

How does it work?

In summary, each project gets a card and transitions through its lifecycle, from left to right on the cockpit.

The Project Cockpit consists of two main areas, “upcoming projects” and “current projects”. Both areas are separated into three stages eachs, denoting the usual steps of project placing and project realization.

Every project we are contacted for gets represented by an index card with some adhesive tape and a whiteboard magnet on its back. The project card enters the cockpit on the left (in the “future” or “inquiry” region) and moves to the right during its lifecycle. The y-axis of the chart denotes the “importance” of the project, with higher being more important.

cockpit2

In the “upcoming” area, projects are in acquisition phase and might drop out to the bottom, either into the “delay filing” or the “trash”. The former is used if a project was blocked, but is likely to make progress in the future. The latter is the special place we put projects that went awry. It’s a seldom action, but finally putting a project card there was always a relief.

The more natural (and successful) progress of a project card is the advance from the “upcoming” area to the “present” bar. The project is now appointed and might get a redefinition on importance. Soon, it will enter the right area of “current” projects and be worked on.

The right area of “current” projects is a direct indicator of our current workload. From here on, project cards move to the rightmost bar labeled “past” projects. Past projects are achievements to be proud of (until the card magnet is needed for a new project card).

If you want to, you can color code the project cards for their urgency or apply fancy numbers stating their volume.

What’s the benefit?

The Project Cockpit enables every member of our company to stay informed about the project situation. It’s a great place to agree upon the importance of new projects and keep long running acquisitions (the delay filing cases) in mind. The whiteboard acts as an information radiator, everybody participates in project and workload planning because it’s always present. Unlike simpler approaches to the task, our Project Cockpit includes project importance, urgency and volume without overly complicating the matter.

The whiteboard occupies a wall in our meeting room, so every customer visiting us gets a glance on it. As we use internal code names, most customers even don’t spot their own project, let alone associate the other ones. But its always clear to them in which occupancy condition we are, without a word said about it.

Ultimately, we get visibility of very crucial information from our Project Cockpit: When the left side is crowded, it’s a pleasure, when the right side is crowded, it’s a pressure 😉

Batteries not included

Your feature isn’t ready-to-use until you provide the necessary requirements alongside, too.

When I bought a label printing device lately, it came bundled with a label tape roll. That suggested instant usage – no need to think of additional parts upfront. Only tousb-battery-little find out that, you’ve guessed it already, batteries weren’t included. A bunch of standardized parts missing (Murphy’s law applied) and the whole ready-to-use package was rendered useless. The time and effort it took me to get the batteries was the same as to get the label tape I really wanted to use instead of the bundled one.

This is a common pattern not only with device manufacturers, but with software developers, too.

Instant feature – just add effort

Frequently, a software comes “nearly” ready-to-use. All you have to do to make it run is

  • upgrade to the latest graphics drivers
  • install some database system (we won’t tell you how as it’s not our business)
  • create some file or directory manually
  • login with administrator rights once (or worse: always) to gather write access to the registry or configuration file
  • review and change the complete configuration prior to first usage

The last point is a personal pet peeve of mine.

It all boils down to the question if a software or a feature is really ready-to-use. Most of the work you have to do manually is tedious or highly error-prone. Why not add support for this apparently crucial steps to the software in the first place?

It works instantly – with my setup

A common mistake made by developers is to forget about the history of a feature emerging in the development labs. The history includes all the little requirements (a writeable folder here, an existing database table there) that will naturally be present on the developer’s machine when she finishes work, because fulfilling them was part of the development process.

If the same developer was forced to recreate the feature on a fresh machine, she would notice all these steps with ease and probably automate or support (e.g. documentate) them, least to save herself the work of wading through it a third time.

But given that most developers regard a feature “finished”, “done” or “resolved” when the code was accepted by the repository (and hopefully the continuous integration system), the aching of the users wont reach them.

This is a case of lacking feedback.

Feel the pain – publicly

To close this open feedback loop, we established a habit of “adopting” features and bringing them to the user in person to overcome the problem of “nearly done”. If you can’t make your own feature run on the client’s machine within a few seconds, is it really that usable and “ready”? The unavoidable presence of the whole process – from the first feature request to the installed and proven-to-work software acts as a deterrent to fall for the “works on my machine” style of programming. It creates a strong relationship between the user, a feature and the developer as a side-effect.

We’ve seen quite a few junior developers experiencing a light bulb moment (and heavy sweating) in front of the customer. This is the hot-wired feedback loop working. In most cases, the situation (a feature requiring non-trivial effort to be run) will not repeat ever.

Batteries are part of the product

If your product (e.g. software) isn’t usable because some standard part (e.g. a folder) is missing, make sure you add these parts to the delivery package. It is a very pleasant experience for the user to just unwrap a software and use it right away. It shows that you’ve been cared for.