Generating a spherified cube in C++

In my last post, I showed how to generate an icosphere, a subdivided icosahedron, without any fancy data-structures like the half-edge data-structure. Someone in the reddit discussion on my post mentioned that a spherified cube is also nice, especially since it naturally lends itself to a relatively nice UV-map.

The old algorithm

The exact same algorithm from my last post can easily be adapted to generate a spherified cube, just by starting on different data.

cube

After 3 steps of subdivision with the old algorithm, that cube will be transformed into this:
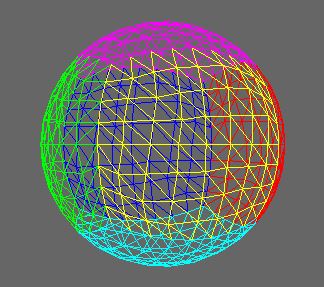
split4

Slightly adapted

If you look closely, you will see that the triangles in this mesh are a bit uneven. The vertical lines in the yellow-side seem to curve around a bit. This is because unlike in the icosahedron, the triangles in the initial box mesh are far from equilateral. The four-way split does not work very well with this.

One way to improve the situation is to use an adaptive two-way split instead:
split2

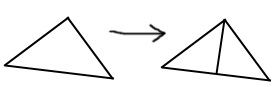
Instead of splitting all three edges, we’ll only split one. The adaptive part here is that the edge we’ll split is always the longest that appears in the triangle, therefore avoiding very long edges.

Here’s the code for that. The only tricky part is the modulo-counting to get the indices right. The vertex_for_edge function does the same thing as last time: providing a vertex for subdivision while keeping the mesh connected in its index structure.

TriangleList
subdivide_2(ColorVertexList& vertices,
  TriangleList triangles)
{
  Lookup lookup;
  TriangleList result;

  for (auto&& each:triangles)
  {
    auto edge=longest_edge(vertices, each);
    Index mid=vertex_for_edge(lookup, vertices,
      each.vertex[edge], each.vertex[(edge+1)%3]);

    result.push_back({each.vertex[edge],
      mid, each.vertex[(edge+2)%3]});

    result.push_back({each.vertex[(edge+2)%3],
      mid, each.vertex[(edge+1)%3]});
  }

  return result;
}

Now the result looks a lot more even:
split2_sphere

Note that this algorithm only doubles the triangle count per iteration, so you might want to execute it twice as often as the four-way split.

Alternatives

Instead of using this generic of triangle-based subdivision, it is also possible to generate the six sides as subdivided patches, as suggested in this article. This approach works naturally if you want to have seams between your six sides. However, that approach is more specialized towards this special geometry and will require extra “stitching” if you don’t want seams.

Code

The code for both the icosphere and the spherified cube is now on github: github.com/softwareschneiderei/meshing-samples.

Generating an Icosphere in C++

If you want to render a sphere in 3D, for example in OpenGL or DirectX, it is often a good idea to use a subdivided icosahedron. That often works better than the “UVSphere”, which means simply tesselating a sphere by longitude and latitude. The triangles in an icosphere are a lot more evenly distributed over the final sphere. Unfortunately, the easiest way, it seems, is to generate such a sphere is to do that in a 3D editing program. But to load that into your application requires a 3D file format parser. That’s a lot of overhead if you really need just the sphere, so doing it programmatically is preferable.

At this point, many people will just settle for the UVSphere since it is easy to generate programmatically. Especially since generating the sphere as an indexed mesh without vertex-duplicates further complicates the problem. But it is actually not much harder to generate the icosphere!
Here I’ll show some C++ code that does just that.

C++ Implementation

We start with a hard-coded indexed-mesh representation of the icosahedron:

struct Triangle
{
  Index vertex[3];
};

using TriangleList=std::vector<Triangle>;
using VertexList=std::vector<v3>;

namespace icosahedron
{
const float X=.525731112119133606f;
const float Z=.850650808352039932f;
const float N=0.f;

static const VertexList vertices=
{
  {-X,N,Z}, {X,N,Z}, {-X,N,-Z}, {X,N,-Z},
  {N,Z,X}, {N,Z,-X}, {N,-Z,X}, {N,-Z,-X},
  {Z,X,N}, {-Z,X, N}, {Z,-X,N}, {-Z,-X, N}
};

static const TriangleList triangles=
{
  {0,4,1},{0,9,4},{9,5,4},{4,5,8},{4,8,1},
  {8,10,1},{8,3,10},{5,3,8},{5,2,3},{2,7,3},
  {7,10,3},{7,6,10},{7,11,6},{11,0,6},{0,1,6},
  {6,1,10},{9,0,11},{9,11,2},{9,2,5},{7,2,11}
};
}

icosahedron
Now we iteratively replace each triangle in this icosahedron by four new triangles:

subdivision

Each edge in the old model is subdivided and the resulting vertex is moved on to the unit sphere by normalization. The key here is to not duplicate the newly created vertices. This is done by keeping a lookup of the edge to the new vertex it generates. Note that the orientation of the edge does not matter here, so we need to normalize the edge direction for the lookup. We do this by forcing the lower index first. Here’s the code that either creates or reused the vertex for a single edge:

using Lookup=std::map<std::pair<Index, Index>, Index>;

Index vertex_for_edge(Lookup& lookup,
  VertexList& vertices, Index first, Index second)
{
  Lookup::key_type key(first, second);
  if (key.first>key.second)
    std::swap(key.first, key.second);

  auto inserted=lookup.insert({key, vertices.size()});
  if (inserted.second)
  {
    auto& edge0=vertices[first];
    auto& edge1=vertices[second];
    auto point=normalize(edge0+edge1);
    vertices.push_back(point);
  }

  return inserted.first->second;
}

Now you just need to do this for all the edges of all the triangles in the model from the previous interation:

TriangleList subdivide(VertexList& vertices,
  TriangleList triangles)
{
  Lookup lookup;
  TriangleList result;

  for (auto&& each:triangles)
  {
    std::array<Index, 3> mid;
    for (int edge=0; edge<3; ++edge)
    {
      mid[edge]=vertex_for_edge(lookup, vertices,
        each.vertex[edge], each.vertex[(edge+1)%3]);
    }

    result.push_back({each.vertex[0], mid[0], mid[2]});
    result.push_back({each.vertex[1], mid[1], mid[0]});
    result.push_back({each.vertex[2], mid[2], mid[1]});
    result.push_back({mid[0], mid[1], mid[2]});
  }

  return result;
}

using IndexedMesh=std::pair<VertexList, TriangleList>;

IndexedMesh make_icosphere(int subdivisions)
{
  VertexList vertices=icosahedron::vertices;
  TriangleList triangles=icosahedron::triangles;

  for (int i=0; i<subdivisions; ++i)
  {
    triangles=subdivide(vertices, triangles);
  }

  return{vertices, triangles};
}

There you go, a customly subdivided icosphere!
icosphere

Performance

Of course, this implementation is not the most runtime-efficient way to get the icosphere. But it is decent and very simple. Its performance depends mainly on the type of lookup used. I used a map instead of an unordered_map here for brevity, only because there’s no premade hash function for a std::pair of indices. In pratice, you would almost always use a hash-map or some kind of spatial structure, such as a grid, which makes this method a lot tougher to compete with. And certainly feasible for most applications!

The general pattern

The lookup-or-create pattern used in this code is very useful when creating indexed-meshes programmatically. I’m certainly not the only one who discovered it, but I think it needs to be more widely known. For example, I’ve used it when extracting voxel-membranes and isosurfaces from volumes. It works very well whenever you are creating your vertices from some well-defined parameters. Usually, it’s some tuple that describes the edge you are creating the vertex on. This is the case with marching cubes or marching tetrahedrons. It can, however, also be grid coordinates if you sparsely generate vertices on a grid, for example when meshing heightmaps.

C/C++ pitfalls for Java developers

Java and C/C++ have concepts that are similar enough to get an inexperienced Java developer confused. Here I want to show you some mistakes I found or done myself.

Java and C/C++ have concepts that are similar enough to get an inexperienced Java developer confused. Here I want to show you some mistakes I found or done myself.

Type conversion rules

A well known and often used pattern is simultaneous assignment of an expression to a variable and its comparison with another value.

if((a = b) != c) {
  // do something
}

In both Java and C would this code would have the same behaviour. The problem arises when a parenthesis is misplaced, resulting in an assignment of a boolean expression to a:

if((a = b != c)) {
  // do something
}

Since a boolean expression can be converted to an integer and the assignment expression is contained in a parenthesis, the compiler may even not ensue a warning. For Java this code isn’t legal anymore while perfectly fine in C. The error strikes most hard when the result of the comparison, namely 0 or 1, is a valid value. A good example is a call to socket(), that may return 0 as a file descriptor for stdin. The probably simplest solution to this problem is separating the assignment from comparison – even at the cost of a temporary variable.

Memory management

The behaviour of standard containers is sometimes combined with incomplete/misunderstood behaviour of pointers. An example:

class A {}
class B
{
  public:
  void foo()
  {
    std::vector<A*> theContainer;
    for(int i = 0; i < 100; i++) {
      theContainer.push_back(new A());
    }
  }
}

Every call to foo() would result in a memory leak due to not deleted A’s. When the vector is destructed, a destructor of each contained item is called. For pointers and other scalar types this is a no-op, resulting in missing call to the destructor of pointed to class. A solution to this problem could be the use of smart pointers wrapping the actual pointers or an explicit destruction of pointed to objects before the vector goes out of scope.

Deterministic destruction

Coming from language with automatic memory management there is some uncertainty when it comes to the order of destruction when multiple objects leave the scope. Consider this example:

void foo()
{
  std::lock_guard<std::mutex> lock(mutex);
  std::ifstream input ....

  //some operations

  //??
}

In this case the stream is destructed before the lock, guaranteeing that the stream is destructed before the execution reaches the destructor of the lock. This pattern is exploited by the RAII.

Exception handling

This is my personal favourite. Here is a little quiz: what is printed to the screen?

try {
  throw new SomeException();
} catch (SomeException& e) {
  std::cout << "first" << std::endl;
} catch (...) {
  std::cout << "second" << std::endl;
}

As some may already have guessed from the question: the answer is “second”. To make the code work, the reference in the catch block has to be replaced by the pointer. Another, and probably better alternative is to create the exception on the stack. The reason behind this mistake is that in java any thrown object is constructed with new. Explicit hints or experience are required to avoid such flawed exception handling.

Performance Hogs Sometimes Live in Most Unexpected Places

Surprises when measuring performance are common – but sometimes you just can’t believe it.

When we develop software we always apply the best practice of not optimizing prematurely. This plays together with other best practices like writing the most readable code, or YAGNI.

‘Premature’ means different things in different situations. If you don’t have performance problems it means that there is absolutely no point in optimizing code. And if you do have performance problems it means that Thou Shalt Never Guess which code to optimize because software developers are very bad at this. The keyword here is profiling.

Since we don’t like to be “very bad” at something we always try to improve our skills in this field. The skill of guessing which code has to be optimized, or “profiling in your head” is no different in this regard.

So most of the times in profiling sessions, I have a few unspoken guesses at which parts of the code the profiler will point me to. Unfortunately, I have to say that  I am very often very surprised by the outcome.

Surprises in performance fixing sessions are common but they are of different quality. One rather BIG surprise was to find out that std::string::find of the C++ standard library is significantly slower (by factor > 10) than its C library counterpart strstr (discovered with gcc-4.4.6 on CentOS 6, verified with eglibc-2.13 and gcc-4.7).

Yes, you read right and you may not believe it. That was my reaction, too, so I wrote a little test program containing only two strings and calls to std::string::find and std::strstr, respectively. The results were – and I’ve no problem repeating myself here – a BIG surprise.

The reason for that is that std::strstr uses a highly optimized string matching algorithm version whereas std::string::find works with straight-forward memory comparison.

So when doing profiling sessions, always be prepared for shaking-your-world-view kind of surprises. They can even come from your beloved and highly regarded standard library.

UPDATE: See this stackoverflow question for more information.

Clang, The Friendly Compiler

Clang C/C++ compiler can be called The Friendly Compiler, since it makes it much easier to find and understand compile errors and potential bugs in your code. Go use it!

A while back I suggested to make friends with your compiler as a basis for developing high quality code. My focus then was GCC since it was and still is the compiler I use most of the time. Well, turns out that although GCC may be a reasonably good companion on the C/C++ development road, there are better alternatives.

Enter Clang: I had heard about Clang a few times in the past but never gave it a real shot. That changed after I watched Chandler Carruth’s talk at GoingNative 2012.

First of all I was stunned by the quote from Richard Stallman about GCC being deliberatly designed to make it hard to use it in non-free software. I always wondered why IDEs like KDevelop keep reinventing the wheel all the time by implementing their own C/C++ parsers instead of using already existing and free GCC code. This was the answer: THEY SIMPLY COULDN’T!!

One main point of Chandler’s talk was the quality of diagnostic messages of Clang. GCC is a friend that although telling you exactly what’s wrong with your code, it often does it with complicated sentences hidden in walls of text.

Clang on the other hand, tries very hard to comprehend what you really wanted to write, it speaks in much more understandable words and shows you the offending code locations with nice graphics.

You could say that compared to Clang, which is empathic, understanding, pragmatic and always tries to be on the same page with you, GCC comes across more like an arrogant, self-pleasing and I’m-more-intelligent-than-you kinda guy.

Where GCC says: “What? That should be a template instantiation? Guess what, you’re doing WRONG!! “, Clang is more like: “Ok my friend, now let’s sit down together and analyse step-by-step what’s the problem here. I’ll make us tea.

You’ll find many examples of Clangs nice diagnostic output in Chandler’s talk. Here is another one, as a little teaser:

struct A
{
  std::string _str1;
  std::string _str2;
};

struct AHasher
{
  std::size_t operator() (const A& a)
  {
    return std::tr1::hash()(a._str1) ^
      std::tr1::hash()(a._str2);
  }
};
...
typedef std::tr1::unordered_map<A, int> AMap;
...

What’s wrong with this code? Yes, exactly: the operator in AHasher must be const. Errors with const correctness are typical, easy-to-overlook kind of problems in day-to-day programming. GCCs reaction to something like that is that something discards qualifiers. This may be perfectly right, and after a while you even get used to it. But as you can see with Clang, you can do much better.

The following two screenshots directly compare GCCs and Clangs output compiling the code above. Because there is a template instantiation involved, GCC covers you in its typical wall of text, before it actually tells you what’s wrong (last line).

CLang’s output is much better formated, it shows you the template instantiation steps much more cleanly and in the last line it tells you to the point what is really wrong: …but method is not marked const. Yeah!


Breakpad and Your CI – A Strong Team

Google’s breakpad together with your CI system can prepare you for the worst.

If your C++ software has to run 24/7 on some server rack at your customer’s data center, it has to meet not only all the user requirements, but also requirements that come from you as developer. When your customer calls you about some “problems”, “strange behaviours”, or even crashes, you must be able to detect what went wrong. Fast!

One means to this end is of course logging. But if your application crashes, nothing beats a decent stacktrace 🙂

Google’s breakpad library comes in very handy here because it provides very easy crash reporting. Even if your process has 2 gigs of virtual memory, breakpad shrinks that ‘core dump’ down to a couple of megs.

Breakpad pulls that trick off by using so-called symbol files that you have to generate for each compiled binary (executable or shared library). These symbol files together with the breakpad dump file that is created at crash time are then used to recreate the stacktrace.

Because every compilation creates different binaries, dump file and symbol files need to be ‘based on’ exactly the same binaries.

This is where you can let your CI system do some work for you. At one of our customers we use Jenkins not only for the usual automatic builds and tests after each check-in but also for release builds that go into production.

At the end of each build, breakpad’s symbol dumper runs over all compiled executables and libraries and generates the symbol files. These are then archived together with the compiled binaries.

Now we are prepared. Whenever some customer sends us a dump file, we can just easily pull out the symbol files corresponding to the software version that runs at this customer and let breakpad do its magic…


Readability of Boolean Expressions

Readability of boolean expressions lies in the eyes of the beholder.

Following up on various previous posts on code readability and style I want to provide two more examples today – this time under the common theme of “handling of boolean values”.

Consider this (1a):

bool someMethod()
{
  if (expression) {
    return true;
  } else {
    return false;
  }
}

Yes, there are people who consider this more readable than (1b)

bool someMethod()
{
  return (expression);
}

Another example is this (2a):

  if (someExpression() == true)
    ...

versus my preferred version (2b):

  if (someExpression())
    ...

So what could be the reason for these different viewpoints? One explanation I thought of is as follows: Let’s say you have a background in C and you are therefore used to do something like:

#define FALSE (0)
#define TRUE (!FALSE)

In other words, you may not see boolean as a type of its own, like int and double, with a well-defined value range. Instead you see it more like an enumerated type which makes it feel very naturally do a expression == true comparison.

At the same time it feels not very natural to see the result of a boolean expression as being of type bool with all the consequences – e.g. to be able to return it immediately as in the first example.

Another explanation is that 1a and 2a are as verbose as it can be. You don’t have to make any mental efforts to understand what the code does.

While these may be possible explanations, my guess is that most of you, like me,  still see 1a and 2a as unnecessary visual clutter and consider 1b and 2b as far more readable.

How to accidentally kill your CI build time

At one of our customers I do C++ consulting in a mid-sized project which uses cmake as build system. A clean build on our Jenkins CI server takes about 40 minutes (including unit tests) which is way too long to be considered “fast feedback” in an agile kind of way.

Because of that, we do clean builds only 2 times a day – some time during the night and during lunch break. The rest of the day the CI server only does a “svn update” and a normal “make”, which takes about 3-10 minutes depending on what files have been changed.

With C++ there are lots of ways to unnecessarily lengthen your build time. The most important factor is, of course, #include dependencies. One has to be very (very) disciplined in adding #include directives in header files. Otherwise, the whole world suddenly gets rebuild when some small header file somewhere in a little corner of the code has been changed.

And I have to say, for the most part, this project is in pretty good shape with regard to #include dependencies.

So what the hell has suddenly increased our build time from 3-10 minutes to 20-25 minutes? was what I was thinking some time last week while waiting for the CI server to spit out new latest and greatest rpm packages. For some reason, our normal, rest-of-the-day build started to compile what felt like everything in our main package even on the slightest code change in a remote .cpp file.

What happened?

In order to have the build time available (e.g. to show in an “about” box), we use a preprocessor symbol like REVISION_DATE which gets filled in a CMakeLists.txt file. The whole thing looks like this:

...
EXEC_PROGRAM(date ARGS '+%F_%T' OUTPUT_VARIABLE REVISION_DATE)
...
ADD_DEFINITIONS(-DREVISION_DATE=\"${REVISION_DATE}\")
...

Since the beginning of the time these lines of CMake code lived in a small sub-sub-..-directory with little to no incomming dependencies. Then, at some point, it became necessary to have the REVISION_DATE symbol at some other place, too, which led to a move of the above code into the CMakeLists.txt file of the main package.

The value of command date +%F_%T changes every second which leads to a changed REVISION_DATE on every build – which is what we initially intended. What changes, too, of course, is the value of the ADD_DEFINITIONS directive. And as CMake is very strict with the slightest change in this value, every make target below that line gets rebuild – which in our case was everything in the main package.

So there! Build time killing creatures are lurking everywhere in our C/C++ projects. Always be aware of them!

Structuring CppUnit Tests

How to structure cppunit tests in non-trivial software systems so that they can be easily executed selectively during code-compile-test cycle and at the same time are easy to execute as a whole by your continuous integration system.

While unit testing in Java is dominated by JUnit, C++ developers can choose between a variety of frameworks. See here for a comprehensive list. Here you can find a nice comparison of the biggest players in the game.

Being probably one of the oldest frameworks CppUnit sure has some usability issues but is still widely used. It is criticised mostly because you have to do a lot of boilerplate typing to add new tests. In the following I will not repeat how tests can be written in CppUnit as this is described already exhaustively (e.g. here or here). Instead I will concentrate on the task of how to structure CppUnit tests in bigger projects. “Bigger” in this case means at least a few architectually independent parts which are compiled independently, i.e. into different libraries.

Having independently compiled parts in your project means that you want to compile their unit tests independently, too. The goal is then to structure the tests so that they can easily be executed selectively during development time by the programmer and at the same time are easy to execute as a whole during CI time (CI meaning Continuous Integration, of course).

As C++ has no reflection or other meta programming elements like the Java Annotations, things like automatic test discovery and how to add new tests become a whole topic of its own. See the CppUnit cookbook for how to do that with CppUnit . In my projects I only use the TestFactoryRegistry approach because it provides the most automatics in this regard.

Let’s begin with a simplest setup, the Link-Time Trap (see example source code): Test runner and result reporter are setup in the “main” function that is compiled into an executable. The actual unit tests are compiled in separate libraries and are all linked to the executable that contains the main function. While this solution works well for small projects it does not scale. This is simply because every time you change something during the code-compile-test cycle the unit test executable has to be relinked, which can take a considerable amount of time the bigger the project gets. You fall into the Link Time Trap!

The solution I use in many projects is as follows: Like in the simple approach, there is one test main function which is compiled into a test executable. All unit tests are compiled into libraries according to their place in the system architecture. To avoid the Link-Time-Trap, they are not linked to the test executable but instead are automatically discovered and loaded during test execution.

1. Automatic Discovery

Applying a little convention-over-configuration all testing libraries end with the suffix “_tests.so”. The testing main function can then simply walk over the directory tree of the project and find all shared libraries that contain unit test classes.

2. Loading

If a “.._test.so” library has been found, it simply gets loaded using dlopen (under Unix/Linux). When the library is loaded the unit tests are automatically registered with the TestFactoryRegistry.

3. Execution

After all unit test libraries has been found and loaded text execution is the same as in the simple approach above.

Here my enhanced testmain.cpp (see example source code).

#include ... 

using namespace boost::filesystem; 
using namespace std; 

void loadPlugins(const std::string& rootPath) 
{
  directory_iterator end_itr; 
  for (directory_iterator itr(rootPath); itr != end_itr; ++itr) { 
    if (is_directory(*itr)) {
      string leaf = (*itr).leaf(); 
      if (leaf[0] != '.') { 
        loadPlugins((*itr).string()); 
      } 
      continue; 
    } 
    const string fileName = (*itr).string();
    if (fileName.find("_tests.so") == string::npos) { 
      continue;
    }
    void * handle = 
      dlopen (fileName.c_str(), RTLD_NOW | RTLD_GLOBAL); 
    cout << "Opening : " << fileName.c_str() << endl; 
    if (!handle) { 
      cout << "Error: " << dlerror() << endl; 
      exit (1); 
    } 
  } 
} 

int main ( int argc, char ** argv ) { 
  string rootPath = "./"; 
  if (argc > 1) { 
    rootPath = static_cast<const char*>(argv[1]); 
  } 
  cout << "Loading all test libs under " << rootPath << endl; 
  string runArg = std::string ( "All Tests" ); 
  // get registry 
  CppUnit::TestFactoryRegistry& registry = 
    CppUnit::TestFactoryRegistry::getRegistry();
  
  loadPlugins(rootPath); 
  // Create the event manager and test controller 
  CppUnit::TestResult controller; 

  // Add a listener that collects test result 
  CppUnit::TestResultCollector result; 
  controller.addListener ( &result ); 
  CppUnit::TextUi::TestRunner *runner = 
    new CppUnit::TextUi::TestRunner; 

  std::ofstream xmlout ( "testresultout.xml" ); 
  CppUnit::XmlOutputter xmlOutputter ( &result, xmlout ); 
  CppUnit::TextOutputter consoleOutputter ( &result, std::cout ); 

  runner->addTest ( registry.makeTest() ); 
  runner->run ( controller, runArg.c_str() ); 

  xmlOutputter.write(); 
  consoleOutputter.write(); 

  return result.wasSuccessful() ? 0 : 1; 
}

As you can see the loadPlugins function uses the Boost.Filesystem library to walk over the directory tree.

It also takes a rootPath argument which you can give as parameter when you call the test main executable. This solves our goal stated above. When you want to execute unit tests selectively during development you can give the path of the corresponding testing library as parameter. Like so:

./testmain path/to/specific/testing/library

In your CI environment on the other hand you can execute all tests at once by giving the root path of the project, or the path where all testing libraries have been installed to.

./testmain project/root

CMake Builder Plugin for Hudson

Update: Check out my post introducing the newest version of the plugin.

Today I’m pleased to announce the first version of the cmakebuilder plugin for Hudson. It can be used to build cmake based projects without having to write a shell script (see my previous blog post). Using the scratch-my-own-itch approach I started out implementing only those features that I needed for my cmake projects which are mostly Linux/g++ based so far.

Let’s do a quick walk through the configuration:

1. CMake Path:
If the cmake executable is not in your $PATH variable you can set its path in the global Hudson configuration page.

2. Build Configuration:

To use the cmake builder in your Free-style project, just add “CMake Build” to your build steps. The configuration is pretty straight forward. You just have to set some basic directories and the build type.

cmakebuilder demo config

The demo config above results in the following behavior (shell pseudocode):

if $WORKSPACE/build_dir does not exist
   mkdir $WORKSPACE/build_dir
end if

cd $WORKSPACE/build_dir
cmake $WORKSPACE/src -DCMAKE_BUILD_TYPE=Debug -DCMAKE_INSTALL_PREFIX=$WORKSPACE/install_dir
make
make install

That’s it. Feedback is very much appreciated!!

Originally the plan was to have the plugin downloadable from the hudson plugins site by now but I still have some publishing problems to overcome. So if you are interested, make sure to check out the plugins site again in a few days. I will also post an update here as soon as the plugin can be downloaded.

Update: After fixing some maven settings I was finally able to publish the plugin. Check it out!