Speed up your buildbox, Part II: Processor

This is the second part of a series on how to boost your build box without much effort. This episode talks about the effects of different processors.

© Friedberg - Fotolia.comIn the first part of our effort to speed up our buildbox, we replaced the spindle harddisk with a Solid State Disk (SSD) and finally, a RAM disk. This brought the build time down from 03:30 minutes to 02:50 minutes.

The Central Performance Unit

The next step on our journey to a faster buildbox was to replace the processor. Our initial processor was an Intel Core2 Duo E6750 with 2.67 GHz. To our pleasure, the processor socket, namely the LGA775 socket, is extremely versatile in supporting different processors. We had no problem in plugging in faster dual or even quad core processors, except upgrading the BIOS.

Taking the 3 GHz mark

The next processor to try out was an Intel Core2 Duo E8500 with 3.17 GHz operating frequency. The L2 cache went up from 4 MB to 6 MB.

The build time went down immediately from 02:50 minutes to 02:20 minutes. That’s nearly 20 percent less build time. And it’s perfectly linear with the CPU speed increase (also nearly 20 percent).

As a result: Investing in CPU clock power seems to pay off. The higher the frequency, the lower the build time.

Doubling the cores

Fortunately, the LGA775 socket supports quad core processors, too. We plugged in a Core2 Quad Q9550 with 2.8 GHz and ran the build again.

The result was astonishing: Despite the lower frequency, the build time dropped from 02:20 minutes to 02:00 minutes. We can’t really explain this one with basic math like the frequency coupling of the dual cores.

If your build is perfectly multithreaded, something javac isn’t, you’ll notice an even bigger speedup.

To sum it up: you can’t have enough GHz or processor cores when running a build.

Reviewing the result

We replaced the harddisk with RAM and upgraded the processor to meet the current performance threshold. This brought us from a starting 03:30 minutes build time to 02:00 minutes now. The CPU is the major player in this game, so upgrade it first.

Outlook on the third part

But what about the RAM? We really wanted to know what happens when we replace the RAM with bigger and faster one. Read more about this experiment in the third part of the series, coming soon.

Speed up your buildbox, Part I: Introduction & Harddisk

This is the first part of a series on how to boost your build box without much effort. This episode talks about the effects of different harddisks.

W© Friedberg - Fotolia.come actively use Hudson as our continuous integration server software. It has a nice little feature called “build history trend” that shows the duration of all archived builds. One of our major projects started out small and fast with a build duration of 01:20 minutes. One and a half year later, it reached for the 04:00 minute hurdle. It wasn’t a surprise to us, as the build has more than four times the work now and the hardware staid the same.

But a question emerged: How can we speed up our build?

Applying optimization: The basic maths

We did a quick review of our ant build scripts to ensure there’s nothing fundamentally wrong with them and then decided which road to follow first: Optimizing the build scripts or boosting the hardware? There is only one pragmatic answer to us: boost the hardware as long as it stays reasonable in price. Every optimization in the build script would need its time (which isn’t cheap) and possibly increase the script complexity (which is very expensive later on).

Optimizing the hardware

So we went on the journey to make a fast buildbox even faster. We started out with a dual core processor (2.6 GHz), a decent-but-standard harddisk and 4 GB of memory. We replaced every part on its own to see the effect. The journey includes:

Our goal is to cut our build time down by 50 percent, to a little less than 02:00 minutes. We don’t want to spend more than 500 EUR for new hardware. So now, after this introduction:

Part I: Replacing the harddisk

Our buildbox starts with a more or less normal harddisk (0.5 TB), certified for continuous usage. We could have bought just another normal harddisk of a newer generation, but that doesn’t cut it in our experience (we didn’t verify specifically, though).

Calling the carnivores

If you need to upgrade your harddisk, you can buy yourself a VelociRaptor drive and be pretty much assured that you’ll notice the difference. We had pleasant experiences with this kind of fast-spinning drives before, but this time, we wanted to go a step further and try a fast Solid State Disk (SSD). As you only need to relocate the working directories (called workspaces in hudson terminology) of your projects to the new disk, the capacity isn’t important as long as it’s greater than your project sizes. You can just plug your new disk in the buildbox and format it with a high performance file system. As our buildbox runs on Linux, relocating the workspace is just setting a symbolic link. You do not even tell hudson about it. If you happen to run on Windows, check out the “use custom workspace” setting on your job’s configuration page.

An investment of about 200 EUR and 15 minutes of installation later, we had the result: The build average before was 03:30 minutes and now 03:10 minutes. That’s not a big leap forward, as others found out, too. It’s not that the SSD was bad, it performed exceptionally well in the benchmarks, but the harddisk wasn’t the bottleneck. To further proof our assumption, we installed the fastest harddrive you can get: the RAM disk.

Only pretend to use the disk

Linux (like other unixoid systems) has the great feature of an emulated harddisk right in your memory. On Debian/Ubuntu systems, this emulated drive is mounted at /dev/shm and has a capacity of half your total physical memory. It grows dynamically, so you don’t have to worry about its initial size. But you have to check if your workspace fits into it. Our buildbox had 4 GB of RAM and 2 GB were enough to contain the hudson workspace. We configured hudson to build there (you can use symbolic links or the “custom workspace” setting as shown in the picture) and got the result: The build average went down to 02:50 minutes.
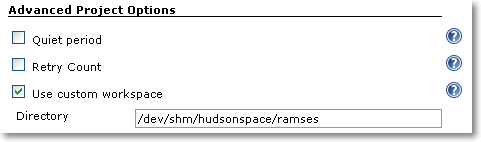
custom_workspace

Review on the results

That’s as far as we could speed up our buildbox by just replacing the harddisk. Down from 03:30 minutes to 02:50 minutes, a reduction of 40 seconds or 20 percent. In fact, we even cheated as the buildbox doesn’t use an harddisk anymore for building. With Linux, it’s incredibly easy to utilize a RAM disk as long as you have enough RAM to loan. For Windows systems, there are several software products that can do the same. If you don’t want to loan your RAM, you can look into HyperDrives, but for a price!

So we conclude that the fastest harddisk is an emulated one and even then, its effect on the build time is limited.

Stay tuned for the next episode of our journey to a faster buildbox, when we apply a faster CPU.

Don’t trust micro versions

Normally you would think, that upgrading a third party dependency where its micro version (after the second dot, like x in 2.3.x) changes should make your software work (even) better and not break it. Sadly enough it can easily happen. Some time ago we stumbled over a subtle change in the JNDI implementation of the Jetty webserver and servlet container: In version 6.1.11 you specified (or at least could specify) JNDI resources in jetty-env.xml with URLs like jdbc/myDatabase. After the update to 6.1.12 the specified resource could not be found anymore. Digging through code changelogs and the like provided a solution that finally worked with 6.1.12: java:comp/env/jdbc/myDatabase. The bad thing is that the latter does not work with 6.1.11 so that our configuration became micro-version-dependent on Jetty.

It seems that a new feature around JETTY-725 in the update from 6.1.11 to 6.1.12 broke our software.

Conclusion

Always make sure that your dependencies are fixed for your software releases and test your software everytime when upgrading a dependency. Do not trust some automatic dependency update system or the version numbers of a project. In the end they are just numbers and should indicate the impact of the changes but you never can be sure the changes do not break something for you.

CMake Builder Plugin for Hudson

Update: Check out my post introducing the newest version of the plugin.

Today I’m pleased to announce the first version of the cmakebuilder plugin for Hudson. It can be used to build cmake based projects without having to write a shell script (see my previous blog post). Using the scratch-my-own-itch approach I started out implementing only those features that I needed for my cmake projects which are mostly Linux/g++ based so far.

Let’s do a quick walk through the configuration:

1. CMake Path:
If the cmake executable is not in your $PATH variable you can set its path in the global Hudson configuration page.

2. Build Configuration:

To use the cmake builder in your Free-style project, just add “CMake Build” to your build steps. The configuration is pretty straight forward. You just have to set some basic directories and the build type.

cmakebuilder demo config

The demo config above results in the following behavior (shell pseudocode):

if $WORKSPACE/build_dir does not exist
   mkdir $WORKSPACE/build_dir
end if

cd $WORKSPACE/build_dir
cmake $WORKSPACE/src -DCMAKE_BUILD_TYPE=Debug -DCMAKE_INSTALL_PREFIX=$WORKSPACE/install_dir
make
make install

That’s it. Feedback is very much appreciated!!

Originally the plan was to have the plugin downloadable from the hudson plugins site by now but I still have some publishing problems to overcome. So if you are interested, make sure to check out the plugins site again in a few days. I will also post an update here as soon as the plugin can be downloaded.

Update: After fixing some maven settings I was finally able to publish the plugin. Check it out!

Lightweight dependency management

Managing project dependencies without maven or ant ivy, using a custom ant task to ensure classpath orthogonality.

Java’s classpath is a powerful concept – when used appropriate. As your project grows larger in terms of code and people, it gets harder to ensure that your classpath is correct. A great danger arises from JAR files containing different versions of the same resource. You might end up running different code than you think, leading to strange effects. If you build your classpath using wildcards, you can’t even control the order your JAR files are loaded.

Managing dependencies

To avoid the issues mentioned above, you need to manage your project dependencies. It’s a common practice to implement the build process of the project using maven or ant ivy. Both tools provide dependency mangement by declaration. But at a high cost. Especially maven has received some malice lately, criticizing its steep learning curve and complexity.

Scratching the biggest itch

We decided to try a different approach to dependency management, tackling only our biggest concern: The duplication of classpath resources. We take care of the scope of a third-party library, put required JARs in the repository (to us, third party binary artifacts are part of the project source) and update manually. The one thing we cannot assure manually is that every resource is unique. Sometimes, the same class is included in different JARs, as it seems to be common practice among java web frameworks.

Ant to the rescue

Thus, I wrote a custom ant task that, given the classpath, checks for duplicate entries. If it finds one, it lists the culprits and optionally aborts the build process. Included in our continuous integration system, it gets run every time somebody performs a change. You can’t forget to delete an old version of a library or check in the same library twice without breaking the build now.

Our ClasspathCollisionCheckTask

I provide this task here, without any warranty. The source code is included in the JAR alongside the classes, if you want to know what it does exactly.

Assuming you already know how to use custom tasks within an ant build script, here’s only a short usage description.

Import the custom task:

<taskdef
    name="check.collision"
    classname="com.schneide.internal.anttask.ClasspathCollisionCheckTask"
    classpath="${customtasks.library.directory}/schneidetasks.jar"
/>

Next, use it on your classpath:

<check.collision verbose="true" failOnCollision="true">
    <path>
        <fileset dir="${classpath.library.directory}">
            <include name="**/*.jar"/>
        </fileset>
        <fileset dir="${internal.library.directory}">
            <include name="**/*.jar"/>
        </fileset>
    </path>
</check.collision>

The task scans the whole path you give it and reports any collision it detects. You will see the warnings in your build log.

If the failOnCollision parameter is set to true (optional, defaults to false), the build will abort after a collision. If you want to have debug information, set the verbose parameter to true (optional, defaults to false).

Conclusion

If you manage your project dependencies manually, you might find our custom ant task useful. If you use maven or ant ivy, you already have this functionality in your build process.

Feedback

I’m very interested in hearing your opinion on the task or about your way of handling dependencies. Leave us a comment.