1-Click Deployment of RPMs with Jenkins

In one of my previous posts we learned how to build and package our projects as RPM packages. How do we get our shiny packages to our users? If we host our own RPM repository, we can use our extisting CI infrastructure (jenkins in our case) for that. Here are the steps in detail:

Convention for the RPM location in our jobs

To reduce the work needed for our deployment job we define a location where each job puts the RPM artifacts after a successful build. Typically we use something like $workspace/build_dir for that. Because we are using matrix build for different target plattforms, we need to use the same naming conventions for our job axes, too!

Job for RPM deployment

Because of the above convention we can use one parameterized job to deploy the packages of different build jobs. We use the JOBNAME of the build job as our only parameter:

Deploy-RPM-Jobname-Parameter

First the deploy job needs to get all the rpms from the build job. We can do this using the Copy Artifact plugin like so:Deploy-RPM-Copy-Artifacts

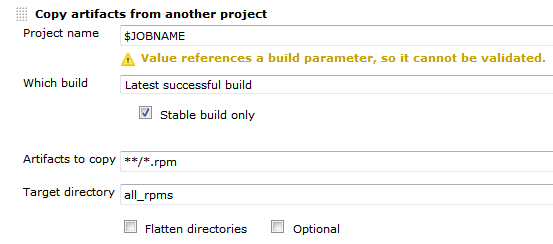
Since we are usually building for several distributions and processor architectures, we have a complete directory tree in our target directory. We are using a small shell script to copy all the packages to our repository using rsync. Finally we can update the remote repository over ssh. See the complete shell script below:

for i in suse-12.2 suse-12.1 suse-11.4 suse-11.3
do
  rm -rf $i
  dir32=$i/RPMS/i686
  dir64=$i/RPMS/x86_64
  mkdir -p $dir32
  mkdir -p $dir64
  versionlabel=`echo $i | sed 's/[-\.]//g'`
  if [ -e all_rpms/Architecture\=32bit\,Distribution\=$versionlabel/build_dir/ ]
  then
    cp all_rpms/Architecture\=32bit\,Distribution\=$versionlabel/build_dir/* $dir32
  fi
  if [ -e all_rpms/Architecture\=64bit\,Distribution\=$versionlabel/build_dir/ ]
  then
    cp all_rpms/Architecture\=64bit\,Distribution\=$versionlabel/build_dir/* $dir64
  fi
  rsync -e "ssh" -avz $i/* root@repository-server:/srv/www/htdocs/repo/$i/
  ssh root@repository-server "createrepo /srv/www/htdocs/repo/$i/RPMS"
done

Conclusion

With a few small tricks and scripts we can deploy the artifacts of our build jobs to the RPM repository and thus deliver a new software release at the push of a button. You could let the deployment job run automatically after a successful build, but we like to have more control over the actual software we release to our users.

Procrastination

Not doing things at the time they ought be done seems to be a known problem for as long as people are able to plan. They know the consequences and knowingly decide to delay the inevitable. When do you encounter such situations in your professional life? How can they be improved?

Deadline

is the trump card that can be played every time someone wants to put off a task that hinders but not completely stops the process. I’ve seen it often when talking about refactorings or automated tests – “We can do it when we have time”. When the situation does not permit changes to the schedule it is a valid and appropriate decision to delay them until later. Delaying again and again is not. To improve the situation it is necessary that everyone in the chain in the development process from the developer to the customer[1] knows the consequences of accumulating technical debt. In most cases they are just ignorant of the fact or of its long term impact and will change the course of action when “enlightened”. The next step should be the reduction of workload to catch up and improve the product in time.

Fear

of failure or fear of consequences is also often the reason someone delays important tasks. The fear can be fostered through misinterpreted quality standards. A little checklist to keep in mind:

  • Breaking the build is not bad. It is bad to let it stay broken.
  • Checkstyle is not everything. There are situations when people are “more right”. Dogmatism is unhealthy anyway.
  • Man is not a machine. Nobody can be expected to work full time without making mistakes. Even hardware fails.

To improve this situation it is necessary to revise the values and make sure that the consequences are reduced to the level where they are noticeable but not hurting or even crippling. This way any person can make decisions – even wrong ones – without anticipation of immediate punishment. Not all working environments are that toxic. Sometimes the person is just inexperienced or has low self esteem. Here teaching, leading by example and encouragement to take responsibility helps a lot.

Boredom

is like torture for conscious mind. A boring task can be endured once, but doing it every day is very unconfortable. Fortunately when something can be predicted, it can be automated. Cron jobs, continuous integration systems or small round vacuum cleaners serve as example. Even our brain automates processes by pushing them into the subconscious mind – this way we are able to speak and walk at the same time without any problems. Some bureaucratic routines however, like time tracking, cannot be automated fully and require our intervention at regular intervals. The natural behaviour to increase the intervals between the tasks or forgetting them ultimately leads to the situation comparable to technical debt where a huge amount of undone tasks grinds a system to a halt. Since most companies require some amount of bureaucracy to function, it is not possible to completely optimize it away. But it is possible to reduce the chance to forget a task. As example we are always wearing a real cowboy hut when we work in a production environment. Only when we are done, we can put it off. To make boring tasks more attractive the idea of continuous integration game can be used. In time tracking context the user would get points for booking time at the same working day and less for booking at the next day.

Conclusion
Simplified the equation is: pressure * negative feelings towards the task = danger of procrastination. To improve the situation, lower the factors!

[1] Especially in product development: Customer is not the one who buys or uses the product, but the one who pays the developer to make the product and later wants to make money with it.

Build a RPM package using CMake

Some while ago I presented a way to package projects using different build systems as RPM packages. If you are using CMake for your projects you can use CPack to build RPM packages (in addition to tarballs, NSIS installers, deb packages and so on). This is a really nice option for deployment of your own projects because installation and update can be easily done by the users using familiar package management tools like zypper, yum and yast2.

Your first CPack RPM

It is really easy to add RPM using CPack to your existing project. Just set the mandatory CPack variables and include CPack below the variable definitions, usually as one of the last steps:

project (my_project)
cmake_minimum_required (VERSION 2.8)

set(VERSION "1.0.1")
<----snip your usual build instructions snip--->
set(CPACK_PACKAGE_VERSION ${VERSION})
set(CPACK_GENERATOR "RPM")
set(CPACK_PACKAGE_NAME "my_project")
set(CPACK_PACKAGE_RELEASE 1)
set(CPACK_PACKAGE_CONTACT "John Explainer")
set(CPACK_PACKAGE_VENDOR "My Company")
set(CPACK_PACKAGING_INSTALL_PREFIX ${CMAKE_INSTALL_PREFIX})
set(CPACK_PACKAGE_FILE_NAME "${CPACK_PACKAGE_NAME}-${CPACK_PACKAGE_VERSION}-${CPACK_PACKAGE_RELEASE}.${CMAKE_SYSTEM_PROCESSOR}")
include(CPack)

These few lines should be enough to get you going. After that you can execute a make package command should obtain the RPM package.

Spicing up the package

RPM packages can contain much more metadata and especially package dependencies and a version changelog. Most of the stuff can be specified using CPACK variables. We sometimes prefer to use a SPEC file template to be filled and used by CPack because it then contains most of the RPM specific stuff in a familiar manner instead of polluting the CMakeLists.txt itself:

project (my_project)
<----snip your usual CMake stuff snip--->
<----snip your additional CPack variables snip--->
configure_file("${CMAKE_CURRENT_SOURCE_DIR}/my_project.spec.in" "${CMAKE_CURRENT_BINARY_DIR}/my_project.spec" @ONLY IMMEDIATE)
set(CPACK_RPM_USER_BINARY_SPECFILE "${CMAKE_CURRENT_BINARY_DIR}/my_project.spec")
include(CPack)

The variables in the RPM SPEC file will be replaced by the values provided in the CMakeLists.txt and then be used for the RPM package. It looks very similar to a standard SPEC file but you can omit the usual build instructions boiling down to something like this:

Buildroot: @CMAKE_CURRENT_BINARY_DIR@/_CPack_Packages/Linux/RPM/@CPACK_PACKAGE_FILE_NAME@
Summary:        My very cool Project
Name:           @CPACK_PACKAGE_NAME@
Version:        @CPACK_PACKAGE_VERSION@
Release:        @CPACK_PACKAGE_RELEASE@
License:        GPL
Group:          Development/Tools/Other
Vendor:         @CPACK_PACKAGE_VENDOR@
Prefix:         @CPACK_PACKAGING_INSTALL_PREFIX@
Requires:       opencv >= 2.4

%define _rpmdir @CMAKE_CURRENT_BINARY_DIR@/_CPack_Packages/Linux/RPM
%define _rpmfilename @CPACK_PACKAGE_FILE_NAME@.rpm
%define _unpackaged_files_terminate_build 0
%define _topdir @CMAKE_CURRENT_BINARY_DIR@/_CPack_Packages/Linux/RPM

%description
Cool project solving the problems of many colleagues.

# This is a shortcutted spec file generated by CMake RPM generator
# we skip _install step because CPack does that for us.
# We do only save CPack installed tree in _prepr
# and then restore it in build.
%prep
mv $RPM_BUILD_ROOT @CMAKE_CURRENT_BINARY_DIR@/_CPack_Packages/Linux/RPM/tmpBBroot

%install
if [ -e $RPM_BUILD_ROOT ];
then
  rm -Rf $RPM_BUILD_ROOT
fi
mv "@CMAKE_CURRENT_BINARY_DIR@/_CPack_Packages/Linux/RPM/tmpBBroot" $RPM_BUILD_ROOT

%files
%defattr(-,root,root,-)
@CPACK_PACKAGING_INSTALL_PREFIX@/@LIB_INSTALL_DIR@/*
@CPACK_PACKAGING_INSTALL_PREFIX@/bin/my_project

%changelog
* Tue Jan 29 2013 John Explainer <john@mycompany.com> 1.0.1-3
- use correct maintainer address
* Tue Jan 29 2013 John Explainer <john@mycompany.com> 1.0.1-2
- fix something about the package
* Thu Jan 24 2013 John Explainer <john@mycompany.com> 1.0.1-1
- important bugfixes
* Fri Nov 16 2012 John Explainer <john@mycompany.com> 1.0.0-1
- first release

Conclusion

Integrating RPM (or other package formats) to your CMake-based build is not as hard as it seems and quite flexible. You do not need to rely on the tools provided by your OS vendor and still deliver your software in a way your users are accustomed to. This makes CPack very continuous integration (CI) friendly too!

Lazy Initialization/evaluation can help you performance and memory-consumption-wise

One way to improve performance when working with many objects or large data structures is lazy initialization or evaluation. The concept is to defer expensive operations to the latest moment possible – ideally never. I want to show some examples how to use lazy techniques in java and give you pointers to other languages where it is even easier and part of the core language.

One use case was a large JTable showing hundreds of domain objects consisting of meta-data and measured values. Initially our domain objects held both types of data in memory even though only part of the meta data was displayed in the table. Building the table took several seconds and we were limited to showing a few hundred entries at once. After some analysis we changed our implementation to roughly look like this:

public class DomainObject {
  private final DataParser parser;
  private final Map<String, String> header = new HashMap<>();
  private final List<Data> data = new ArrayList<>();

  public DomainObject(DataParser aParser) {
    parser = aParser;
  }

  public String getHeaderField(String name) {
    // Here we lazily parse and fill the header map
    if (header.isEmpty()) {
      header.addAll(parser.header());
    }
    return header.get(name);
  }
  public Iterable<Data> getMeasurementValues() {
    // again lazy-load and parse the data
    if (data.isEmpty()) {
      data.addAll(parser.measurements());
    }
    return data;
  }
}

This improved both the time to display the entries and the number of entries we could handle significantly. All the data loading and parsing was only done when someone wanted the details of a measurement and double-clicked an entry.

A situation where you get lazy evaluation in Java out-of-the-box is in conditional statements:

// lazy and fast because the expensive operation will only execute when needed
if (aCondition() && expensiveOperation()) { ... }

// slow order (still lazy evaluated!)
if (expensiveOperation() && aCondition()) { ... }

Persistence frameworks like Hibernate often times default to lazy-loading because database access and data transmission is quite costly in general.

Most functional languages are built around lazy evaluation of and their concept of functions as first class citizens and isolated/minimized side-effects support lazyness very well. Scala as a hybrid OO/functional language introduces the lazy keyword to simplify typical java-style lazy initialization code like above to something like this:

public class DomainObject(parser: DataParser) {
  // evaluated on first access
  private lazy val header = { parser.header() }

  def getHeaderField(name : String) : String = {
    header.get(name).getOrElse("")
  }

  // evaluated on first access
  lazy val measurementValues : Iterable[Data] = {
    parser.measurements()
  }
}

Conclusion
Lazy evaluation is nothing new or revolutionary but a very useful tool when dealing with large datasets or slow resources. There may be many situations where you can use it to improve performance or user experience using it.
The downsides are a bit of implementation cost if language support is poor (like in Java) and some cases where the application can feel more responsive with precomputed/prefetched values when the user wants to see the details.

Automated Testing of E-Mail Functionality

Nowadays most (web) applications have to send e-mails for notifications, news, passwords, reminders and so on. You have to ensure that the correct e-mail is really sent to the receiver and it is a good idea to do this using an automated test. Since you usually do not want to depend on the whole network infrastructure and externally installed mail servers which could cause breaking tests without code change once in a while some kind of mock mail server would be nice.

We tried two solutions in our grails web application:

Dumbster

A really simple fake smtp server written in Java. Using it is really simple: You just add the jar to your project and start the smtp server on some port:

SmtpServer mailServer = SmtpServerFactory.startServer(2525);

Your application can now simply send e-mails using the smtp-server running locally on the specified port. In your tests you can check the mail server for the expected e-mails. After each test we stopped dumpster resetting it to a clean state.

mailServer.stop()

The problem we had with this solution was, that stopping the fake smtp was not enough between tests. There were zombie dumpster threads left which caused an excessive load. Our acceptance test run slowed down increasingly with every new test. Eventually, execution time of acceptance tests doubled to more than two hours!

Greenmail (plugin for grails)

Due to the problems with dumbster we tried greenmail with its grails plugin. The greenmail smtp is available as a spring bean in grails and is mostly transparent as a plugin. We only had to change our WithEmailServer rule which provides a clean and enabled state and disables greenmail after the test using the rule.

    void before() {
        SpringUtil.getBean('grailsApplication').config.grails.mail.disabled = false
        SpringUtil.getBean('greenMail').deleteAllMessages()
    }

    void after() {
        SpringUtil.getBean('grailsApplication').config.grails.mail.disabled = true
    }

If your tests are executing in a different JVM than your app is running, you may need to use the Remote Control-plugin to access greenMail or grailsApplication. The grails greenmail plugin provides a controller too, which lets you inspect sent messages over the web interface.

Testing on .NET: Choosing NUnit over MSTest

We sometimes do smaller .NET projects for our clients even though we are mostly a Java/JVM shop. Our key infrastructure stays the same for all projects – regardless of the platform. That means the .NET projects get integrated into our existing continuous integration (CI) infrastructure based on Jenkins. This works suprisingly well even though you need a windows slave and the MSBuild plugin.

One point you should think about is which testing framework to use. MSTest is part of Visual Studio and provides nice integration into the IDE. Using it in conjunction with Jenkins is possible since there is a MSTest plugin for our favorite CI server. One downside is that you need either Visual Studio itself or the Windows SDK (500MB download, 300MB install) installed on the build server in addition to .NET. Another one is that it does not work with the “Express” editions of Visual Studio. Usually that is not a problem for companies but it raises the entry barrier for open source or other non-profit projects by requiring relatively expensive Visual Studio licences.

In our scenarios NUnit proved much lighter and friendlier in installation and usage. You can easily bundle it with your sources to improve self-containment of the project and lessen the burden on the system and tools. If you plug the NUnit tool into the external tools-section of Visual Studio (which also works with Express) the integration is acceptable, too.

Conclusion

If you are not completely on the full Microsoft stack for you project infrastructure using Visual Studio, TeamCity, Sourcesafe et al. it is worth considering choosing NUnit over MSTest because of its leaner size and looser coupling to the Mircosoft stack.

Checking preconditions in advance vs. on demand vs. exceptions

Usually, it is good practice to check certain preconditions before applying operations to input data. This is often referred to as defensive programming. Many people are used to lines like:

public void preformOn(String foo) {
  if (!myMap.containsKey(foo)) {
    // handle it correctly
    return;
  }
  // do something with the entry
  myMap.get(foo).performOperation();
}

While there is nothing wrong with such kind of “in advance checking” it may have performance implications – especially when IO is involved.

We had a problem some time ago when working with some thousand wrappers for File objects. The wrappers checked if the given File object actually is a file using the innocent isFile()-method in the constructor which caused hard disk access each time. So building our collection of wrapped files took quite some time (dozens of seconds) and our client complained (rightfully so!) about the performance. Once the collection was built the operations were fast because no checking was needed anymore.

Our first optimization step was deferring the check to the point where the file was actually used. This sped up the creation of the wrappers so it was barely noticeable but processing a bunch of elements took longer because of additional disk accesses. Even though this approach may work for a plethora of situations for our typical use cases the effect of this optimization was not enough.

So we looked at our problem from another perspective: The vast majority of file handles were actually existing and readable files and directories and foreign/unknown files were the exception. Because of this fact we chose to simply leave out any kind of checks and handle the exceptions! Exception handling is often referred to as slow but if exceptions are rare it can make a difference in some orders of magnitude. Our speed up using this approach was enourmous and the client was happy about sub-second responsiveness for his typical operations. In addition we think that the code now expresses more cleary that irregular files really are the exception and not the rule for this particular code.

Conclusion

There are different approaches to handling of parameters and input data. Depending on the cost of the check and the frequency of special input different strategies may prove beneficial both in expressing your intent and the perceived performance of your application.

Triggering jenkins from git with common post-receive hook

The standard way of triggering Jenkins jobs from a git repository was issuing a get request on the “build now” URL of the job in the post-receive hook, e.g.

curl http://my_ci_server:8080/job/my_job/build?delay=0sec

The biggest problem of this approach is that you have to hardcode the job name into the url. This prevents sharing the hook between repositories and requires you to put an adjusted post-receive hook script into each new repository. Also, additional work has to be done to trigger jobs only for certain branches and the like.
Fortunately, Jenkins offers a new way of triggering jobs from a git repository for quite a while now. Essentially you have to notify jenkins of the commit in your repository and configure the job for polling.

To trigger jobs for the repository git@my_repository_server:my_project.git you can use the following script:

GIT_REPO_URL=git@my_repository_server:`pwd | sed 's:.*\/::'`
curl http://my_ci_server:8080/git/notifyCommit?url=$GIT_REPO_URL

Notice the absence of any repository or job specific stuff in the post-receive hook. Such a hook can be placed in a central location and be shared between repositories using symbolic links.

A tale of anti-virus software killing local connectivity

We are developing and running a distributed system which is deployed on-site at our client. Everything was running smoothly for years only some minor hick-ups related to network infrastructure problems occurred over time. Then one day our client told us the scheduled database backups were not working anymore. We immediately checked the database, all installed firewall programs and the like on that Windows 7 server machine. The Postgresql database was running and our local and remote application components were able to connect. Strangely though, neither pgAdmin nor psql or even telnet were able to make a connection locally to the database!! Adding more oddity we did not change or update any part of the system at the time things stopped working. Remote access to the database was working though leaving us even more confused. To sum up the situation:

  • Some applications can connect to the database locally, others cannot
  • Remote access to the database works without problems for all applications, even those that cannot connect locally on the server
  • We did not change any of these applications, neither client side nor server side
  • All firewalls were disabled and the problem persisted over reboots

The explanation

So we talked to our client again and depicted our complete analysis pinning the date of the breakage to a moment when we evidently did not change anything. Suddenly it struck him like lightning when he remembered that there was an automatic update of an anti-virus program. He removed the software from the machine and everything worked again as expected. Even reinstalling the anti-virus program did not break the system again. It was only this misbehaving automatic update somewhere in time that killed some part of our system in a most odd way…