A tale of anti-virus software killing local connectivity

We are developing and running a distributed system which is deployed on-site at our client. Everything was running smoothly for years only some minor hick-ups related to network infrastructure problems occurred over time. Then one day our client told us the scheduled database backups were not working anymore. We immediately checked the database, all installed firewall programs and the like on that Windows 7 server machine. The Postgresql database was running and our local and remote application components were able to connect. Strangely though, neither pgAdmin nor psql or even telnet were able to make a connection locally to the database!! Adding more oddity we did not change or update any part of the system at the time things stopped working. Remote access to the database was working though leaving us even more confused. To sum up the situation:

  • Some applications can connect to the database locally, others cannot
  • Remote access to the database works without problems for all applications, even those that cannot connect locally on the server
  • We did not change any of these applications, neither client side nor server side
  • All firewalls were disabled and the problem persisted over reboots

The explanation

So we talked to our client again and depicted our complete analysis pinning the date of the breakage to a moment when we evidently did not change anything. Suddenly it struck him like lightning when he remembered that there was an automatic update of an anti-virus program. He removed the software from the machine and everything worked again as expected. Even reinstalling the anti-virus program did not break the system again. It was only this misbehaving automatic update somewhere in time that killed some part of our system in a most odd way…

Testing C programs using GLib

Writing programs in good old C can be quite refreshing if you use some modern utility library like GLib. It offers a comprehensive set of tools you expect from a modern programming environment like collections, logging, plugin support, thread abstractions, string and date utilities, different parsers, i18n and a lot more. One essential part, especially for agile teams, is onboard too: the unit test framework gtest.

Because of the statically compiled nature of C testing involves a bit more work than in Java or modern scripting environments. Usually you have to perform these steps:

  1. Write a main program for running the tests. Here you initialize the framework, register the test functions and execute the tests. You may want to build different test programs for larger projects.
  2. Add the test executable to your build system, so that you can compile, link and run it automatically.
  3. Execute the gtester test runner to generate the test results and eventually a XML-file to you in your continuous integration (CI) infrastructure. You may need to convert the XML ouput if you are using Jenkins for example.

A basic test looks quite simple, see the code below:

#include <glib.h>
#include "computations.h"

void computationTest(void)
{
    g_assert_cmpint(1234, ==, compute(1, 1));
}

int main(int argc, char** argv)
{
    g_test_init(&argc, &argv, NULL);
    g_test_add_func("/package_name/unit", computationTest);
    return g_test_run();
}

To run the test and produce the xml-output you simply execute the test runner gtester like so:

gtester build_dir/computation_tests --keep-going -o=testresults.xml

GTester unfortunately produces a result file which is incompatible with Jenkins’ test result reporting. Fortunately R. Tyler Croy has put together an XSL script that you can use to convert the results using

xsltproc -o junit-testresults.xml tools/gtester.xsl testresults.xml

That way you get relatively easy to use unit tests working on your code and nice some CI integration for your modern C language projects.

Update:

Recent gtester run the test binary multiple times if there are failing tests. To get a report of all (passing and failing) tests you may want to use my modified gtester.xsl script.

Better diagnostics in TDD

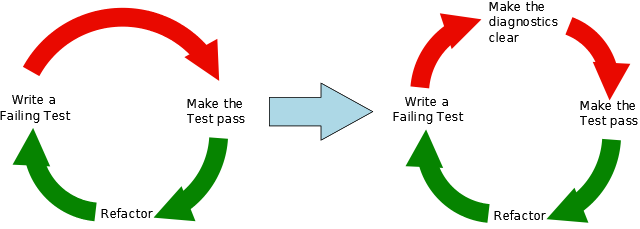
Automated tests gain more and more popularity in our field and our company. Avoiding being slowed down by tests becomes crucial. Steve Freeman has a nice talk on infoq.com with many advices for maintaining the benefits of automated testing without producing too much drag. One seldomly discussed topic is test diagnostics and immediately caught our attention. In short your aim is to produce as meaningful messages as possible for failing tests. This leads to the extended TDD cycle depicted below.

There are several techniques to improve the diagnostics of failing tests. Here is a short list of the most important ones:

  • Using assertion messages to make clear what exactly failed
  • Using “named objects” where you essentially just override the toString()-method of some type in your tests to provide meaning for the checked value
    Date startDate = new Date(1000L) {
        @Override
        public String toString() {
            return "startDate";
        }
    };
    
    
  • Using “tracer objects” by giving names to mocks/collaborators in the test, e.g. in Mockito-syntax:
    EventManager em1 = mock(EventManager.class, "Gavin");
    EventManager em2 = mock(EventManager.class, "Frank");
    // do something with them
    

Conclusion

By applying the extended TDD-cycle you can drastically reduce guessing of what went wrong and find regressions much faster without using debug messages or the debugger itself.

Your own CI-based RPM build farm, part 3

In my previous post we learned how to build RPM packages of your software for multiple versions of your target distribution(s). Now I want to present a way of automating the build process and building packages on/for all target platforms. You should have a look at the openSUSE build service to see if it already fits your needs. Then you can stop reading here :-).

We needed better control over the platforms and the process, so we setup a build farm based on the Jenkins continuous integration (CI) server ourselves. The big picture consists of the following components:

  • build slaves allowing a jenkins user to do unattended builds of the packages
  • Jenkins continuous integration server using matrix builds with build slaves for each target platform
  • build script orchestrating the build of all our self-maintained packages
  • jenkins job to deploy the packages to our RPM repository

Preparing the build slaves

Standard installations of openSUSE need some minor tweaks so they can be used as Jenkins build slaves doing unattended RPM package builds. Here are the changes we needed to make it work properly:

  1. Add a user account for the builds, e.g. useradd -m -d /home/jenkins jenkins and setup a password with passwd jenkins.
  2. Change sshd configuration to allow password authentication and restart sshd.
  3. We will link the SOURCES and SPECS directories of /usr/src/packages to the working copy of our repository, so we need to delete the existing directories: rm -r /usr/src/packages/SPECS /usr/src/packages/SOURCES /usr/src/packages/RPMS /usr/src/packages/SRPMS.
  4. Allow non-priviledged users to work with /usr/src/packages with chmod -R o+rwx /usr/src/packages.
  5. Copy the ssh public key for our git repository to the build account in ~/.ssh/id_rsa
  6. Test ssh access on the slave as our build user with ssh -v git@repository. With this step we confirm the host authenticity one time so that future public key ssh interactions work unattended!
  7. Configure git identity on the slave with git config --global user.name "jenkins@build###-$$"; git config --global user.email "jenkins@buildfarm.myorg.net".
  8. Add privileges for the build user needed for our build process in /etc/sudoers: jenkins ALL = (root) NOPASSWD:/usr/bin/zypper,/bin/rpm

Configuring the build slaves

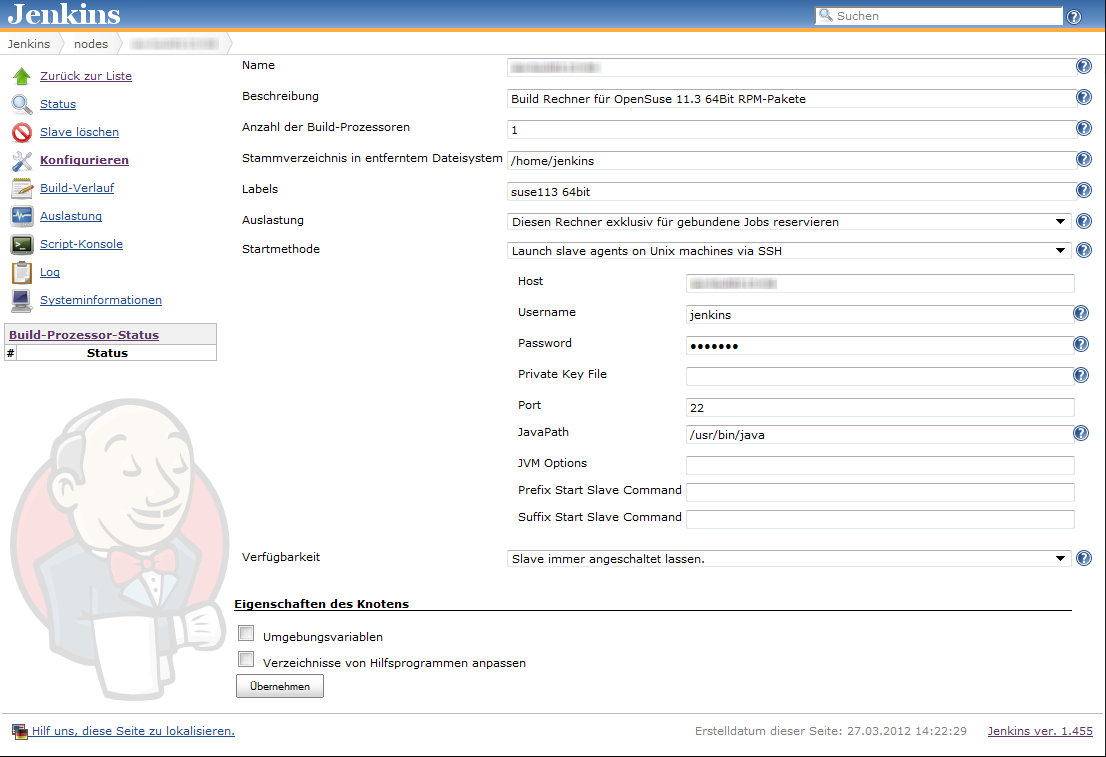
Linux build slaves over ssh are quite easily configured using Jenkins’ web interface. We add labels denoting the distribution release and architecture to be easily able to setup our matrix builds. Then we setup our matrix build as a new job with the usual parameters for source code management (in our case git) etc.

Our configuration matrix has the two axes Architecture and OpenSuseRelease and uses the labels of the build slaves. Our only build step here is calling the script orchestrating the build of our rpm packages.

Putting together the build script

Our build script essentially sets up a clean environment, builds package after package installing build prerequisites if needed. We use small utility functions (functions.sh) for building a package, installing packages from repository, installing freshly built packages and removing installed RPM. The script contains roughly the following phases:

  1. Figure out some quirks about the environment, e.g. openSUSE release number or architecture to build.
  2. Clean the environment by removing previously installed self-built packages.
  3. Setting up the build environment, e.g. linking folder from /usr/src/packages to our working copy or installing compilers, headers and the like.
  4. Building the packages and installing them locally if they are a dependency of packages yet to be built.

Here is a shortened example of our build script:

#!/bin/bash

RPM_BUILD_ROOT=/usr/src/packages
if [ "i686" = `uname -m` ]
then
  ARCH=i586
else
  ARCH=`uname -m`
fi
SUSE_RELEASE=`cat /etc/SuSE-release | sed '/^[openSUSE|CODENAME]/d' | sed 's/VERSION =//g' | tr -d '[:blank:]' | sed 's/\.//g'`

source functions.sh

# setup build environment
ensureDirectoryLinks
# force a repository refresh without checking the signature
sudo zypper -n --no-gpg-checks refresh -f OUR_REPO
# remove previously built and installed packages
removeRPM libomniORB4.1
removeRPM omniNotify2
# install needed tools
installFromRepo c++-compiler
if [ $SUSE_RELEASE -lt 121 ]
then
  installFromRepo java-1_6_0-sun-devel
else
  installFromRepo jdk
fi
installFromRepo log4j
buildRPM omniORB
installRPM $ARCH/libomniORB4.1
installRPM $ARCH/omniORB-devel
installRPM $ARCH/omniORB-servers
buildAndInstallRPM omniNotify2 $ARCH

Deploying our packages via Jenkins

We setup a second Jenkins job to deploy successfully built RPM packages to our internal repository. We use the Copy Artifacts plugin to fetch the rpms from our build job and put them into a directory like all_rpms. Then we add a build step to execute a script like this:

for i in suse-12.1 suse-11.4 suse-11.3
do
  rm -rf $i
  mkdir -p $i
  versionlabel=`echo $i | sed 's/[-\.]//g'`
  cp -r "all_rpms/Architecture=32bit,OpenSuseRelease=$versionlabel/RPMS" $i
  cp -r "all_rpms/Architecture=64bit,OpenSuseRelease=$versionlabel/RPMS" $i
  cp -r "all_rpms/Architecture=64bit,OpenSuseRelease=$versionlabel/SRPMS" $i
  rsync -e "ssh" -avz $i/* root@rpmrepository.intranet:/srv/www/htdocs/OUR_REPO/$i/
  ssh root@rpmrepository.intranet "createrepo /srv/www/htdocs/OUR_REPO/$i/RPMS"

Summary

With a setup like this we can perform an automatic build of all our RPM packages on several targetplatform everytime we update one of the packages. After a successful build we can deploy our new packages to our RPM repository making them available for our whole organisation. There is an initial amount of work to be done but the rewards are easy, unattended package updates with deployment just one button click away.

Packaging RPMs for a variety of target platforms, part 2

In part 1 of our series covering the RPM package management system we learned the basics and built a template SPEC file for packaging software. Now I want to give you some deeper advice on building packages for different openSUSE releases, architectures and build systems. This includes hints for projects using cmake, qmake, python, automake/autoconf, both platform dependent and independent.

Use existing makros and definitions

RPM provides a rich set of macros for generic access to directory paths and programs providing better portability over different operating system releases. Some popular examples are /usr/lib vs. /usr/lib64 and python2.6 vs. python2.7. Here is an exerpt of macros we use frequently:

  • %_lib and %_libdir for selection of the right directory for architecture dependent files; usually [/usr/]lib or [/usr/]lib64.
  • %py_sitedir for the destination of python libraries and %py_requires for build and runtime dependencies of python projects.
  • %setup, %patch[#], %configure, %{__python} etc. for preparation of the build and execution of helper programs.
  • %{buildroot} for the destination directory of the build artifacts during the build

Use conditionals to enable building on different distros and releases

Sometimes you have to use %if conditional clauses to change the behaviour depending on

  • operating system version
    %if %suse_version < 1210
      Requires: libmysqlclient16
    %else
      Requires: libmysqlclient18
    %endif
    
  • operating system vendor
    %if "%{_vendor}" == "suse"
    BuildRequires: klogd rsyslog
    %endif
    

because package names differ or different dependencies are needed.

Try to be as lenient as possible in your requirement specifications enabling the build on more different target platforms, e.g. use BuildRequires: c++_compiler instead of BuildRequires: g++-4.5. Depend on virtual packages if possible and specify the versions with < or > instead of = whenever reasonable.

Always use a version number when specifying a virtual package

RPM does a good job in checking dependencies of both, the requirements you specify and the implicit dependencies your package is linked against. But if you specify a virtual package be sure to also provide a version number if you want version checking for the virtual package. Leaving it out will never let you force a newer version of the virtual package if one of your packages requires it.

Build tool specific advices

  • qmake: We needed to specify the INSTALL_ROOT issuing make, e.g.:
    qmake
    make INSTALL_ROOT=%{buildroot}/usr
    
  • autotools: If the project has a sane build system nothing is easier to package with RPM:
    %build
    %configure
    make
    
    %install
    %makeinstall
    
  • cmake: You may need to specify some directory paths with -D. Most of the time we used something like:
    %build
    cmake -DCMAKE_INSTALL_PREFIX=%{_prefix} -Dlib_dir=%_lib -G "Unix Makefiles" .
    make
    

Working with patches

When packaging projects you do not fully control, it may be neccessary to patch the project source to be able to build the package for your target systems. We always keep the original source archive around and use diff to generate the patches. The typical workflow to generate a patch is the following:

  1. extract source archive to source-x.y.z
  2. copy extracted source archive to a second directory: cp -r source-x.y.z source-x.y.z-patched
  3. make changes in source-x.y.z-patched
  4. generate patch with: cd source-x.y.z; diff -Naur . ../source-x.y.z-patched > ../my_patch.patch

It is often a good idea to keep separate patches for different changes to the project source. We usually generate separate patches if we need to change the build system, some architecture or compiler specific patches to the source, control-scripts and so on.

Applying the patch is specified in the patch metadata fields and the prep-section of the SPEC file:

Patch0: my_patch.patch
Patch1: %{name}-%{version}-build.patch

...

%prep
%setup -q # unpack as usual
%patch0 -p0
%patch1 -p0

Conclusion
RPM packaging provides many useful tools and abstractions to build and package projects for a wide variety of RPM-based operation systems and releases. Knowing the macros and conditional clauses helps in keeping your packages portable.

In the next and last part of this series we will automate building the packages for different target platforms and deploying them to a repository server.

Softwaredistribution using own RPM-packages and repositories, part 1

Distributing and deploying your software in an Linux environment should be done through the packaging system of the distribution(s) in use. That way your users can use a uniform way of installing, updating and removing all the software on their machine. But where and how do you start?

Some of our clients use the RPM-based openSUSE distribution, so I want to cover our approach to packaging and providing RPMs.

A RPM-package is built from

  • an archive containing the buildable, vanilla sources
  • a SPEC-file describing the packaged software, the steps required to build the software and a changelog
  • optional patches needed to build and package the software for the target platform

The heart of the build process is the SPEC-file which is used by rpmbuild to actually build and package the software. In addition to the meta data and dependencies it structures the process into several steps:

  1. preparing the source by unpacking and patching
  2. building the project, e.g using configure and make
  3. installing the software into a defined directory
  4. packaging the installed files into the RPM
  5. cleanup after packaging

After creation of the SPEC-file (see my template.spec) the package can be built with the rpmbuild-tool. If everything goes right you will have your binary RPM-package after issuing the rpmbuild -bb SPECS/my-specfile.spec command. This rpm-package can already be used for distribution and installation on systems with the same distribution release as the build system. Extra care may be needed to make the package (or even the SPEC-file) work on different releases or distributions.

You will need a RPM-repository to distribute the packages so that standard system tools like yast2 or zypper can use and manage them, including updates and dependency resolution. There are three types of RPM-repositories:

  1. plain cache sources
  2. repomd/rpm md/YUM sources
  3. YaST sources

As option 2 “YUM sources” gives you the most bang for the buck we will briefly explain how to set up such a repository. Effectively, it only consists of the same specific directory structure like /usr/src/packages/RPMS on a webserver (like apache) and an index file. To create and update the repository, we simply perform the following steps:

  1. create the repository root directory on the webserver, e.g. mkdir -p /srv/www/htdocs/our_repo/RPMS
  2. copy our RPMS folder to the webserver using rsync or scp: scp -r /usr/src/packages/RPMS/* root@webserver:/srv/www/htdocs/our_repo/RPMS/
  3. create the repository index file using the createrepo-tool: ssh root@webserver "createrepo /srv/www/htdocs/our_repo/RPMS"

Now you can add the repository to your system using the URL http://webserver/our_repo/RPMS and use the familiar tools for installing and managing the software on your system.

In the next part I want to give additional advice and cover some pitfalls I encountered setting the whole thing up and packaging different software packages using different build systems.

In part 3 we will set up a jenkins build farm for building packages for different openSUSE releases on build slaves.

Different view on Apache Maven

Many people see Apache Maven as a build and dependency management tool. I see its strengths in other areas. Recently we had an in-house discussion about maven and I want to present my views here:

Pros

  • Maven standardizes your project layout and thus lowers the entry barrier for other developers.
  • Maven provides a IDE/tool agnostic way of describing a project and infrastructure to work with it. You get things like build and launch targets for free, depending on the archetype.
  • Archetypes (templates) for new projects make getting up to speed faster and easier.
  • Integration in many tools like continuous integration servers or IDEs is very good, so not much configuration work has to be done to get your project under test and supervision of analysis tools.
  • Ready-to-use plugins for many tasks.
  • Usable software distribution model helping in distibuted environments.

Cons

  • Big, ugly xml-specification (maven2, still need to check out the groovy and scala DSLs for poms) of the project.
  • Lacking documentation in some areas, e.g. certain plugins and best practices.
  • Once in a while “downloading the internet”-effect and auto-magic you need cope with.
  • Does not really solve dependency problems the way many people expect it.

So while you certainly can implement all wanted features of maven with other build and scripting systems and setup nice self-contained projects using maven can help you depending on your scenario. You have to know the strengths and weaknesses of your tools and try to decide accordingly. My experience is that you can get a basic project up and running in a healthy state very fast with maven. As the project grows the complexity will too and may outweigh the initial benefits. All tools require that you understand and use them well or they will stand in your way more and more. Especially using maven makes only sense if you adopt its style and conventions. If you strongly disagree there you will be happier with some solution like ant, cmake, gradle, ivy, make, sbt or the like providing more freedom by leaving more descisions up to you.

We are using different build and project description tools depending on the environment, involved technologies and project size and scope. Often this decision will not or cannot be changed so try to make a sensible decision considering all available information at hand.

Upgrading your app to Grails 2.0.0? Better wait for 2.0.1

Grails 2.0.0 is a major step forward for this popular and productive, JVM-based web framework. It has many great new features that make you want to migrate existing projects to this new version.

So I branched our project and started the migration process. Everything went smoothly and I had only to fix some minor compilation problems to get our application running again. Soon the first runtime errors occured and approximately 30 out of over 70 acceptance tests failed. Some analysis showed three major issue categories causing the failures:

  1. Saving domain objects with belongsTo() associations may fail with a NULL not allowed for column "AUTHOR_ID"; SQL statement: insert into book (id, version, author_id, name) values (null, ?, ?, ?) [90006-147] message due to grails issue GRAILS-8337. Setting the other direction of the association manually can act as a workaround:
    book.author.book = book
  2. When using the MarkupBuilder with the img tag in your TabLibs, your images may disappear. This is due to a new img closure defined in ApplicationTagLib. The correct fix is using
    delegate.img

    in your MarkupBuilder closures. See GRAILS-8660 for more information.

  3. Handling of null and the Groovy NullObject seems to be broken in some places. So we got org.codehaus.groovy.runtime.typehandling.GroovyCastException: Cannot cast object 'null' with class 'org.codehaus.groovy.runtime.NullObject' to class 'Note' using groovy collections’ find() and casting the result with as:
     Note myNote = notes?.find {it.title == aTitle} as Note

    Removing type information and the cast may act as a workaround. Unfortunately, we are not able to reproduce this issue in plain groovy and did not have time to extract a small grails example exhibiting the problem.

These bugs and some other changes may make you reconsider the migration of some bigger project at this point in time. Some of them are resolved already so 2.0.1 may be the release to wait for if you are planning a migration. We will keep an open eye on the next releases and try to switch to 2.0.x when our biggest show stoppers are resolved.

Even though I would advise against migrating bigger existing applications to Grails 2.0.0 I would start new projects on this – otherwise great – new platform release.

Deployment with the Play! framework

Play! is a great framework for java-base development of modern web applications. Unfortunately, the documentation about deployment options is not really that extensive in certain details. I want to describe a way to automatically build a self-contained zip archive without the source code. The documentation does state that using the standalone web server is preferred so we will use that option.

Our goal is:

  • an artifact with the executable application
  • no sources in the artifact
  • startup script for different platform and environments
  • CI integration with execution of the tests

Fortunately, the play framework makes most of this quite easy if you know some small tricks.

The first very important step towards our goal is embedding the whole Play! framework somewhere in your project directory. I like to put it into lib/play-x.y.z (x.y.z being the framework version). That way you can do perform all neccessary calls to play scripts using relative paths and provide a self-contained artifact which developers or clients may download and execute on their machine. You can also be sure everyone is using the correct (read “same”) framework version.

The next important thing is to write some small start-scripts so you can demo the software easily on any machine with Java installed. Your clients may try it out theirselves if the project policy is open enough. Here are small examples for linux

#!/bin/sh
python lib/play-1.2.3/play run --%demo -Dprecompiled=true

and windows

REM start our app in the "demo" environment
lib\play-1.2.3\play run --%%demo -Dprecompiled=true

The last ingredient to a great deployment and demoing experience is the build script which builds, tests and packages the software together. We do not want to include the sources in the artifact, so there is a bit of work to do. We perform following steps in the script:

  1. delete old artifacts to ensure a clean build
  2. call play to precompile our application
  3. call play to execute all our automatic tests
  4. copy all needed files into our distribution directory ready to be packed together
  5. pack the artifacts into a zip archive

Our sample build script is for the linux shell but you can easily translate it to the scripting environment of your choice, be it apache ant, gradle, windows batch depending on your needs and preference:

#!/bin/sh

rm -r dist
rm -r test-result
rm -r precompiled
python lib/play-1.2.3/play precompile
python lib/play-1.2.3/play auto-test
TARGET=dist/my_project
mkdir -p $TARGET/app
cp -r app/views $TARGET/app
cp -r conf lib modules precompiled public $TARGET
cp programs/my_project* $TARGET
cd dist && zip -r my_project.zip my_project

Now we can hook the project into a continuous integration server like Jenkins and let it archive the build artifact containing an executable installation of our web application. You could grant your client direct access to the artifact, use it for demos and further deployment steps like triggered upload to a staging server or the like.

Inconsistent usage of type definitions kills portability in C/C++

C/C++ are nice low level, high-performance languages if you need to be “close to the metal” due to performance or memory constraints. Nevertheless, C/C++ are portable languages because they provide datatypes to abstract from the underlying hardware and compilers for virtually every hardware platform. It is very easy to kill portability because the specification allows certain platform-dependent sizes for the built-in datatypes. An int can be 16 bits or 32 bits, a long 32 bits or 64 bit and so on. Many programmers mitigate the issue by defining own datatypes like WORD or uint32. If you are using some libraries it is very likely that several such type definitions are available and often times interchangeable.

It is absolutely crucial to be consistent when using the type definitions and usually a good advice not to use the built-in types like int or long because they will change in size on different platforms.

In one of our projects we are working on Tango device servers written in C++ and use the YAT (Yet Another Toolbox) library. There are at least 3 possible ways in this small project to define a (most of the time) unsigned 32 bit word:

  • yat::uint32
  • unsigned long
  • tango::DevUlong

To make matters a bit more interesting the tango::DevUlong is defined by the CORBA C++ mapping. Code using all of these definitions may work on a certain platform so you will not notice the problem right away, but we had several compilation problems and even program crashes when compiling or running on Linux/x86, Linux/AMD64, Windows 7 32bit and Windows 7 64bit. Using types that guarantee their size on all platforms and consistent usage of them will make your code compile and run on many platforms flawlessly.