Tell different stories within the same universe

You might know this from fantasy book series: the author creates a unique world, a whole universe of their own and sets a story or series of books within it. Then, a few years later, a new series is released. It is set in the same universe, but at a different time, with different characters, and tells a completely new story. Still, it builds on the foundation of that original world. The author does not reinvent everything from scratch. They use the same map, the same creatures, the same customs and rules established in the earlier books.

Examples of this are the Harry Potter series and Fantastic Beasts, or The Lord of the Rings and The Hobbit.

But what does this have to do with software development?
In one of my projects, I faced a very similar use case. I had to implement several services, each covering a different use case, but all sharing the same set of peripherals, adapters, and domain types.

So I needed an architecture that did not just allow for interchangeable periphery, as is usually the focus, but also supported interchangeable use cases. In other words, I needed a setup that allowed for multiple “books” to be written within the same “universe.”

Architecture

Let’s start with a simple example: user management.
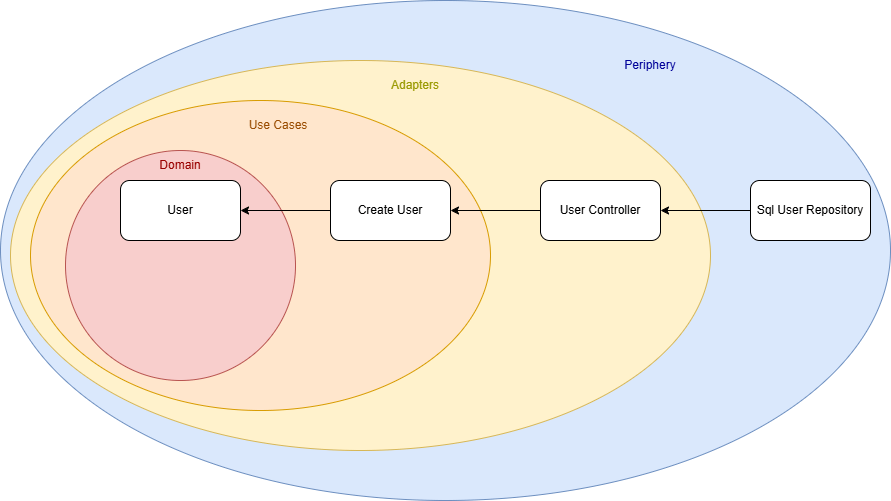
I originally implemented it following Clean Architecture principles, where the structure resembles an onion, dependencies flow inward, from the outer layers to the core domain logic. This makes the outer layers (the “peel”) easily replaceable or extendable.

Our initial use case is a service that creates a user. The use case defines an interface that the user controller implements, meaning the dependency flows from the outer layer (the controller) toward the core. So far, so good.

However, I wanted to evolve the architecture to support multiple use cases. For that, the direct dependency from the UserController to the CreateUser use case had to be removed.

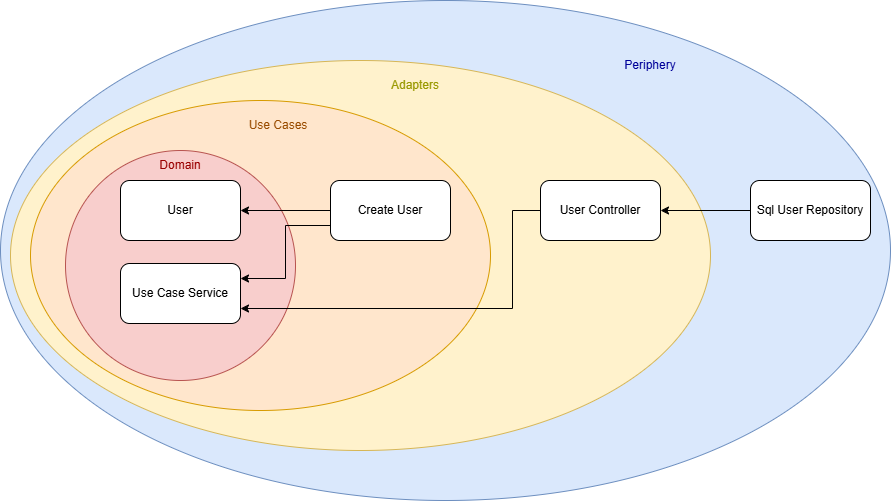
My solution was to introduce a new domain module, a shared foundation that contains all interfaces, data types, and common logic used by both use cases and adapters. I called this module the UseCaseService.

The result is a new architecture diagram:

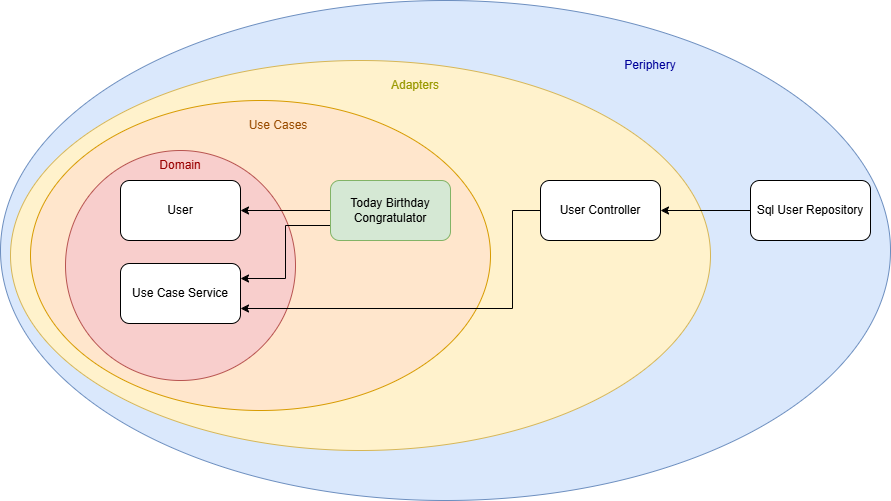
There is no longer a direct connection between a specific use case and an adapter. Instead, both depend on the shared UseCaseService module. With this setup, I can easily create new use cases that reuse the existing ecosystem without duplicating code or logic.

For example, I could implement another service that retrieves all users whose birthday is today and sends them birthday greetings. (Whether this is GDPR-compliant is another discussion!) But thanks to this architecture, I now have the freedom to implement that use case cleanly and efficiently.

Conclusion

Architecture is a highly individual matter. There is no one-size-fits-all solution that solves every problem or suits every project. Models like Clean Architecture can be helpful guides, but ultimately, you need to define your own architectural requirements and find a solution that meets them. This was a short story of how one such solution came to life based on my own needs.

It is also a small reminder to keep the freedom to think outside the box. Do not be afraid to design an architecture that truly fits you and your project, even if it deviates from the standard models.

Forking an Open Source Repository in Good Faith

One might love Open Source for different reasons: Maybe as a philosophical concept of transcendental sharing and human progress, maybe for reasons of transparency and security, maybe for the sole reason of getting stuff for free…

But, as a developer, Open Source is additionally appealing for the sake of actively participating, learning and sharing on a directly personal level.

Now I would guess that most repository forks are probably done for rather practical reasons (“I wanna have that!”), the forks get some minor patches one happens to need right now – or for some super-specific use case – and then hang around for some time until that use case vanishes or the changes are so vast that there will never be a merge (a situation commonly known as “der Zug ist abgefahren”), one might sometimes try to supply one’s work for the good of more than oneself. That is what I hereby declare a “Fork in Good Faith.”

A fork can happen in good faith if some conditions are true, like:

  • I am sure that someone else can benefit from my work
  • My technical skills match the technical level of the repository in question
  • Said upstream repository is even open for contributions (i.e. not understaffed)
  • My broader vision does not diverge from the original maintainers’ vision

Maybe there are more of these, but the most essential point is a mindset:

  • I declare to myself that I want to stay compatible with the upstream as long as is possible from both sides.

To fork with Good Faith is, then, a great idea because it helps to advance much more causes at once than just the stuff for free, i.e. on a developmental level:

  1. You learn from the existing code, i.e. the language, coding style, design patterns, specific solutions, algorithms, hidden gems, …
  2. You learn from the existing repository, i.e. how commits and branches are organized, how commit messages are used productively, how to manage patches or changes in general, …
  3. In reverse, the original maintainers might learn from you, or at least future contributors might
  4. You might get more people to actually see / try / use your awesome feature, thus getting more feedback or bug reports than brewing your own soup
  5. You might consider it as a workout of professional confidence, to advocate your use cases or implementation decisions against other developers, training to focus on rational principles and unlearning the reflexes of your ego.
  6. This can also serve as a workout in mental fluidity, by changing between different coding styles or conventions – if you are e.g. used of your super-perfect-one-and-only way of doing things, it might just positively blow your mind to see that other conventions can work too, if done properly.
  7. Having someone to actually review your changes in a public pull request (merge request) gives you feedback also on an organisational level, as in “was all of this part actually important for your feature?”, “can you put that into a future pull request?” or “why did you rewrite all comments for some Paleo-Siberian language??”

Not to forget, you might grow your personal or professional network to some degree, or at least get the occasional thank you from anyone (well…).

But the basic point of this post is this:

Maintaining a Fork in Good Faith is active, continuous work.

And there is no shame in abandoning that claim, but if you do once, there might be no easy return.

Just think about the pure sadness of features that are sometimes replicated over-and-over again, or get lost over the time;

And just think about how confusing or annoying that already could have been for yourself, e.g. with some multiply-forked npm package or maybe full-fledged end-user projects (… how many forks of e.g. WLED do even exist?).

This is just some reflection of how careful such a decision should be done. Of course, I am writing this because I recently became aware of that point of bifurcation, i.e. not the point where a repository is forked, but the one where all of the advantages mentioned above are weighed against real downsides.

And these might be legitimate, and numerous, too. Just to name a few,

  1. Maybe the existing conventions are just not “done properly”, and following them for the sake of uniformity makes you unproductive over time?
  2. Maybe the original maintainers are just understaffed, non-responsive or do not adhere to a style of communication that works with you?
  3. Maybe most discussions are really just debates of varying opinion (publicly, over the internet – that usually works!) and not vehicles of transcending the personal boundaries of human knowledge after all?
  4. Maybe you are stuck with sub-par legacy code, unable to boy-scout away some technical debt because “that is not the point right now”, or maybe every other day some upstream commit flushes in more freshly baked legacy code?
  5. Maybe no one understands your use case and contrary to the idea mentioned above – in order to get appropriate feedback about your features, and to prove its worth, you need to distribute this independently?
  6. Maybe at one point the maintainers of an upstream repository change, and from now on you have to name your variables in some Paleo-Siberian language?

I guess you get the point by now. There is much energy to be saved by never considering upstream compatibility in the first place, but there is also much potential to be wasted. I have no clear answer – yet – how to draw the line, but maybe you have some insight on that topic, too.

Are there any examples of forks that live on their own, still with the occasional cherry-pick, rebase, merge? Not one comes to my mind.

Nginx upload limit

Today, I encountered a surprising issue with my Docker-based web application. The application has an upload limit set, but before reaching it, an unexpected error appeared:

413 Request Entity Too Large

Despite the application’s upload limit being correctly configured, the error occurred much earlier—when the file was barely over 1MB. Where does this limitation come from, and how can it be changed?


Troubleshooting

The issue occurred before the request even reached the application layer, during a critical step in request processing. The root cause was Nginx, the web server and reverse proxy used in the Docker stack.

Nginx, commonly used in modern application stacks for load balancing, caching, and HTTPS handling, acts as the gateway to the application, managing all incoming requests. However, Nginx was rejecting uploads larger than 1MB. This was due to the client_max_body_size directive, which—when unset—defaults to a relatively low limit in some configurations. As a result, Nginx blocked larger file uploads before they could reach the application.

Solution

To resolve this issue, the client_max_body_size directive in the Nginx configuration needed to be updated to allow larger file uploads.

Modify the nginx.conf file or the relevant server block configuration:

server {
    listen 80;
    server_name example.com;
    client_max_body_size 100M;  # Allow uploads up to 100MB
}

After making this change, restart Nginx to apply the new configuration:

nginx -s reload

If Nginx is running in a Docker container, you can restart the container instead:

docker restart <container_name>

With this update, the upload limit increased to 100MB, allowing the application to handle larger files without premature rejection. Once the configuration was applied, the error disappeared, and file uploads worked as expected, provided they remained within the newly defined limits.

Integrating API Key Authorization in Micronaut’s OpenAPI Documentation

In a Java Micronaut application, endpoints are often secured using @Secured(SecurityRule.IS_AUTHENTICATED), along with an authentication provider. In this case, authentication takes place using API keys, and the authentication provider validates them. If you also provide Swagger documentation for users to test API functionalities quickly, you need a way for users to specify an API key in Swagger that is automatically included in the request headers.

For a general guide on setting up a Micronaut application with OpenAPI Swagger and Swagger UI, refer to this article.

The following article focuses on how to integrate API key authentication into Swagger so that users can authenticate and test secured endpoints directly within the Swagger UI.

Accessing Swagger Without Authentication

To ensure that Swagger is always accessible without authentication, update the application.yml file with the following settings:

micronaut:  
  security:
    intercept-url-map:
      - pattern: /swagger/**
        access:
          - isAnonymous()
      - pattern: /swagger-ui/**
        access:
          - isAnonymous()
    enabled: true

These settings ensure that Swagger remains accessible without requiring authentication while keeping API security enabled.

Defining the Security Schema

Micronaut supports various Swagger annotations to configure OpenAPI security. To enable API key authentication, use the @SecurityScheme annotation:

import io.swagger.v3.oas.annotations.security.SecurityScheme;
import io.swagger.v3.oas.annotations.enums.SecuritySchemeIn;
import io.swagger.v3.oas.annotations.enums.SecuritySchemeType;

@SecurityScheme(
    name = "MyApiKey",
    type = SecuritySchemeType.APIKEY,
    in = SecuritySchemeIn.HEADER,
    paramName = "Authorization",
    description = "API Key authentication"
)

This defines an API key security scheme with the following properties:

  • Name: MyApiKey
  • Type: APIKEY
  • Location: Header (Authorization field)
  • Description: Explains how the API key authentication works

Applying the Security Scheme to OpenAPI

Next, we configure Swagger to use this authentication scheme by adding it to @OpenAPIDefinition:

import io.swagger.v3.oas.annotations.info.*;
import io.swagger.v3.oas.annotations.security.SecurityRequirement;

@OpenAPIDefinition(
    info = @Info(
        title = "API",
        version = "1.0.0",
        description = "This is a well-documented API"
    ),
    security = @SecurityRequirement(name = "MyApiKey")
)

This ensures that the Swagger UI recognizes and applies the defined authentication method.

Conclusion

With these settings, your Swagger UI will display an Authorization field in the top-left corner.

Users can enter an API key, which will be automatically included in all API requests as a header.

This is just one way to implement authentication. The @SecurityScheme annotation also supports more advanced authentication flows like OAuth2, allowing seamless token-based authentication through a token provider.

By setting up API key authentication correctly, you enhance both the security and usability of your API documentation.

String Representation and Comparisons

Strings are a fundamental data type in programming, and their internal representation has a significant impact on performance, memory usage, and the behavior of comparisons. This article delves into the representation of strings in different programming languages and explains the mechanics of string comparison.

String Representation

In programming languages, such as Java and Python, strings are immutable. To optimize performance in string handling, techniques like string pools are used. Let’s explore this concept further.

String Pool

A string pool is a memory management technique that reduces redundancy and saves memory by reusing immutable string instances. Java is a well-known language that employs a string pool for string literals.

In Java, string literals are automatically “interned” and stored in a string pool managed by the JVM. When a string literal is created, the JVM checks the pool for an existing equivalent string:

  • If found, the existing reference is reused.
  • If not, a new string is added to the pool.

This ensures that identical string literals share the same memory location, reducing memory usage and enhancing performance.

Python also supports the concept of string interning, but unlike Java, it does not intern every string literal. Python supports string interning for certain strings, such as identifiers, small immutable strings, or strings composed of ASCII letters and numbers.

String Comparisons

Let’s take a closer look at how string comparisons work in Java and other languages.

Comparisons in Java

In this example, we compare three strings with the content “hello”. While the first comparison return true, the second does not. What’s happening here?

String s1 = "hello";
String s2 = "hello";
String s3 = new String("hello");

System.out.println(s1 == s2); // true
System.out.println(s1 == s3); // false

In Java, the == operator compares references, not content.

First Comparison (s1 == s2): Both s1 and s2 reference the same object in the string pool, so the comparison returns true.

Second Comparison (s1 == s3): s3 is created using new String(), which allocates a new object in heap memory. By default, this object is not added to the string pool, so the object reference is unequal and the comparison returns false.

You can explicitly add a string to the pool using the intern() method:

String s1 = "hello";
String s2 = new String("hello").intern();

System.out.println(s1 == s2); // true

To compare the content of strings in Java, use the equals() method:

String s1 = "hello";
String s2 = "hello";
String s3 = new String("hello");

System.out.println(s1.equals(s2)); // true
System.out.println(s1.equals(s3)); // true
Comparisons in Other Languages

Some languages, such as Python and JavaScript, use == to compare content, but this behavior may differ in other languages. Developers should always verify how string comparison operates in their specific programming language.

s1 = "hello"
s2 = "hello"
s3 = "".join(["h", "e", "l", "l", "o"])

print(s1 == s2)  # True
print(s1 == s3)  # True

print(s1 is s2)  # True
print(s1 is s3)  # False

In Python, the is operator is used to compare object references. In the example, s1 is s3 returns False because the join() method creates a new string object.

Conclusion

Different approaches to string representation reflect trade-offs between simplicity, performance, and memory efficiency. Each programming language implements string comparison differently, requiring developers to understand the specific behavior before relying on it. For example, some languages differentiate between reference and content comparison, while others abstract these details for simplicity. Languages like Rust, which lack a default string pool, emphasize explicit memory management through ownership and borrowing mechanisms. Languages with string pools (e.g., Java) prioritize runtime optimizations. Being aware of these nuances is essential for writing efficient, bug-free code and making informed design choices.

Why Java’s built-in hash functions are unsuitable for password hashing

Passwords are one of the most sensitive pieces of information handled by applications. Hashing them before storage ensures they remain protected, even if the database is compromised. However, not all hashing algorithms are designed for password security. Java’s built-in hashing mechanisms used e.g. by HashMap, are optimized for performance—not security.

In this post, we will explore the differences between general-purpose and cryptographic hash functions and explain why the latter should always be used for passwords.

Java’s built-in hashing algorithms

Java provides a hashCode() method for most objects, including strings, which is commonly used in data structures like HashMap and HashSet. For instance, the hashCode() implementation for String uses a simple algorithm:

public int hashCode() {
    int h = 0;
    for (int i = 0; i < value.length; i++) {
        h = 31 * h + value[i];
    }
    return h;
}

This method calculates a 32-bit integer hash by combining each character in the string with the multiplier 31. The goal is to produce hash values for efficient lookups.

This simplicity makes hashCode() extremely efficient for its primary use case—managing hash-based collections. Its deterministic nature ensures that identical inputs always produce the same hash, which is essential for consistent object comparisons. Additionally, it provides decent distribution across hash table buckets, minimizing performance bottlenecks caused by collisions.

However, the same features that make the functions ideal for collections are also its greatest weaknesses when applied to password security. Because it’s fast, an attacker could quickly compute the hash for any potential password and compare it to a leaked hash. Furthermore, it’s 32-bit output space is too small for secure applications and lead to frequent collisions. For example:

System.out.println("Aa".hashCode()); // 2112
System.out.println("BB".hashCode()); // 2112

The lack of randomness (such as salting) and security-focused features make hashCode() entirely unsuitable for protecting passwords. You can manually add a random value before passing the string into the hash algorithm, but the small output space and high speed still make it possible to generate a lookup table quickly. It was never designed to handle adversarial scenarios like brute-force attacks, where attackers attempt billions of guesses per second.

Cryptographic hash algorithms

Cryptographic hash functions serve a completely different purpose. They are designed to provide security in the face of adversarial attacks, ensuring that data integrity and confidentiality are maintained. Examples include general-purpose cryptographic hashes like SHA-256 and password-specific algorithms like bcrypt, PBKDF2, and Argon2.

They produce fixed-length outputs (e.g., 256 bits for SHA-256) and are engineered to be computationally infeasible to reverse. This makes them ideal for securing passwords and other sensitive data. In addition, some cryptographic password-hashing libraries, such as bcrypt, incorporate salting automatically—a technique where a random value is added to the password before hashing. This ensures that even identical passwords produce different hash values, thwarting attacks that rely on precomputed hashes (rainbow tables).

Another critical feature is key stretching, where the hashing process is deliberately slowed down by performing many iterations. For example, bcrypt and PBKDF2 allow developers to configure the number of iterations, making brute-force attacks significantly more expensive in terms of time and computational resources.

Conclusion

Java’s built-in hash functions, such as hashCode(), are designed for speed, efficiency, and consistent behavior in hash-based collections. They are fast, deterministic, and effective at spreading values evenly across buckets.

On the other hand, cryptographic hash algorithms are purpose-built for security. They prioritize irreversibility, randomness, and computational cost, all of which are essential for protecting passwords against modern attack vectors.

Java’s hashCode() is an excellent tool for managing hash-based collections, but it was never intended for the high-stakes realm of password security.

A few more heuristics for rejecting Merges

Since a few weeks ago, I am trying to find a few easy things to look for when facing a Merge Request (also called “Pull Request”) that is too large to be quickly accepted.

When facing a larger Merge Request, how can one rather quickly decide whether it is worth going through all changes in one session, or to decide that this is too dangerous and reject.

These thoughts apply for a medium-sized repository – I am of the opinion that if you happen to work in a large project, or contribute to a public open-source repository, one should never even aim for larger merge requests, i.e. they should be rejected if there is more than one reason any code changed in that MR.

Being too strict just for the sake of it, in my eyes, can be a costly mistake – You waste your time in unnecessary structure and, in earlier / more experimental development stages, you might not want to take the drive out of a project. Nevertheless, maintainers need to know what’s going on.

Last time, I kept two main thoughts open, and I want to discuss these here, especially since they now had time to flourish a while in the tasty marinade that is my brain.

Can you describe the changes in one sentence?

I want my code to change for a multitude of reasons, but I want to know which kind of “glasses” I read these changes with. For me, it is a lesser problem to go through many changes if I can assign them to the same “why”. I.e. introducting i18n might change many lines of codes, but as these happen for the same reason, they can be understood easily.

But if, for some reason, people decide to change the formatting (replace tabs with spaces or such shenanigans), you better make sure that this the only reason any line changes. If there is any other thing someone did “as it just appeared easy” -reject the whole MR. That is no place for the “boy scout rule”, it is just too dangerous.

For me, it is too little to always apply the same type of glasses to any Merge Request there is. One could say “I only look for technical correctness”. But usually I can very well allow myself some flexibility there. I need to know, however, that all changes happened for only a few given reasons, because only then I can be sure that the developer did not actually loose track of his goal somewhere on the way.

Does this Merge increase the trust in a collaboration?

From a bird-eye point of view, people working together should always pay attention whether a given trajectory goes in the direction of increasing trust. Of course, if you fix a broken menu button in a user interface of a large project, the MR should just do that – but if you are in a smaller project with the intention of staying there, I suggest that every MR expresses exactly that: “I understand what is important at the current stage of this collaboration and do exactly that”.

Especially when working together for a longer time, it can be easy to let the branching discipline slip a little – things might have gone well for a longer time. But this is a fragile state, because if you then care too little about the boundaries of a specific MR, this can damage the trust all too easily.

In a customer project, this trust goes out to the customer. This might be the difference between “if something breaks they’ll write you a mail, you fix it, they are happy” and “they insist on a certain test coverage”.

Conclusion

So basically, reviewing the code of others boils down to writing own code, or improving User Experience, or managing anything – think not in a list of small-scale checklists, think in terms of “Cognitive Load”. A good programmer should have a large set of possible glasses (mindsets) through which they see code, especially foreign code. One should always be honest whether a given change is compatible with only a very small number of reasons. If there is a Merge Request that allows itself to do too much, this is not the Boy Scout Rule – it is a recipe of undermining mutual trust. Do not overestimate your own brain capacity. Reject the thing, and reserve that capacity for something useful.

A few heuristics for rejecting Merges

The title of this post is somewhat of a working title. It is based on the observation, that in larger projects a day might come where you have to outsource some amount of work (an “issue”, if you will) to anyone who is not you, and maybe not even someone you already know well. Or at least now, how well they fit your image of good code.

That concept is probably not new* for you, and neither is the idea that sooner or later, the foreign code has to be merged, and you are the reviewer. (depending on your version control system, the lingo might differ, but let’s call this whole process a Merge Request for now, like GitLab does).

Now, every issue is different, therefore it is not upon me to give you hard rules what a Merge Request should do. These rules would be as diverse as the issues themselves, and there is no clear answer to “as a reviewer, what should I actually look for?”.

The Best-Case Scenario (forget about it)

The best-case scenario might be:

  • You understand the issue well enough
  • You understand the code base well enough
  • You understand the language well enough
  • The changes are few enough that you can understand them quickly enough.

In that case, you do not need some blog post to help you.

So you could try and pull up some rules for your project in which every Issue leads to Best-Case Merge Requests, but as you will fail anyway, it might be the wiser thing to lower your expectation. I mean, if all issues would match that case, you probably would be faster by writing all the code yourself.

Rather go for the Not-Good-Enough Scenarios

So, what do you do to combine the requirements a) the collaboration should really simplify your life and b) you do not want to compromise your standards too heavily?

This thought process is not finished yet, but at least I would go for some heuristics – if these are violated too heavily, chances are that everyone involved might actually profit from having this Merge Request rejected.

  • Can the issue be grasped within a few minutes?
  • Can the changes be grasped in about half an hour or less?
  • Can the problematic code pieces be described in a few short points?
  • Does this increase the feeling of trust in the collaboration?
Can the issue be grasped within a few minutes?

If it can’t, or you can’t, how come you are the reviewer? This is probably the easiest heuristic to ignore, because real-life problems and real-life programmers might be so imperfect that this is utopian, but still, if it happens, be extra wary.

Can the changes be grasped in about half an hour or less?

The half-an-hour is only a rough figure, of course, but that’s not the point.

If you ever thought “my brain is great”, remember that this was your brain speaking. Your attention span is just not good. If you think otherwise, how come you are the reviewer?

It is easy to think that longer Merge Requests just take a longer time to process. But it doesn’t scale. You will use up your willpower, motivation, attention span quicker than you would like to admit; and if you then go for “well, at least I want to finish the thing now, otherwise I have to do it even again” you will probably let too many mistakes slip.

It is just not responsible. If you want to show willpower, go for increasing your willpower in admitting that some Merge Requests are just too big, and reject them.

One can always backup a branch, create a new one, cherry-pick commits on them, even only commit portions of the same file – this might feel like a punishment at first, but chances are that this process might actually find several problems that were hidden before.

To be continued…

I spoilered my two other heuristics above, but figure that this post is long enough already. Even if you don’t agree with e.g. the time spans given above – the main idea is: Do not let a large Merge Request through just because you believe that you are strong enough to handle it. There’s noone to be impressed.

The impressive part of good work is that it doesn’t look impressive.

I will continue this, and – maybe you have some ideas from your experience? What would you do when a Merge Request is too complex?

The algorithm in an algorithm – Builder design pattern

In the following blog post, I would like to explain to you, the design pattern builder, why this is an algorithm in the algorithm and what advantages result from it.

General

The builder is a creational design pattern. It separates the construction of complex objects from their representations, allowing the same construction processes to be reused.

The design pattern consists of a director, the builder interface, and concrete builder implementations. The director is responsible for the abstract construction of the product and has a defined interface with the builder to pass the design instructions. The concrete builders then build the concrete product according to the instructions and can also provide the generated product.

So in the end, the director defines its own little programming language inside the program where the construction instructions can be programmed as algorithm. The builder then executes that algorithm. So we have a program in the program, an algorithm in the algorithm. Crazy!

Example cake recipe

We know such procedures from real life. For example, from the kitchen. When you bake a cake, you take your yellow mixing bowl, the ingredients, and the blue mixer and make the dough. Very concrete.

But now, if someone asks about the recipe, then we abstract it from our concrete equipment to a general manual. There, it only says you are mixing the ingredients, and your yellow mixing bowl and blue mixer are not mentioned. So someone else can bake the cake in their own kitchen with their own equipment. Should your blue mixer ever fail, you can easily carry out the recipe with a whisk or with the new food processor.

Example file generation

An example from programming is the generation of a file. For example, a pdf certificate. If you program everything directly in PDFBox, it works first. But if you ever want to use a different library, or if you also want the certificate as a normal text document or image, you need to rewrite everything.

With the design pattern, you would have an algorithm that says I want “certificate” as a title, then a dividing line, then a table and then this paragraph. Exactly how this will be implemented is not known. The PDFBox builder takes these instructions and creates the file with its own library-specific commands.

If the library or file type changes, only one new builder needs to be written. For example, a text file builder, an image builder or an OpenPDF builder. The logic of how the certificate should look at the end remains unchanged.

Conclusion

Finally, separating the construction from the production offers some advantages. The program is more expandable and modifiable. It also complies with the single responsibility principle. The disadvantage is a close coupling between the product, the concrete builder, and the classes involved in the construction, making it difficult to change the basic process.

Regular expressions in JavaScript

In one of our applications, users can maintain info button texts themselves. For this purpose, they can insert the desired info button text in a text field when editing. The end user then sees the text as a HTML element.

Now, for better structuring, the customer wants to make lists inside the text field. So there was a need to frame lines beginning with a hyphen with the <li></li> HTML tags.

I used JavaScript to realize this issue. This was my first use of regular expressions in JavaScript, so I had to learn their language-specific specials. In the following article, I explain the general syntax and my solution.

General syntax

For the replacement, you can either specify a string to search for or a regular expression. To indicate that it is a regular expression, the expression is enclosed in slashes.

let searchString = "Test";
let searchRegex = /Test/;

It is also possible to put individual parts of the regular expression in brackets and then use them in the replacement part with $1, $2, etc.

let hello = "Hello Tom";
let simpleBye = hello.replace(/Hello/, "Bye");    
//Bye Tom
let bye = hello.replace(/Hello (.*)/, "Bye $1!"); 
//Bye Tom!

In general, with replace, the first match is replaced. With replaceAll, all occurrences are replaced. But these rules just work for searching strings. With regular expressions, modifiers decide if all matches were searched and replaced. To find and replace all of them, you must add modifiers to the expression.

Modifiers

Modifiers are placed at the end of a regular expression and define how the search is performed. In the following, I present just a few of the modifiers.

The modifier i is used for case-insensitive searching.

let hello = "hello Tom";
let notFound = hello.replaceAll(/Hello/, "Bye");
//hello Tom
let found= hello.replaceAll(/Hello/i, "Bye");
//Bye Tom

To find all occurrences, independent of whether replace or replaceAll is called, the modifier g must be set.

let hello = "Hello Tom, Hello Anna";
let first = hello.replaceAll(/Hello/, "Bye");
//Bye Tom, Hello Anna
let replaceAll = hello.replaceAll(/Hello/g, "Bye");
//Bye Tom, Bye Anna
let replace = hello.replace(/Hello/g, "Bye");
//Bye Tom, Bye Anna

Another modifier can be used for searching in multi-line texts. Normally, the characters ^ and $ are for the start and end of the text. With the modifier m, the characters also match at the start and end of the line.

let hello = `Hello Tom,
hello Anna,
hello Paul`;
let byeAtBegin = hello.replaceAll(/^Hello/gi, "Bye");     
//Bye Tom, 
//hello Anna,
//hello Paul
let byeAtLineBegin = hello.replaceAll(/^Hello/gim, "Bye");     
//Bye Tom, 
//Bye Anna,
//Bye Paul

Solution

With this toolkit, I can now convert the hyphens into HTML <li></li>. I also remove the line breaks at the end because, in real code, they will be replaced with <br/> in the next step, and I do not want empty lines between the list points.

let infoText = `This is an important field. You can input:
- right: At the right side
- left: At the left side`;
let htmlInfo = infoText.replaceAll(/^-(.*)\n/gm, "<li>$1</li>");
//This is an important field. You can input:
//<li>right: At the right side</li><li>left: At the left side</li>

If you are familiar with the syntax and possibilities of JavaScript, it offers good functions, such as taking over parts of the regular expression.