Configuration of TANGO devices

In the previous part of our TANGO tutorial trail we put our TANGO device into production by registering it with a TANGO database. The TANGO tools allowed for basic interaction with our device. Now we want to improve the device with the TANGO way of configuration: properties.

TANGO device configuration

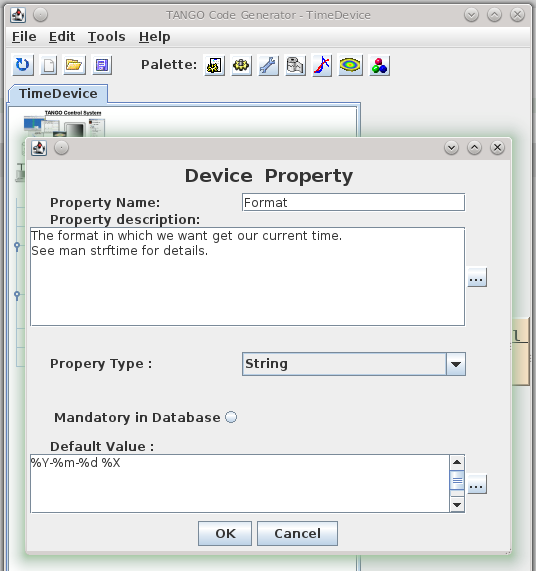
TANGO devices are configured with properties, which are not to confuse with OO-properties or TANGO attributes. TANGO properties are read on initialisation of a device and saved to the TANGO database. That way they live across server restarts. TANGO properties replace simple configuration files or registry-like configuration frameworks. As they are saved in the TANGO database it makes our devices location-agnostic – they can run on any host system on the network. Let us add a format properties to our TimeDevice to change the output to our liking. Again, we use pogo to define the property:

Pogo-Device Property

The property will be generated as a member variable of our TANGO device manage by the framework. We do not need to read it from the database ourselves – the corresponding code is generated by pogo – we just use it (format in line 5):

/*----- PROTECTED REGION ID(TimeDevice::read_CurrentTime) ENABLED START -----*/

  attr_CurrentTime_read = new Tango::DevString;
  TimeProvider timeProvider;
  *attr_CurrentTime_read = Tango::string_dup(timeProvider.now(format).c_str());
  //	Set the attribute value
  attr.set_value(attr_CurrentTime_read, 1, 0, true);

/*----- PROTECTED REGION END -----*/	//	TimeDevice::read_CurrentTime

Managing device state

The state of a TANGO device is extremely important for TANGO clients because they often decide how to interact with a device based on its state. We will cover state and the TANGO state machine in a later post but for now we make our TimeDevice sane by setting the its state to ON after correct initialisation, so that it reflects the operating state of the TimeDevice:

/*----- PROTECTED REGION ID(TimeDevice::init_device) ENABLED START -----*/

  set_state(Tango::ON);
  set_status("Ready to accept time queries.");

/*----- PROTECTED REGION END -----*/    //    TimeDevice::init_device

Here is the result in Jive and AtkPanel:

Configure Device in Jive-AtkPanel

Conclusion
We extended our to device with some real world features like configuration by the means of device properties and rudimentary state management. Real state management is an important topic on its own and deserves a separate blog post. Feel free to play with the full source code.

What developers can learn from designers

Looking beyond the tellerrand into what and how and why other disciplines do something can teach us more about our craft.

Slow down

Technology demands speed. Our industry focuses on speed and efficiency. Even our processes measure speed. (Scrum calls it velocity) But thinking needs time. Planning takes time. Caring needs time. Details need time. Testing needs time. Hearing, researching, observing, listening. All these need time. Designers know this.
We need to slow down. In order to see and design the details without losing the big picture we need to slow down. Great designs come from thinking hard. How do you do that? You concentrate on the essence. What matters most. How do you identify the essence? By thinking hard. And that needs time.

Design is about intention

Take a look at your code: is every line there for a reason? Every line? The order of the methods. The name of the variables. The separation in classes, interfaces, packages. How much of it is accidentally? Good designers choose everything with a reason. The place of this button? No coincidence. This color? This control? This flow of actions? Everything has an intention behind it. The information presented. Even the information not presented. The wording? Is part of the overall character. The menu structure? Grounded in good decisions.
On the other side when I look at my code (especially after some months) it doesn’t look so organized and determined. The order of the methods? Grown. The reason for this interface when there is only one implementation? Maybe I thought there would be more. Using this pattern here? What part of your code tells you its intent? And how much cries: incidental complexity? Think about it: did you choose what to include and what to left out?

Test for change, build to learn

What was the subtitle of the first XP book? Embrace change. This sounds like we are victims. Change is coming and we need to cope with it. But what when change is really coming? Are we prepared? 58 unit tests for the garbage?! The whole architecture and patterns I developed, tested and refactored countless times? Delete them?! In reality we still fear change.
But it does not have to be this way. What do designers do? They test for change. They build wireframes, mockups, prototypes. If some of them didn’t work out they can abandon them. The cost to create them is low. And even when it was not the right design they learned something. They build the prototypes to test their hypotheses. They build them to proof or falsify their assumptions. They build to learn.
The learning effect is more important than the artifact itself.
And when the application is in production? They also test for change. They do A/B tests (again for learning). Designers don’t wait until change comes to them and then they have to embrace it, they test for change.

Listen

Listen. Truly listen. Shut down your preconceptions. How often do we ask too fast, too much? Suggestive questions? Questions with constrained possibilities to answer? I often ask goal directed questions. To further find out. To define what the requirements are.
Then one day I made a mistake. I asked an open ended question. And got an answer. Not what I expected. I thought I would know the shape of the problem. I thought: okay, we need a chart, the possibility to switch between different scales and a second view for the deviation. But no. Suddenly the customer tells me: just show one series in one scale. The deviation can be displayed in a table. We do not need other scales. In previous meetings he nodded in agreement when I presented the other solution. What happened? Did the customer change his mind? No. He told me his thoughts. Not the other way around. I did not tell him what I think and he agrees. He had to think for himself. He had to shape his thoughts in order to explain them to me. He had to think it through.

Net effect matters most

Developers like to think in features. When you ask a developer what did you do for customer X, he might tell you: we created a system to manage the complex process of submitting proposals for a great variety of technologies in an efficient manner. Features: submission of proposals, complexity management, flexibility and efficiency. The what.
A designer might answer: through our work scientists all over the world have access to advanced technology to explore the future of science. The effect on the world, users and customers.
Think what is made possible through our creations, how it improves lives. Start with why.

Documentation is essential

There is this notion in our craft that the code is all the documentation you need. Why is this the way it is? Take a look at the code. The code is the documentation. Look at the commit message. This is all you need.
No. In our experience code as documentation sucks. It is too low level. What is the goal you want to reach with this piece? What is the information you collected. What are the decisions you made. What is omitted. What is rethought. What alternatives were abandoned.
Designers use all kind of artifacts to learn and record their findings and decisions. They create and keep only the essential ones and keep it pragmatic. Easy to create. Easy to update. Easy to note down what you learned and what was wrong in your assumptions. The code is just one level of abstraction and usually the end result of the thought and decision process. Record and keep the way of the decisions, not just the end result.

Focus on the whole

Developers like to divide and conquer. To separate everything into small manageable pieces. Agile demands that. First services. Then microservices. What’s next? Nanoservices?
Designers on the other hand keep the complete experience in mind. For them the whole product matters. The whole is more than the sum of its parts. The dream of the developer is that all pieces fit like Lego stones together in the end. But they forget to imagine and plan the whole creation they wanted to build. A house is not the same as another house. The composition of rooms matter. The lighting. The connections between rooms and floors. The placement of windows and doors. The whole experience. The same is valid for applications that people use.

Solution alternatives

As developers we are natural problem solvers. We are given a problem and create a solution. Designers are problem solvers, too. They identify a problem and create many solutions, test them, rate them and present them. They explore. They test and learn. They collect data and evidence. They know that every solution has its trade offs. The most promising ones are evaluated. With a plan. With hypotheses. They crave for feedback.

Reduced and emphasized – It’s about the connection

YAGNI. KISS. We know them. But what do we do with the time saved? We solve other problems. Designers carve out the details. They think of interactions, clear wording, better defaults. The little things that delight the user. Going the extra mile. The user of the applications feels cared for. He feels that there was a human that thought about his situation. There’s a connection between designers and users through the application.
When we saw Bret Victor presenting his jaw dropping talk about “Inventing on principle” he made one important point: creators must feel a connection to their creation. I think everyone should feel a connection to the software he uses. He should feel cared for and delighted. Applications are not just tools, they are experiences, they create emotions, they connect us.

Domain model design with food coupons

A recent customer requirement for the implementation of an application specified that every data-modifying user action has to be confirmed by the user through a confirmation prompt.
The application in question is a single page web application with client/server communication over an HTTP JSON API. The domain model is located on the server side, the client side is the user interface.

One option to accomplish the requirement could have been to implement the confirmation process exclusively on the client-side. The client code would show a confirmation dialog right before every HTTP POST, PUT, PATCH or DELETE request and perform the request only after confirmation. This would be fairly easy to implement. The downside of this approach is that the requirement is not reflected in the application’s domain model. The requirement however is so crucial that it should be part of the domain model, not just an implementation detail of the client user interface. So we opted for a different approach, which makes the confirmation process part of the domain model and exposes it through the HTTP API.

Coupon system

The basic idea is a coupon system, analogous to the ones that can be found at some food and beverage sales booths at festivals: you choose a food or drink item, pay for it at the pay booth and get a coupon. This coupon can be redeemd at a different booth where you receive the actual item.

coupon
Source: http://de.wikipedia.org/wiki/Verzehrbon | License: Public domain


Transferred to our web application the implementation looks like this: The client sends a request for an action to the server. But instead of performing the action immediately, the server stalls the action and responds with a unique confirmation token that identifies the waiting action. The client receives the token and can finally trigger the action by sending the confirmation token to a separate confirmation API endpoint. The server recognizes the pending user action based on the confirmation token and executes it. Of course, some care has to be taken that those pending actions, which are never confirmed time out after a while and that a malicious user can’t flood the server with waiting actions. The confirmation dialog can be triggered from the client-side code via an HTTP response interceptor that checks for a confirmation token in the response and opens the confirmation dialog if a token is present and hands the token to the confirmation endpoint if the user clicks “Ok”.

Conclusion

With this design the requirement is encoded in the server-side domain model and becomes apparent through the API. Any user of the API is called to attention by the guidance of its design. Of course, an implementor of a new client could choose to ignore the hint and return the token directly to the server without prompting the user for confirmation, but that would be a deliberate and conscious choice and not a mere oversight.

Using your TANGO devices

Now that we have built a nice TANGO device server in the previous part of this tutorial we finally want to use it.

After installing TANGO from the sources or binaries provided on www.tango-controls.org and running the TANGO database device server you need to register your device with the database to use it fully. There is however a nodb-mode if you absolutely cannot communicate with the the database device due to networking restrictions. We assume normal operation with a database accessible for the following stuff.

Registering a device server at a TANGO database

The database to use is specified by the environment variable TANGO_HOST. So first you run the tool jive and run the Server Wizard from the Tools menu:

Server Wizard1

The server name equals the executable name for C++ device servers but can be set by the programmer for Python and Java device servers. We use time_device_server for our tutorial. The instance name may be chosen quite freely – lets call our server instance localtime. In the next step we have to start the server with the same TANGO_HOST and the instance name as parameter. That way you can register and run the same server multiple times on the same or even different machines and distinguish the them. Then you have to declare the device classes and name the device instances of this server:

Server Wizard2 Server Wizard3

The device name is a three part identifier which is used to communicate with the device. In our example we use the first part to differentiate between real/hardware devices and virtual/logical devices implemented completely in software. It also could be used for the different departments in your institution for example. It is up to you to fill the identifier with meaningful information.

At the end of the wizard the device server is reinitialised and ready to use. Now we can use Jive to find our device:

Device in Jive-AtkPanel

Our device implementation is very basic so it provides only the meaningless state information of UNKNOWN but also our read-only attribute providing us with the current machine time in ISO format. AtkPanel polls all attributes of our devices and gives us a generic overview of the actual device state. Writable attributes can be changed through AtkPanel or with Test device from the Jive context menu (bottom window of the screenshot above). Feel free to experiment a bit with both tools.

In the next post we will improve our device server and add configuration via device properties.

The developer experience (DX): Our development process

Personally I like reading stories about how others tackle problems, their way to the solution, their process. This post is intended to give you a glimpse of how we work.

Personally I like reading stories about how others tackle problems, their way to the solution, their process.
Recently our team sat down together to brainstorm what is not so good or even bad about our way of solving things. To address those problems and to improve our developer experience I researched and documented our typical development process. This post is intended to give you a glimpse of how we work.
First you have to know that we are a service business so usually a project starts with a (potential or recurring) customer coming to us with his concerns, his business needs. On the course of a typical project the following phases (some in iterations) run:

1. Identifying the problem (aka analysis)

Often the first expressed need is not the problem to be solved. We need to dig deeper and identify the core. At this point in the process we ask the customer goal oriented questions. We guide the conversation to find any constraints of the solution. One of these constraints is often the technological platform (web, mobile, desktop).
If it is a bigger problem we need to work through different levels of abstraction, one iteration at a time.
We document all the results in functional specs. These are small blocks of text in the language of the customer describing the functional side of the problem and its constraints. These specs form the basis of every project and are entered as issues in our JIRA.
Alongside we record the concepts of the domain in form of a glossary in our wiki.
Besides the text we draw complex or core parts of the domain as diagrams on paper. A rough domain model. A module concept. A high level architecture of the system.

2. Planning

In a planning poker session we estimate each issue from the analysis. The customer sets a priority. Together we develop a milestone plan for our iterations. Smaller (1 week) iterations for explorative or fast paced projects and longer (2 – 3 weeks) iterations for slow paced or well defined projects.

3. Finding a solution

Before implementing a solution to a problem in code, we create different concepts which fit the constraints we recorded earlier.
These concepts can be paper prototypes or sketches. Sometimes these are HTML mockups or simulations.
From these we choose the best suited concept by talking with the customer or from our experience.

4. Development

At the start of the project we set up the necessary internal infrastructure. This usually consists of a git repository and jenkins jobs for continuous integration. We install the libraries, frameworks and applications. We create a project in the IDE and start implementing. While developing we write automated tests where appropriate. We use manual testing to tell us what the users will see and how it behaves like we expected. When we think we are done we look for feedback.

5. Feedback and acceptance

For feedback we deploy the project on a staging or test system, email the customer so that he fulfills a manual user acceptance test.
If the customer accepts the solution we continue with the next phase. If bigger problems arise we reopen our JIRA issues or create new ones and start with the analysis again.

6. Delivery

First we need to set up a machine to our project specific needs: automatic or manual (snowflaking). This is called provisioning.
We create scripts and jobs in Jenkins for the following steps: one for release and one for deployment and commissioning.
The release step packages the project and creates documents from our JIRA issues which were resolved in this version. The deploy step takes the release artifact and transfers this to the target machine. Usually this step also runs the deployed project. Every installation (release and deploy/commisioning) is documented manually on paper to be traceable. An email to the customer tells him what the new release includes. Tags in the repository identify the deployed code.

7. Monitoring

Every error or exception occurring is sent via email to a project specific account. Additionally we create a job in Jenkins which supervises the system periodically. The job tries to reach the application and executes some health checks.

TANGO device server step-by-step tutorial

Now that we learned about TANGO in general and the architecture of device servers it is time to get our hands dirty. Here is a step-by-step tutorial for making your software remotely accessible as TANGO devices.

We will develop a small C++ class that can provide us the current time and date as a string and then build a device server that makes our functionality available over TANGO to remote clients. Our plain C++ project structure looks like this:

$PROJECT_ROOT/
  CMakeLists.txt
  TimeProvider/
    CMakeLists.txt
    TimeProvider.h
    TimeProvider.cpp
    main.cpp

Here are our CMake build files:
toplevel

project(Time)
cmake_minimum_required(VERSION 2.8)

find_package(PkgConfig)

add_subdirectory(TimeProvider)

and for the TimeProvider

project(TimeProvider)

add_library(time TimeProvider.cpp)

add_executable(timeprovider main.cpp)
target_link_libraries(timeprovider time)

And the C++ sources for our standalone application:
TimeProvider.h

#include <string>

class TimeProvider
{
public:
    TimeProvider() {}

    const std::string now();
};

TimeProvider.cpp

#include "TimeProvider.h"

#include <ctime>

const std::string TimeProvider::now()
{
    time_t now = time(0);
    struct tm time;
    char timeString[100];
    time = *localtime(&now);
    strftime(timeString, sizeof(timeString), "%Y-%m-%d %X", &time);
    return timeString;
}

main.cpp

#include <iostream>
#include "TimeProvider.h"

int main()
{
    TimeProvider tp;
    std::cout << tp.now() << std::endl;
    return 0;
}

Next we create a new subdirectory “TimeDevice” and add it to our toplevel CMakeLists.txt along with the TANGO package lookup:

...
find_package(PkgConfig)
pkg_check_modules(TANGO tango>=7.2.6 REQUIRED)

add_subdirectory(TimeProvider)
add_subdirectory(TimeDevice)

In this newly created directory we now run the Pogo application with pogo TimeDevice from our TANGO installation to generate our device server skeleton:

Pogo-Create Deviceand add the Attribute:Pogo-AddAttributeso the result looks like:

Pogo-TimeDevice

Now we need to add the generated sources to our CMake build like this:

project(TimeDevice)

set(SOURCES
    ${PROJECT_NAME}.cpp
    ${PROJECT_NAME}Class.cpp
    ${PROJECT_NAME}StateMachine.cpp
    ClassFactory.cpp
    main.cpp
)

# this is needed because of wrong generation of include statements
# you may correct them in generated code because they are in protected regions
include_directories(.)

include_directories(
    ${TimeProvider_SOURCE_DIR}
    ${TANGO_INCLUDE_DIRS}
)

add_definitions("-std=c++11")

add_executable(time_device_server ${SOURCES})
target_link_libraries(time_device_server
    time
    ${TANGO_LIBRARIES}
)

As the last step, we implement the code for the CurrentTime attribute like this:

void TimeDevice::read_CurrentTime(Tango::Attribute &attr)
{
	DEBUG_STREAM << "TimeDevice::read_CurrentTime(Tango::Attribute &attr) entering... " << endl;
	/*----- PROTECTED REGION ID(TimeDevice::read_CurrentTime) ENABLED START -----*/

    attr_CurrentTime_read = new Tango::DevString;
    TimeProvider timeProvider;
    *attr_CurrentTime_read = Tango::string_dup(timeProvider.now().c_str());
    //	Set the attribute value
    attr.set_value(attr_CurrentTime_read, 1, 0, true);

	/*----- PROTECTED REGION END -----*/	//	TimeDevice::read_CurrentTime
}

For other correct implementations of string attributes see the documentation on the TANGO website.
Now we should end up with a ready to run TANGO device server executable.

Conclusion
If  you structure your project with hindsight you can integrate your drivers or services in your TANGO control system with very low effort. In the next post we we will show how to add a device server to a TANGO database and use its facilities like device properties for configuration or jive for inspection of a device.

Feel free to download the full source code of this tutorial.

How I find the source of bugs

You know the situation: a user calls or emails you to tell you your program has a problem. Here I illustrate how I find the source of the problem

You know the situation: a user calls or emails you to tell you your program has a problem. When you are lucky he lists some steps he believe he did to reproduce the behaviour. When you are really lucky those steps are the right ones.
In some cases you even got a stacktrace on the logs. High fives all around. You follow the steps the problem shows and you get the exact position in the code where things get wrong. Now is a great time to write a test which executes the steps and shows the bug. If the bug isn’t data dependent you normally can nail it with your test. If it is dependent on the data in the production system you have to find the minimal set of data constraints which causes the problem. The test fails, fixing it should make it green and fix the problem. Done.
But there are cases where the problem is caused not in the last action but sometime before. If the data does not reflect that the problem is buried in layers between like caches, in memory structures or the particular state the system is in.
Here knowledge of the frameworks used or the system in question helps you to trace back the flow of the state and data coming to the position of the stack trace.
Sometimes the steps do not reproduce the behaviour. But most of the time the steps are an indicator for how to reproduce the problem. The stack trace should give you enough information. If it doesn’t, take a look in your log. If this also does not show enough info to find the steps you should improve your log around the position of the strack trace. Wait for the next instance or try your own luck and then you should have enough information to find the real problem.
But what if you have no stack trace? No position to start your hunt? No steps to reproduce? Just a message like: after some days I got an empty transmission happening every minute. After some days. No stack trace. No user actions. Just a log message that says: starting transmission. No error. No further info.
You got nothing. Almost. You got a message with three bits of info: transmission, every minute and empty.
I start with transmission. Where does the system transmit data. Good for the architecture but bad for tracing the transmission is decoupled from the rest of the system by using a message bus. Next.
Every minute. How does the system normally start recurring processes? By quartz, a scheduler for Java. Looking at the configuration of the live system no process is nearly triggered every minute. There must be another place. Searching the code and the log another message indicates a running process: a watchdog. This watchdog puts a message on the bus if it detects a problem. Which is then send by the transmission process. Bingo. But why is it empty?
Now the knowledge about the facilities the system uses comes into play: UMTS. Sometimes the transmission rate is so low that the connection does not transfer any packages. The receiving side records a transmission but gets no data.
Most of the time the problem can be found in your own code but all code has bugs. If you assume after looking at your code that the frameworks you use have a bug. Search the bug database of the framework hopefully it is found there and already fixed.

The four rules of data safety

I tried to translate the four rules of gun safety to the task of data validation in order to formulate a behavioural framework of improved input safety.

firefly-gunOne of the most dangerous objects to handle is guns. No wonder there are strict and understandable rules how to handle them safely. The Canadians have The Four Firearm ACTS, but for this blog entry, I will cite the Four Rules stated by Captain Ira L. Reeves right before the first world war and restated by Colonel Jeff Cooper:

  1. All guns are always loaded
  2. Never let the muzzle (the business end of a gun) cover anything you are not willing to destroy
  3. Keep you finger off the trigger until your sights are on the target
  4. Be sure of your target and what is beyond it

Even if you accidentally break one rule (for example, rule 3 is often blatantly disobeyed on television), there are still enough precautions in place to keep you (and everybody around you) relatively safe. The rules are meant to instill a certain amount of respect for the gun into the owner so that offloading of responsibility isn’t possible any more, as in the line “I know this gun is unloaded, so it’s probably mighty fun to point it at somebody”.

The guns of software development

In software development, the most dangerous objects we can handle is user-created data or inputs. To mitigate the risks we take when we accept inputs from our users (and most software would be pretty useless otherwise), we have the concept of validation: Before anything other may happen with the data, it needs to be validated, meaning “proved to be free of danger”. Improper input validation is so prevalent in software development that it has its own CWE number (CWE-20) and ranked number 1 on the Top 25 list of “most dangerous programming errors”.

There are some concepts ready to help us tackle this task. The most promising is the Taint checking that treats all input as dangerous and therefore unworthy of further usage unless proven otherwise. Taint checking reminds you of validation, but not how to validate and isn’t available in most programming languages, unfortunately. What we need is a language agnostic set of rules that shape our behaviour in a way that we can’t make the most common mistakes of validation. It seems that gun owners have tried the same and succeeded. So Let’s formulate our Four Rules of data safety, inspired by the gun rules.

Our four rules

  1. All data always contains malicious aspects
  2. Never accept input for modules you cannot afford to have hacked
  3. Leave input data alone until you actually want to use it
  4. Be sure what aspects to validate and how to do it properly

This is just a starting ground for discussion, let’s call it the first version of the Four Rules. Here is my motivation for each rule:

All data always contains malicious aspects

Most users of most systems are in no way harmful. But if they attempt to harm a system, it better stands prepared. Problem is, even with a thorough validation in your current context, there is always the possibility that your attacker plays a rail shot, entering the system here, but causing damage somewhere else. A good example of this practice were images with Javascript code in their metadata. An adequate validation of uploaded images would check for a valid image format, but don’t mind the “dead content” in the meta tags. A browser would later discover the Javascript and execute it – a classic cross-site scripting attack. Never treat any data as fully validated. If you know that your particular code is vulnerable to a specific threat, let’s say a zero value in a variable used as a divisor, validate once more against this threat. This practice is also contained in the idea of Defensive programming.

Never accept input for modules you cannot afford to have hacked

Behind this rule lies a simple truth: Everything that can be hacked will be hacked, given enough time. The only protection against any hack is no access at all (like in “some air between network cable and network card”). If for example you run a certificate authority and absolutely cannot risk losing your secret private key, the machine using this key must not be connected to any network. If your database contains data much too valuable to be “stolen”, the database shouldn’t be accessible directly – and all access need to be validated beforehand. You need to think about a pragmatic compromise for your scenario when following this rule, but you’ve always been warned.

Leave input data alone until you actually want to use it

This was the most difficult rule for me to decide on. The rationale is that even the slightest bit of validation is actually usage of the input. Given enough knowledge about the validation, an attacker could possibly attack the system by abusing weaknesses in the validation itself (see rule 1 for inspiration). Any contact with input data is dangerous, even when it happens with the best intentions. The downside is that you won’t have a stronghold security architecture, where a mighty wall separates the danger zone from friendly territory (or tainted from cleaned data). Remember that even persisting the input data is using it in some form.

Be sure what aspects to validate and how to do it properly

If the time has come to use the input and to validate it right before, you need to think deep about the threats you want to eliminate. Just like with guns, where real bullets (as opposed by “television bullets”) won’t stop at the shooter’s convenience, your validation has consequences beyond an immediate gain of security. A common error is the rushed countermeasure, when you think of a specific threat and immediately try to abolish it. Take your time and think deep! For example, if your users can enter way too high values, it’s of no use to constrain the input field length, because direct web requests and notations like “1E9” are still possible. But converting an input string to a number to check its value might not be the smartest idea, too. Not long ago, you could crash nearly every application by entering a certain “number of death”. Following this rule requires experience and lots of reading, learning and thinking. And even then, there’s always somebody smarter than you, so ultimately, you should plan your system under the impression of rule 2.

As stated, this is just a starting point to try to formulate rules for data validation that provide a behaviour framework that avoids the most common mistakes and pitfalls. I’m highly interested to hear your thoughts about this topic. Please leave a comment below – but be gentle with the comment validation algorithm.

TANGO device server architecture

In my previous post I explained the basics of TANGO and why you probably want to use TANGO for development of a distributed system. Now I would like to explain how to build and design a TANGO device server. There are several best practices and even a comprehensive and ever evolving guide you should definately have a look at.

General Approach

I like to think about TANGO as a thin wrapper around some software object. That means almost all logic and hardware/platform dependent stuff is implemented in the software object which should provide all services the TANGO wrapper needs. Usually you will design an opinionated library supporting your use cases and encapsulating platform, hardware and driver issues and leaves out the stuff you do not need.

TANGO Server - ArchitectureThe opinionated library has no dependencies on TANGO and can be use in different clients independently of TANGO. The TANGO device classes mostly delegate to the library and manage just the TANGO specific things like device state, synchronisation, allowed methods and so on.

TANGO Server Architecture

As said before the TANGO device that makes use of the software component developed with TANGO in mind contains only short methods doing parameter conversion and some TANGO book keeping and life-cycle-management. The design of the server itself is an interesting part in itself though. Often it pays off to implement several devices in one (or more) TANGO servers that perform different tasks and provide special interfaces to their clients.

For example, a multi-axis motor controller could export one device per axis, so clients can move the axes independently in a natural fashion by denoting the respective axis by its device name. Alongside there may be some controller device that provides access to controller functionality not specific to a single axis like a stop all axes command. Sometimes it is helpful to let the axis devices talk to the controller and not directly to the component you are trying to expose via TANGO. That way you can for example synchronise access to the component with TANGO framework functionality on the controller device.

For imaging systems like CCD cameras or other detectors additional devices for image transformations, persisting the images or additional buffering may be a good decision. Such devices can be made largely independent of the actual hardware or imaging system which makes for nice reuse and plug-able functionality.

So it is good to think about the different tasks and aspects your TANGO server should perform and separate them into specialised devices. That should make each device itself clearer and enables specialised service interfaces for different clients. Your devices become easier to use and many parts may be even reusable. We try to standardise on device interfaces every time we identify general abstractions. That makes it much easier for the clients to work with your exposed TANGO devices.

Successful patterns for software developers

Some lessons I learned

Be good at everything but better at something

Diversify. Knowing and working in different domains, using different programming languages and tools and handling diverse tasks enriches your creativity as a developer. It keeps your mind flexible and inspires you. Many can agree on that. But on the other hand you should find your niche, your personal joy, your home ground. Different developers have different personalities, different talents and different preferences. People shine when they work with something they like. They are more happy, more productive and more creative. But not all developers in a team or company have the same favorites. Your company should encourage you getting better at your specialty. Work on your strengths.
I like dynamic languages, others prefer static languages. Some developers like to craft desktop software, some web applications. Others concentrate on the UI or controlling robots or sensors. Some ponder over algorithms while others are happy with designing visualizations.
When your team has a common ground but everybody has strengths in different fields everybody can learn from and supplement each other. Synergy is created.

Be support, project manager, admin, …

Developers in our company wear many hats. Sometimes even literally (but that’s another story). If a developer is responsible or takes part in other roles of the project his view is widened. When he talks with customers he not only understands their needs better but also can suggest different ways or solutions. His domain knowledge grows and he can identify pain points. Working with the platforms where the application is deployed and the systems involved also strengthens his grasp of the environment the application lives in. As a project manager he learns to juggle time and scope. He learns to work with constraints and different forces pulling not only the code but the whole project.

Optimize for forgiveness

A user deleted a post accidentally. What do we normally do? We introduce a security question to establish a barrier for deletion. What’s this? We make the UX worse because we think it is the user’s fault and we need to protect him from himself. A better way would be to don’t delete the post but make it invisible. This way he can undo if he wrongly deleted the post. But what about updates? Updating a post overwrites the old content. What if this happened not on purpose? A better way would be to record the last state of the post and undo the update if necessary. Todays computers have so much memory and are so powerful that an application can be allowed to be merciful. It can forgive its users when they did something wrong and want to revert it.

It is not about you

This is one of the hardest lessons to learn. Your work is not about you. Yes, it reflects you in a way. But it does not define you, you define the work. If your code has bugs or you make a mistake and accidentally delete important data, take a deep breath and think. Get help. Plan your steps, discuss with others what to do. Tell them you made a mistake. Everybody does. Do not try to fix it yourself. Do not hide it. Focus on the problem at hand. Not your shame or feeling of guilt. (This goes hand in hand with optimizing for forgiveness)

Talk and listen

Feedback. One of the most important things in software development. Talk to your users. Listen. Again and again. Often talking 10 minutes about a task or problem can result in hours of work saved. The bug you couldn’t reproduce? It was in a different area. The feature you thought was nearly impossible? With a slight change it is much easier. This also goes for everything else. Deployments and commits. Design decisions. You are the expert in your domain, the customer in his. Act accordingly. Tell him the options he has and what will be the consequences. Don’t let him guess. He shouldn’t do your work.