The Java Cache API and Custom Key Generators

The Java Cache API allows you to add a @CacheResult annotation to a method, which means that calls to the method will be cached:

import javax.cache.annotation.CacheResult;

@CacheResult
public String exampleMethod(String a, int b) {
    // ...
}

The cache will be looked up before the annotated method executes. If a value is found in the cache it is returned and the annotated method is never actually executed.

The cache lookup is based on the method parameters. By default a cache key is generated by a key generator that uses Arrays.deepHashCode(Object[]) and Arrays.deepEquals(Object[], Object[]) on the method parameters. The cache lookup based on this key is similar to a HashMap lookup.

You can define and configure multiple caches in your application and reference them by name via the cacheName parameter of the @CacheResult annotation:

@CacheResult(cacheName="examplecache")
public String exampleMethod(String a, int b) {

If no cache name is given the cache name is based on the fully qualified method name and the types of its parameters, for example in this case: “my.app.Example.exampleMethod(java.lang.String,int)”. This way there will be no conflicts with other cached methods with the same set of parameters.

Custom Key Generators

But what if you actually want to use the same cache for multiple methods without conflicts? The solution is to define and use a custom cache key generator. In the following example both methods use the same cache (“examplecache”), but also use a custom cache key generator (MethodSpecificKeyGenerator):

@CacheResult(
  cacheName="examplecache",
  cacheKeyGenerator=MethodSpecificKeyGenerator.class)
public String exampleMethodA(String a, int b) {
    // ...
}

@CacheResult(
  cacheName="examplecache",
  cacheKeyGenerator=MethodSpecificKeyGenerator.class)
public String exampleMethodB(String a, int b) {
    // ...
}

Now we have to implement the MethodSpecificKeyGenerator:

import org.infinispan.jcache.annotation.DefaultCacheKey;

import javax.cache.annotation.CacheInvocationParameter;
import javax.cache.annotation.CacheKeyGenerator;
import javax.cache.annotation.CacheKeyInvocationContext;
import javax.cache.annotation.GeneratedCacheKey;

public class MethodSpecificKeyGenerator
  implements CacheKeyGenerator {

  @Override
  public GeneratedCacheKey generateCacheKey(CacheKeyInvocationContext<? extends Annotation> context) {
    Stream<Object> methodIdentity = Stream.of(context.getMethod());
    Stream<Object> parameterValues = Arrays.stream(context.getKeyParameters()).map(CacheInvocationParameter::getValue);
    return new DefaultCacheKey(Stream.concat(methodIdentity, parameterValues).toArray());
  }
}

This key generator not only uses the parameter values of the method call but also the identity of the method to generate the key. The call to context.getMethod() returns a java.lang.reflect.Method instance for the called method, which has appropriate hashCode() and equals() implementations. Both this method object and the parameter values are passed to the DefaultCacheKey implementation, which uses deep equality on its parameters, as mentioned above.

By adding the method’s identity to the cache key we have ensured that there will be no conflicts with other methods when using the same cache.

Adding a dynamic React page to your classic grails multi-page application

We are developing and maintaining a more than 10 years old classic multi-page application based on the Grails web framework. With the advent of HTML 5 and modern browsers with faster JavaScript engines user expect more and more dynamic and pleasant user experience (UX) from web applications. Our application is used by hundreds of users and our customer expects a stable, familiar and feature-rich experience that continues to improve over time. Something like a complete rewrite of the UI is way out of scope time- and budget-wise.

One of the new feature requests would benefit highly from a client-side JavaScript implementation so we looked at our options. Fortunately it is quite easy to integrate a react app with grails and the gradle build system. So we implemented the new page almost completely as a react app while leaving all the other pages as normal server-side rendered Groovy Server Pages (GSP). The result is quite convincing and opens up a transition path to more and more dynamic client-side pages and perhaps even to the complete transformation to a single-page-application (SPA) in a distant future.

Integrating a React-App into Grails build process

The Grails react-webpack profile can serve as a great starting point to integrate a react app into an existing grails project. First you create the react app for the new page in the folder src/main/webapp, using the create-react-app scripts for example. Then you need to add a $GRAILS_PROJECT/webpack.config.js to configure webpack appropriately like so:

var path = require('path');

module.exports = {
  entry: './src/main/webapp/index.js',
  output: {
    path: path.join(__dirname, 'grails-app/assets/javascripts'),
    publicPath: '/assets/',
    filename: 'bundle.js'
  },
  module: {
    rules: [
      {
        test: /\.js$/,
        include: path.join(__dirname, 'src/main/webapp'),
        use: {
          loader: 'babel-loader',
          options: {
            presets: ["@babel/preset-env", "@babel/preset-react"],
            plugins: ["transform-class-properties"]
          }
        }
      },
      {
        test: /\.css$/,
        use: [
          'style-loader',
          'css-loader'
        ]
      },
      {
        test: /\.(jpe?g|png|gif|svg)$/i,
        use: {
          loader: 'url-loader?limit=10000&prefix=assets/!img'
        }
      }
    ]
  }
};

The next step is to move the package.json to the $GRAILS_PROJECT directory because we want gradle tasks to take care of building and bundling it as a grails asset. To make this convenient we add some gradle tasks employing yarn to our build.gradle:

buildscript {
    dependencies {
        ...
        classpath "com.moowork.gradle:gradle-node-plugin:1.2.0"
    }
}

...

apply plugin:"com.moowork.node"

...

node {
    version = '12.15.0'
    yarnVersion = '1.22.0'
    distBaseUrl = 'https://nodejs.org/dist'
    download = true
}

task bundle(type: YarnTask, dependsOn: 'yarn') {
    group = 'build'
    description = 'Build the client bundle'
    args = ['run', 'bundle']
}

task webpack(type: YarnTask, dependsOn: 'yarn') {
    group = 'application'
    description = 'Build the client bundle in watch mode'
    args = ['run', 'start']
}

bootRun.dependsOn(['bundle'])
assetCompile.dependsOn(['bundle'])

...

Now we have integrated our new react app with the grails build system and packaging. The webpack task allows updating the javascript bundle on the fly so that we have almost the same hot reloading support when developing as with the rest of grails.

Delivering the react app as a page

Now that we have integrated the react app in the build and packaging process of our grails application we need to deliver it when the new page is requested by the browser. This is quite simple and straightforward and can be achieved with a GSP like so:

<html>
<head>
    <meta name="layout" content="main"/>
    <title>
        <g:message code="example.header"/>
    </title>
</head>
<body>
    <div id="react-content">
    </div>
    <asset:javascript src="bundle.js"/>
</body>
</html>

Now you just have to develop the endpoints for the javascript app in form of normal grails controllers rendering JSON instead of GSP views. This is extremely easy using groovy maps and the grails JSON converters:

import grails.converters.JSON

class DataApiController {

    def getData = {
        def responseData = [
            name: 'John',
            age: 37
        ]
        render responseData as JSON
    }
}

Conclusion

Grails and its build infrastructure is flexible enough to easily integrate SPA pages into an existing traditional web application. This allows you to deliver modern UX and features expected by nowadays users without completely rewriting your trusty and proven grails application. The process can be gradually and individual pages/views can be renewed when needed. That way you can continually add value to your customer while incrementally modernizing your application.

Some strings are more equal before your Oracle database

When working with customer code based on ADO.net, I was surprised by the following error message:

The german message just tells us that some UpdateCommand had an effect on “0” instead of the expected “1” rows of a DataTable. This happened on writing some changes to a table using an OracleDataAdapter. What really surprised me at this point was that there certainly was no other thread writing to the database during my update attempt. Even more confusing was, that my method of changing DataTables and using the OracleDataAdapter to write changes had worked pretty well so far.

In this case, the title “DBConcurrencyExceptionturned out to be quite misleading. The text message was absolutely correct, though.

The explanation

The UpdateCommand is a prepared statement generated by the OracleDataAdapter. It may be used to write the changes a DataTable keeps track of to a database. To update a row, the UpdateCommand identifies the row with a WHERE-clause that matches all original values of the row and writes the updates to the row. So if we have a table with two rows, a primary id and a number, the update statement would essentially look like this:

UPDATE EXAMPLE_TABLE
  SET ROW_ID =:current_ROW_ID, 
      NUMBER_COLUMN =:current_NUMBER_COLUMN
WHERE
      ROW_ID =:old_ROW_ID 
  AND NUMBER_COLUMN =:old_NUMBER_COLUMN

In my case, the problem turned out to be caused by string-valued columns and was due to some oracle-weirdness that was already discussed on this blog (https://schneide.blog/2010/07/12/an-oracle-story-null-empty-or-what/): On writing, empty strings (more precisely: empty VARCHAR2s) are transformed to a DBNull. Note however, that the following are not equivalent:

WHERE TEXT_COLUMN = ''
WHERE TEXT_COLUMN is null

The first will just never match… (at least with Oracle 11g). So saying that null and empty strings are the same would not be an accurate description.

The WHERE-clause of the generated UpdateCommands look more complicated for (nullable) columns of type VARCHAR2. But instead of trying to understand the generated code, I just guessed that the problem was a bug or inconsistency in the OracleDataAdapter that caused the exception. And in fact, it turned out that the problem occured whenever I tried to write an empty string to a column that was DBNull before. Which would explain the message of the DBConcurrencyException, since the DataTable thinks there is a difference between empty strings and DBNulls but due to the conversion there will be no difference when the corrensponding row is updated. So once understood, the problem was easily fixed by transforming all empty strings to null prior to invoking the UpdateCommand.

The “parameter self-destruction” bug

A few days ago, I got a bug report for a C++ program about a weird exception involving invalid characters in a JSON format. Now getting weird stuff back from a web backend is not something totally unexpected, so my first instinct was to check whether any calls to the parser did not deal with exceptions correctly. To my surprise, they all did. So I did what I should have done right away: just try to use the feature were the client found the bug. It crashed after a couple of seconds. And what I found was a really interesting problem. It was actually the JSON encoder trying to encode a corrupted string. But how did it get corrupted?

Tick, tick, boom..

The code in question logs into a web-service and then periodically sends a keep-alive signal with the same information. Let me start by showing you some support code:


class ticker_service
{
public:
  using callable_type = std::function<void()>;
  using handle = std::shared_ptr<callable_type>;

  handle insert(callable_type fn)
  {
    auto result = std::make_shared<callable_type>(
      std::move(fn));
    callables_.push_back(result);
    return result;
  }

  void remove(handle const& fn_ptr)
  {
    if (fn_ptr == nullptr)
      return;

    // just invalidate the function
    *fn_ptr = {};
  }

  void tick()
  {
    auto callable_invalid =
      [](handle const& fn_ptr) -> bool
    {
      return !*fn_ptr;
    };

    // erase all the 'remove()d' functions
    auto new_end = std::remove_if(
      callables_.begin(),
      callables_.end(),
      callable_invalid);

    callables_.erase(new_end, callables_.end());

    // call the remainder
    for (auto const& each : callables_)
      (*each)();
  }

private:
  std::vector<handle> callables_;
};

This is dumbed down from the real thing, but enough to demonstrate the problem. In the real code, this only runs the functions after a specific time has elapsed, and they are all in a queue. Invalidating the std::function serves basically as “marking for deletion”, which is a common pattern for allowing deletion in queue or heap-like data structure. In this case, it just allows to mark a function for deletion in constant time, while the actual element shifting is “bundled” in the tick() function.

Now for the code that uses this “ticker service”:

class announcer_service
{
public:
  explicit announcer_service(ticker_service& ticker)
  : ticker_(ticker)
  {
  }

  void update_presence(std::string info)
  {
    // Make sure no jobs are running
    ticker_.remove(job_);

    if (!send_web_request(info))
      return;

    // reinsert the job
    job_ = ticker_.insert(
      [=] {
        update_presence(info);
    });
  }
private:
  ticker_service& ticker_;
  ticker_service::handle job_;
};

The announcer service runs

ticker_service ticker;
announcer_service announcer(ticker);

announcer.update_presence(
  "hello world! this is a longer text.");
ticker.tick();

A subtle change

You might be wondering where the bug is. To the best of my knowledge, there is none. And the real code corresponding to this worked like a charm for years. And I did not make any significant changes to it lately either. Or so I thought.
If I open that code in CLion, Clang-Tidy is telling me that the parameter “info” to update_presence is only used as a reference, and I should consider turning it into one. Well, Clang-Tidy, that’s bad advice. Because that’s pretty much the change I made:

void update_presence(std::string const& info) // <--

And this makes it go boom on the second call to update_presence(), the one from tick(). Whew. But why?

What is happening?

It turns out, even though we are capturing everything by value, the lambda is still at fault here. Or rather, using values that are captured by the lambda after the lambda has been destroyed. And in this case, the lambda actually destroys itself in the call to ticker_service::remove(). In the first call to update_presence(), the job_ handle is still nullptr, turning remove() into a no-op. On the second call however, remove() overwrites the std::function that is currently on the stack, calling into update_presence, with a default-constructed value. This effectively deletes the lambda that was put there by the last iteration of update_presence, thereby also destroying the captured info string. Now if info was copied into update_presence, this is not a problem, but if you’re still referencing the value stored in the lambda, this is a typical use-after-free. Ooops. I guess C++ can be tricky sometimes, even if you are using automatic memory management.

How to avoid this

This bug is not unlike changing your container when changing it while iterating over it. Java people know this error from the ConcurrentModificationException. Yes, this is possible, if you are really really careful. But in general, you better solve this bug by defering your container modification to a later point after you’re done iterating. Likewise, in this example, the std::function that is currently executing is being modified while it is executing.
A good solution is to defer the deletion until after the execution. So I argue the bug is actually in the ticker_service, which is not as safe as it can be. It should make sure that the lambda survives the complete duration of the call. An easy, albeit somewhat inefficient, approach would be copying the std::function before calling it. Luckily, in the real code, the functions are all just executed once, so I could std::move them to a local variable before executing.

24 hour time format: Difference between JodaTime and java.time

We have been using JodaTime in many projects since before Java got better date and time support with Java 8. We update projects to the newer java.time classes whenever we work on them, but some still use JodaTime. One of these was a utility that imports time series from CSV files. The format for the time stamps is flexible and the user can configure it with a format string like “yyyyMMdd HHmmss”. Recently a user tried to import time series with timestamps like this:

20200101 234500
20200101 240000
20200102 001500

As you can see this is a 24-hour format. However, the first hour of the day is represented as the 24th hour of the previous day if the minutes and seconds are zero, and it is represented as “00” otherwise. When the user tried to import this with the “yyyyMMdd HHmmss” format the application failed with an internal exception:

org.joda.time.IllegalFieldValueException:
Cannot parse "20200101 240000": Value 24 for
hourOfDay must be in the range [0,23]

Then he tried “yyyyMMdd kkmmss”, which uses the “kk” format for hours. This format allows the string “24” as hour. But now “20200101 240000” was parsed as 2020-01-01T00:00:00 and not as 2020-01-02T00:00:00, as intended.

I tried to help and find a format string that supported this mixed 24-hour format, but I did not find one, at least not for JodaTime. However, I found out that with java.time the import would work with the “yyyyMMdd HHmmss” format, even though the documentation for “H” simply says “hour-of-day (0-23)”, without mentioning 24.

The import tool was finally updated to java.time and the user was able to import the time series file.

The best of both worlds: scoped_flags

C++11 introduced a pretty nice change to enum types in C++, the scoped enumeration. They mostly supersede the old unscoped enumeration, which was inherited from C and had a few shortcomings. For example, the names in the enumeration where added to its parent scope. This means that given an enum colors {red, green blue}; you can simply say auto my_color = red;. This can, of course, lead to ambiguities and people using some weird workarounds like putting the enums in namespaces or prefixing all elements á la hungarian-notation. Also, unscoped enumerations are not particularly type-safe: they can be converted to integer types and back without any special consideration, so you can write things like int x = red; without the compiler complaining.
Scoped enumerations improves both theses aspects: with enum class colors {red, green, blue};, you have to use auto my_color = colors::red; and int x = colors::red; will simply not compile.
To get the second part to compile, you need to insert a static_cast: int x = static_cast(colors::red); which is purposefully a lot more verbose. Now this is a bit of a blessing and a curse. Of course, this is a lot more type-safe, but it make one really common usage pattern with enums very cumbersome: bit flags.

Did this get worse?

While you could previously use the bit operators to combine different bitmasks defined as enums, scoped enumerations will only let you do that if you cast them first. In other words, type-safety prevents us from combining flags because the result might, of course, no longer be a valid enum.
However, we can still get the convenience and compactness of bit flags with a type that represents combinations bitmasks from a specific enum type. Oh, this reeks of a template. I give you scoped_flags, which you can use like this:

enum class window_flags
{
  has_border = 1 << 0,
  has_caption = 1 << 1,
  is_child = 1 << 2,
  /* ... */
};
void create_window(scoped_flags<window_flags> flags);

void main()
{
  create_window({window_flags::has_border, window_flags::has_caption});
}

scoped_flags<window_flags> something = /* ... */

// Check a flag
bool is_set = something.test(window_flags::is_child);

// Remove a flag
auto no_border = something.without(window_flags::has_border);

// Add a flag
auto with_border = something.with(window_flags::has_border);

Current implementation

You can find my current implementation on this github gist. Even in its current state, I find it a niftly little utility class that makes unscoped enumerations all but legacy code.
I opted not to replicate the bitwise operator syntax, because &~ for “without” is so ugly, and ~ alone makes little sense. A non-explicit single-argument constructor makes usage with a single flag as convenient as the old C-style variant, while the list construction is just a tiny bit more complicated.
The implementation is not complete or final yet; for example without is missing an overload that gets a list of flags. After my previous adventures with initializer_lists, I’m also not entirely sure whether std::initializer_list should be used anywhere but in the c’tor. And maybe CTAD could make it more comfortable? Of course, everything here can be constexpr‘fied. Do you think this is a useful abstraction? Any ideas for improvements? Do tell!

std::initializer_list considered evil

I am so disappointed in you, std::initializer_list. You are just not what I thought you were.

Lights out

While on the train to Meeting C++ this year, I was working on the lighting subsystem of the 3D renderer for my game abstractanks. Everything was looking fine, until I switched to the release build. Suddenly, my sun light went out. All the smaller lights were still there, it just looked like night instead of day.
Now stuff working in Debug and not working in Release used to be quite common and happens when you’re not correctly initializing built-in variables. So I went digging, but it was not as easy as I had thought. Several hours later, I tracked the problem down to my global light’s uniform buffer initialization code. This is a buffer that is sent to the GPU so the shaders can read all the lighting information. It looked like a fairly innocent for-loop doing byte-copies of matrices and vectors to a buffer:

using Pair = std::pair;
auto Mapping = std::initializer_list{
  {ShadowMatrix.ptr(), MATRIX_BYTE_SIZE},
  {LightDirection.ptr(), VECTOR4_BYTE_SIZE},
  {ColorAndAmbient.ptr(), VECTOR4_BYTE_SIZE}
};

std::size_t Offset = 0;
for (auto const& Each : Mapping)
{
  mUniformBuffer.SetSubData(GL_UNIFORM_BUFFER, Each.second, Offset, Each.first);
  Offset += Each.second;
}

The Culprit

After mistakenly blaming alignment issues for a while, I finally tried looking at the values of Each.second and Each.first. To my surprise, they were bogus. Now what is going on there? It turns out not writing this in almost-always-auto style, i.e. using direct- instead of copy-initialization fixes the problem, so there’s definitely a lifetime issue here.

Looking at the docs, it became apparent that std::initializer_list is indeed a reference-type that automatically creates a value-type (the backing array) internally and keeps it alive exactly as binding a reference to that array would. For the common cases, i.e. when std::initializer_list is used as a parameter, this is fine, because the original list lives for the whole function-call expression. For the direct-initialization case, this is also fine, since the reference-like lifetime-extension kicks in. But for copy-initialization, the right-hand-side is done after the std::initializer_list is copied. So the backing array is destroyed. Oops.

Conclusion and alternatives

Do not use std::initializer_list unless as a function parameter. It works well for that, and is surprising for everything else. In my case, a naive “extract variable” refactoring of for (auto const& each : {a, b, c}) { /* ... */ } led me down this rabbit hole.
My current alternative is stupidly simple: a built-in array on the stack:

using Pair = std::pair;
Pair Mapping[]{
  {ShadowMatrix.ptr(), MATRIX_BYTE_SIZE},
  {LightDirection.ptr(), VECTOR4_BYTE_SIZE},
  {ColorAndAmbient.ptr(), VECTOR4_BYTE_SIZE}
};

It does the same thing as the “correct” version of the std::initializer_list, and if you try to use it AAA-style, at least clang will give you this nice warning: warning: temporary whose address is used as value of local variable 'Mapping' will be destroyed at the end of the full-expression [-Wdangling]

Think of your code as a maintenance minefield

Most of the cost, effort and time of a software project is spent on the maintenance phase, the modification of a software product after delivery. If you think about all these resources as “negative investments” or debt settlement and try to associate your spendings with specific code areas or even single lines of code, you’ll probably find that the maintenance cost per line is not equally distributed. There are lots of lines of code that outlast the test of time without any maintenance work at all, a fair amount of lines that require moderate attention and some lines that seem to require constant and excessive developer care.

If you transfer this image to another metaphor, your code presents itself like a minefield for maintenance effort: Most of the area is harmless and safe to travel. But there are some positions that will just blow up once touched. The difference is that as a software developer, you don’t tread on the minefield, but you catch the flak if something happens.

You should try to deliver your code free of maintenance mines.

Spotting a maintenance mine

Identifying a line of code as a maintenance mine after the fact is easy. You probably already recognize the familiar code as “troublesome” because you’ve spent hours trying to understand and fix it. The commit history of your version control system can show you the “hottest” lines in your code – the areas that were modified most often. If you add tests for each new bug, you’ll find that the code is probably tested really well, with tests motivated by different bug issues. In hindsight, you can clearly distinguish low-effort code from high maintenance code.

But before delivery, all code looks the same. Or does it?

An example of a maintenance mine

Let’s look at an example. Our system monitors critical business data and sends out alerts if certain conditions are met. One implementation of the part sending the alerts is a simple e-mail sender. The code is given here:


public class SendEmailService {

  public void sendTo(
                Person person,
                String subject,
                String body) {
    execCmd(
         buildCmd(
               person.email(), subject, body));
  }

  private String buildCmd(String recipientMailAdress, String subject, String body){
    return "'/usr/bin/mutt -t " + recipientMailAdress + " -u " + subject + " -m " + body + "'";
  }

  private int execCmd(String command) throws IOException{
    return Runtime.getRuntime()
                  .exec(command).exitValue();
  }
}

This code has two interesting problems:

  • The first problem is that it is written in Java, a platform agnostic programming language, but depends on being run on a linux (or sufficiently similar unixoid) operating system. The system it runs on needs to supply the /usr/bin/mutt program and have the e-mail sending settings properly configured or else every try to run the send command will result in an error. This implicit dependency on the configuration of the production system isn’t the best way to deal with the situation, but it’s probably a one-time pain. The problem clearly presents itself and once the system is set up in the right way, it is gone (until somebody tampers with the settings again). And my impression is that this code separates two concerns between development and operations rather nicely: Development provides software that can send specific e-mails if operations provides a system that is capable of sending e-mails. No need to configure the system for e-mail sending and doing it again for the software on said system.
  • The second problem looks like a maintenance mine. In the line where the code passes the command line to the operating system (by calling Runtime.getRuntime().exec()), a Process object is returned that is only asked for its exitValue(), implicating a wait for the termination of the system command. The line looks straight and to the point. No need to store and handle intermediate objects if you aren’t interested in them. But perhaps, you should care:

By default, the created process does not have its own terminal or console. All its standard I/O (i.e. stdin, stdout, stderr) operations will be redirected to the parent process, where they can be accessed via the streams obtained using the methods getOutputStream(), getInputStream(), and getErrorStream(). The parent process uses these streams to feed input to and get output from the process. Because some native platforms only provide limited buffer size for standard input and output streams, failure to promptly write the input stream or read the output stream of the process may cause the process to block, or even deadlock.

Emphasize by me, see also: https://docs.oracle.com/en/java/javase/11/docs/api/java.base/java/lang/Process.html

This means that the Process object’s stdout and stderr outputs are stored in buffers of unknown (and system dependent) size. If one of these buffers fills up, the execution of the command just stops, as if somebody had paused it indefinitely. So, depending on your call’s talkativeness, your alert e-mail will not be sent, your system will appear to have failed to recognize the condition and you’ll never see a stacktrace or error exit value. All other e-mails (with less chatter) will go through just fine. This is a guaranteed source of frantic telephone calls, headaches and lost trust in your system and your ability to resolve issues.

And all the problems originate from one line of code. This is a maintenance mine with a stdout fuse.

The fix for this line might lie in the use of the ProcessBuilder class or your own utility code to drain the buffers. But how would you discover the mine before you deliver it?

Mines often lie at borders

One thing that stands out in this line of code is that it passes control to the “outside”. It acts as a transit point to the underlying operating system and therefor has a lot of baggage to check. There are no safety checks implemented, so the transit must be regarded as unsafe. If you look out for transit points in your code (like passing control to the file system, the network, a database or another external system), make sure you’ve read the instructions and requirements thoroughly. The problems of a maintenance mine aren’t apparent in your code and only manifest themselves during the interaction with the external system. And this is a situation that happens disproportionately often in production and comparably seldom during development.

So, think of your code as a maintenance minefield and be careful around its borders.

What is your minesweeper story? Drop us a comment.

A new star in software verification?

F* (pronounced F star) is a functional programming language with a dependent type system that supports verification. What follows is a story about my experiences with F* and a concluding opinion why languages like F* could be useful for the working software developer.

There is a big project using F* and related tools for the ambitious goal to build a verified implementation of TLS.
So far, judging from the website, there is a verified efficient implementation of the relevant cryptographic primitives but their implementation of the protocol is not yet verified. That is certainly already a great achievement and got me interested F*.

Setting it up

There is a F*-Tutorial which comes with an online editor, which is great if you just want to play a bit with the language. You don’t have to install anything, provided you have a recent mainstream browser. The tutorial is fun to do, but after I spent some time on it, I wanted to know what it is like to use F* not on a prescribed path.

Sooner or later, you probably want to install it on your machine, which is not a problem at all, if you are on linux system and an emacs user. There is a binary and an emacs mode which is also easy to install on windows but the combination was somehow forbiddingly slow on my (fast) machine. In the following, pictures will show excerpts from the emacs-mode.

Programming in F*

Let me first show you, what programming in F* looks like. Here is a definition of the commonly known (higher order) function “filter” which takes a predicate (function to bool in this case) and a list and returns the “sublist” of all things on the list matching the predicate:

filter1

The arrows and strange dots are just “->” and “::” rendered by the emacs mode. Otherwise, it is exactly the pattern matching definition that would also work in OCaml or F# (where you can write exactly the same thing):

The second argument “l” is matched against the two things a list might be, either the empty list “[]” or a list with consisting of some first element “x” and a list “xs”. In the first case, we are done and in the second case we decide if “x” should be in the result list and recursively call “filter” to deal with the “xs”.

The type of “filter” can be inferred by F*, but we could have declared it before the definition like this:

filter3

The alpha is really fancy emacs-mode rendering for ” ‘a ” and stands for an arbitrary type. This is also the type F* would infer, since what we did does not require anything special from the element type of the lists.

So the declaration says that our function takes some predicate “p” a list of things p may be applied to and returns a list of the same type just with “Tot” written in front of it. The latter tells us, that filter is a total function, i.e. it terminates and will not throw an exception (I guess there is a bit more to it, but so far that explanation worked well for me). There is also a modifier “ML” which would tell us, that the function behaves like a function in OCaml – so it could throw runtime exceptions or loop forever. After introducing you to some verification features, I will tell you why this distinction is important here.

Let us first rewrite our declaration a bit:

filter4

I replaced the alpha with a fixed type, the natural numbers (that will simplify things…) and introduced variables “p” and “l” that we can use now to construct types. What kind of types? Well, in this case, I want to construct a replacement for “(list N)” which tells us a bit more about the result of filtering a list. One reason to have types is to make sure, that the result of some construction meets a specification. Usually these kinds of specifications are quite coarse and might just tell you, that the result is an integer. So far, the specification of the filter function only tells us, that the result will be a list of natural numbers. In F*, we can do a lot more. The following specifies the result of filter to be the sublist of all elements of “l” that satisfy “p”:

filter5

Between the curly braces, I put a formula in predicate logic, which describes this specification. The ” ” is a logical “and”, the “∀” is the “forall” from math and ” element x l’ ” is some function which evaluates to true if x is an element of l’ and false if this is not the case.

Now, one of the things that make me happy when playing with F* is that the definition of filter I gave in the beginning checks against this new declaration as is. This is due to F* using a problem solver to prove that our specification is satisfied and the not-so-random coincidence that to prove the formula, you can use the same structural induction on the list as we used to recursively define “filter”.

For completeness, here is my definition of “element”:

element1

The “#a:eqtype” means, that “a” is some type such that comes with a total equality function for terms of type “a”. The natural numbers used above are such an “a”. Btw: Those natural numbers are not limited in size, like e.g. “unsigned int”. They behave a lot like “BigInteger” in some languages and are certainly not fast, but they are good for proving things.

And now, I should tell you, that the declaration of “filter” which nicely specified what filter does, is probably not what you should do. In fact, it is usually better to split things into definitions and “Lemma”s. So here is again the original definition of filter (with inferred type) and a Lemma about it:

filter6

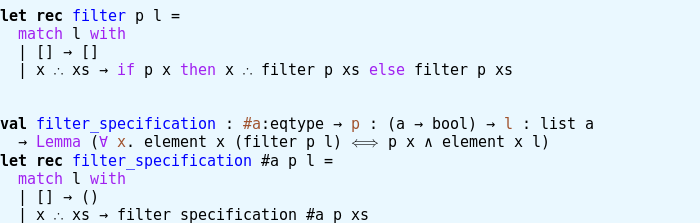
The “Lemma” is again like “Tot” above – it modifies the type. Technically, “filter_specification” is a function, but the only thing important here, is if its definition (“let rec filter_specification = […]”) type checks with the declaration (“val filter_specification […]”) given – because that means that the definition is a proof of the proposition encoded in the declaration. In particular, it is not important what this function returns. In fact, “Lemma” produces a type all of whose terms are equal.

Verifying Project Euler exercises

First thing I usually do when checking out a new programming language is to solve a couple of Project Euler exercises to get fluent in the basic constructions. So, I thought, why shouldn’t I try the same with F* and prove something about my solution code?

Problem 1 asks us to add all multiples of 3 and 5 below 1000. Usually, my mind drops the “below” and I get a wrong result. But not so this time! Here is my definition of the natural numbers below 1000, which produces the correct list of numbers, since specifying precisely what it is made me read the problem text very carefully:

naturals_below_1000

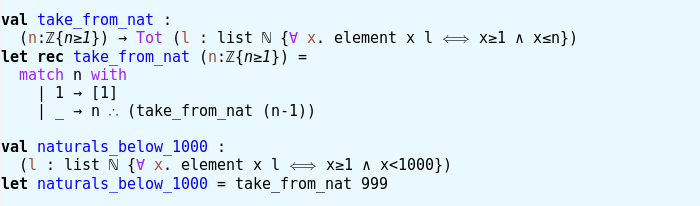
Now, “naturals_below_1000” is specified by its type, which turned out to work well in this case, since it is not a general purpose function I will reuse.

Now for the task at hand, we need to filter numbers that are multiples of 3 or 5. I took the liberty to equivalently say, numbers divisible by 3 or 5:

divisible

I used modulo arithmetic “%” defined in some library to have an easy definition of “divides”. Also note, that I use definitions in proving that I defined the correct list. Both are a bit fishy if I were to claim that I proved some term in my program meets some mathematical definition commonly used for the concepts in the problem text. So you could call that lazy or efficient according to taste.

Now, the number which the exercise asks for can be defined:

ex1

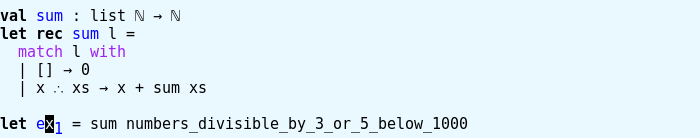
F* can not just check if everything is correct but also evaluate expression. In particular the expression “ex1” which turns out to be the correct answer to the problem.

Is it of use for the working software developer?

I used Scala some years ago to develop a large prototype and, while there were some pains, it worked about as well as expected and I’m quite sure it would have been less fun and less efficient to use Java for the same project. One important point in the decision to use Scala was the possibility to use Java libraries.
F# has the same kind of advantage and I learned to love its type system from OCaml, which apparently was the basis for F#. So for the same reasons that made Scala work for me when constructing prototypes, I could decide to use F# in similar situations. I don’t know, how realistic my hope is, that F* can be used on top of F# one day, but that would be a great improvement over just having F# which is already something I look forward to. So far, it as possible to extract F# code from an F* program.

Usually, tools like F* are thought of and presented as tools to effectively prevent bugs, i.e. catching all of them no matter the effort. I think, what we need for our daily programming tasks are tools for preventing bugs efficiently. My guess is, that dependent types in a practical language like F# are such a tool. This is of course a heavily biased view, since I have a background involving some dependent type theory, which makes me blind to the effort of learning how dependent types work.

One problem with dependently typed languages is, that small changes can break lots of proofs that took effort to prove. This is particularly bad, if you spell out the proofs in all detail and it means refactoring can become quite expensive.

From what I have seen, the use of a problem solver when type checking reduces this problem quite a bit, so this might not be a real issue here and with other dependently typed languages that do something similar. And of, substitute technologies that achieve similar goals, like unit tests or comments,  also increase refactoring work.

So ultimately, apart from the fun, I also look forward at using F* as tool. As I mentioned before, I already knew about dependent types and could translate what I see when learning F*, so I can’t tell you how much effort it takes, if you don’t already know those things. But what I can tell you is, that learning dependent type theory was certainly among the most rewarding scientific experiences in my life, so maybe you want to do that anyway.

Clean deployment of .NET Core application

Microsofts .NET Core framework has rightfully earned its spot among cross-platform frameworks. We like to use it for example as a RESTful backend for our react frontends. If you are not burying your .NET Core application in a docker container without the need to configure/customize it you may feel agitated by its default deployment layout: All the dependencies live next to some JSON configuration files in one directory.

While this is ok if you do not need to look in there for a configuration file and change something you may like to clean it up and put the files into different folders. This can be achieved by customizing your MS build but it is all but straightforward!

Our goal

  1. Put all of our dependencies into a lib directory
  2. Put all of our configuration files int a configuration directory
  3. Remove unneeded files

The above should not require any interaction but be part of the regular build process.

The journey

We need to customize the MSBuild system to achieve our goal because the deps.json file must be rewritten to change the location of our dependencies. This is the hardest part! First we add the RoslynCodeTaskFactory as a package reference to our MSbuild in the csproj of our project. That we we can implement tasks using C#. We define two tasks that will help us in rewriting the deps.json:

<Project ToolsVersion="15.8" xmlns="http://schemas.microsoft.com/developer/msbuild/2003">
  <UsingTask TaskName="RegexReplaceFileText" TaskFactory="CodeTaskFactory" AssemblyFile="$(RoslynCodeTaskFactory)" Condition=" '$(RoslynCodeTaskFactory)' != '' ">
    <ParameterGroup>
      <InputFile ParameterType="System.String" Required="true" />
      <OutputFile ParameterType="System.String" Required="true" />
      <MatchExpression ParameterType="System.String" Required="true" />
      <ReplacementText ParameterType="System.String" Required="true" />
    </ParameterGroup>
    <Task>
      <Using Namespace="System" />
      <Using Namespace="System.IO" />
      <Using Namespace="System.Text.RegularExpressions" />
      <Code Type="Fragment" Language="cs">
        <![CDATA[ File.WriteAllText( OutputFile, Regex.Replace(File.ReadAllText(InputFile), MatchExpression, ReplacementText) ); ]]>
      </Code>
    </Task>
  </UsingTask>

  <UsingTask TaskName="RegexTrimFileText" TaskFactory="CodeTaskFactory" AssemblyFile="$(RoslynCodeTaskFactory)" Condition=" '$(RoslynCodeTaskFactory)' != '' ">
    <ParameterGroup>
      <InputFile ParameterType="System.String" Required="true" />
      <OutputFile ParameterType="System.String" Required="true" />
      <MatchExpression ParameterType="System.String" Required="true" />
    </ParameterGroup>
    <Task>
      <Using Namespace="System" />
      <Using Namespace="System.IO" />
      <Using Namespace="System.Text.RegularExpressions" />
      <Code Type="Fragment" Language="cs">
        <![CDATA[ File.WriteAllText( OutputFile, Regex.Replace(File.ReadAllText(InputFile), MatchExpression, "") ); ]]>
      </Code>
    </Task>
  </UsingTask>
</Project>

We put the tasks in a file called RegexReplace.targets file in the Build directory and import it in our csproj using <Import Project="Build/RegexReplace.targets" />.

Now we can just add a new target that is executed after the publish target to our main project csproj to move the assemblies around, rewrite the deps.json and remove unwanted files:

  <Target Name="PostPublishActions" AfterTargets="AfterPublish">
    <ItemGroup>
      <Libraries Include="$(PublishUrl)\*.dll" Exclude="$(PublishUrl)\MyProject.dll" />
    </ItemGroup>
    <ItemGroup>
      <Unwanted Include="$(PublishUrl)\MyProject.pdb;$(PublishUrl)\.filenesting.json" />
    </ItemGroup>
    <Move SourceFiles="@(Libraries)" DestinationFolder="$(PublishUrl)/lib" />
    <Copy SourceFiles="Build\MyProject.runtimeconfig.json;Build\web.config" DestinationFiles="$(PublishUrl)\MyProject.runtimeconfig.json;$(PublishUrl)\web.config" />
    <Delete Files="@(Libraries)" />
    <Delete Files="@(Unwanted)" />
    <RemoveDir Directories="$(PublishUrl)\Build" />
    <RegexTrimFileText InputFile="$(PublishUrl)\MyProject.deps.json" OutputFile="$(PublishUrl)\MyProject.deps.json" MatchExpression="(?&lt;=&quot;).*[/|\\](?=.*\.dll|.*\.exe)" />
    <RegexReplaceFileText InputFile="$(PublishUrl)\MyProject.deps.json" OutputFile="$(PublishUrl)\MyProject.deps.json" MatchExpression="&quot;path&quot;: &quot;.*&quot;" ReplacementText="&quot;path&quot;: &quot;.&quot;" />
  </Target>

The result

All this work should result in a working application with a root directory layout like in the image. As far as we know the remaining files like the web.config, the main project assembly and the two json files cannot easily relocated. The resulting layout is nevertheless quite clean and makes it easy for administrators to find the configuration files they need to customize.

Of course one can argue if the result is worth the hassle but if your customers’ administrators and operations value it you should do it.