Ansible in Jenkins

Ansible is a powerful tool for automation of your IT infrastructure. In contrast to chef or puppet it does not need much infrastructure like a server and client (“agent”) programs on your target machines. We like to use it for keeping our servers and desktop machines up-to-date and provisioned in a defined, repeatable and self-documented way.

As of late ansible has begun to replace our different, custom-made – but already automated – deployment processes we implemented using different tools like ant scripts run by jenkins-jobs. The natural way of using ansible for deployment in our current infrastructure would be using it from jenkins with the jenkins ansible plugin.

Even though the plugin supports the “Global Tool Configuration” mechanism and automatic management of several ansible installations it did not work out of the box for us:

At first, the executable path was not set correctly. We managed to fix that but then the next problem arose: Our standard build slaves had no jinja2 (python templating library) installed. Sure, that are problems you can easily fix if you decide so.

For us, it was too much tinkering and snowflaking our build slaves to be feasible and we took another route, that you can consider: Running ansible from an docker image.

We already have a host for running docker containers attached to jenkins so our current state of deployment with ansible roughly consists of a Dockerfile and a Jenkins job to run the container.

The Dockerfile is as simple as


FROM ubuntu:14.04
RUN DEBIAN_FRONTEND=noninteractive apt-get update && apt-get -y dist-upgrade && apt-get -y install software-properties-common
RUN DEBIAN_FRONTEND=noninteractive apt-add-repository ppa:ansible/ansible-2.4
RUN DEBIAN_FRONTEND=noninteractive apt-get update && apt-get -y install ansible

# Setup work dir
WORKDIR /project/provisioning

# Copy project directory into container
COPY . /project

# Deploy the project
CMD ansible-playbook -i inventory deploy-project.yml

And the jenkins build step to actually run the deployment looks like


docker build -t project-deploy .
docker run project-deploy

That way we can tailor our deployment machine to conveniently run our ansible playbooks for the specific project without modifying our normal build slave setups and adding complexity on their side. All the tinkering with the jenkins ansible plugin is unnecessary going this way and relying on docker and what the container provides for running ansible.

Modern developer Issue #2: RPM like deployment on Windows

Deployment is a crucial step in every development project. Without shipping no one would ever see our work (and we get no feedback if our work is good).

drawer

Often we fear deploying to production because of the effort involved and the errors we make. Questions like ‘what if we forget a step?’ or ‘what if the new version we install is buggy?’ buzz in our mind.

fears

Deployment needs to be a non-event, a habit. For this we need to automate every step besides the first one: clicking a button to start deployment.

deploy

On Linux we have wonderful tools for this but what if you are stuck with deploying to Windows?

brave

Fear not, brave developer! Even on Windows we can use a package manager to install and rollback buggy versions. Let me introduce you to chocolatey.

choco

Chocolatey (or choco in short) uses the common NuGet package format. Formerly developed for the .net platform we can use it for other platforms, too. In our following example we use a simple Java application which we install as a service and as a task.
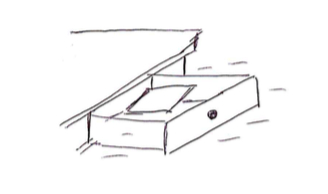
Setting up we need a directory structure for the package like this:

folders

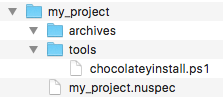
We need to create two files: one which specifies our package (my_project.nuspec) and one script which holds the deployment steps (chocolateyinstall.ps1). The specification file holds things like the package name, the package version (which can be overwritten when building the package), some pointers to project, source and license URLs. We can configure files and directories which will be copied to the package: in our example we use a directory containing our archives (aptly named archives) and a directory containing the installation steps (named tools). Here is a simple example:

<?xml version="1.0" encoding="utf-8"?>
<!-- Do not remove this test for UTF-8: if “Ω” doesn’t appear as greek uppercase omega letter enclosed in quotation marks, you should use an editor that supports UTF-8, not this one. -->
<package xmlns="http://schemas.microsoft.com/packaging/2015/06/nuspec.xsd">
  <metadata>
    <id>my_project</id>
    <title>My Project (Install)</title>
    <version>0.1</version>
    <authors>Me</authors>
    <owners>Me</owners>
    <summary></summary>
    <description>Just an example</description>
    <projectUrl>http://localhost/my_project</projectUrl>
    <packageSourceUrl>http://localhost/git</packageSourceUrl>
    <tags>example</tags>
    <copyright>My company</copyright>
    <licenseUrl>http://localhost/license</licenseUrl>
    <requireLicenseAcceptance>false</requireLicenseAcceptance>
    <releaseNotes></releaseNotes>
  </metadata>
  <files>
    <file src="tools\**" target="tools" />
    <file src="archives\**" target="archives" />
  </files>
</package>

This file tells choco how to build the packages and what to include. For the deployment process we need a script file written in Powershell.

powershell

A Powershell primer

Powershell is not as bad as you might think. Let’s take a look at some basic Powershell syntax.

Variables

Variables are started with a $ sign. As in many other languages ‘=’ is used for assignments.

$ErrorActionPreference = 'Stop'

Strings

Strings can be used with single (‘) and double quotes (“).

$serviceName = 'My Project'
$installDir = "c:\examples"

In double quoted strings we can interpolate by using a $ directly or with curly braces.

$packageDir = "$installDir\my_project"
$packageDir = "${installDir}\my_project"

For escaping double quotes inside a double quoting string we need back ticks (`)

"schtasks /end /f /tn `"${serviceName}`" "

Multiline strings are enclosed by @”

$cmdcontent = @"
cd /d ${packageDir}
java -jar ${packageName}.jar >> output.log 2>&1
"@

Method calls

Calling methods looks a mixture of command line calls with uppercase names.

Write-Host "Stopping and deleting current version of ${packageName}"
Get-Date -format yyyyddMMhhmm
Copy-Item $installFile $packageDir

Some helpful methods are:

  • Write-Host or echo: for writing to the console
  • Get-Date: getting the current time
  • Split-Path: returning the specified part of a path
  • Join-Path: concatenating a path with a specified part
  • Start-Sleep: pause n seconds
  • Start-ChocolateyProcessAsAdmin: starting an elevated command
  • Get-Service: retrieving a Windows service
  • Remove-Item: deleting a file or directory
  • Test-Path: testing for existence of a path
  • New-Item: creating a file or directory
  • Copy-Item: copying a file or directory
  • Set-Content: creating a file with the specified contents
  • Out-Null: swallowing output
  • Resolve-Path: display the path after resolving wildcards

The pipe (|) can be used to redirect output.

Conditions

Conditions can be evaluated with if:

if ($(Get-Service "$serviceName" -ErrorAction SilentlyContinue).Status -eq "Running") {
}

-eq is used for testing equality. -ne for difference.

Deploying with Powershell

For installing our package we need to create the target directories and copy our archives:

$packageName = 'myproject'
$installDir = "c:\examples"
$packageDir = "$installDir\my_project"

Write-Host "Making sure $installDir is in place"
if (!(Test-Path -path $installDir)) {New-Item $installDir -Type Directory  | Out-Null}

Write-Host "Making sure $packageDir is in place"
if (!(Test-Path -path $packageDir)) {New-Item $packageDir -Type Directory  | Out-Null}

Write-Host "Installing ${packageName} to ${packageDir}"
Copy-Item $installFile $packageDir

When reinstalling we first need to delete existing versions:

$installDir = "c:\examples"
$packageDir = "$installDir\my_project"

if (Test-Path -path $packageDir) {
  Remove-Item -recurse $(Join-Path $packageDir "\*") -exclude *.conf, *-bak*, *-old*
}

Now we get to the meat creating a Windows service.

$installDir = "c:\examples"
$packageName = 'myproject'
$serviceName = 'My Project'
$packageDir = "$installDir\my_project"
$cmdFile = "$packageDir\$packageName.cmd"

if (!(Test-Path ($cmdFile)))
{
    $cmdcontent = @"
cd /d ${packageDir}
java -jar ${packageName}.jar >> output.log 2>&1
"@
    echo "Dropping a ${packageName}.cmd file"
    Set-Content $cmdFile $cmdcontent -Encoding ASCII -Force
}

if (!(Get-Service "${serviceName}" -ErrorAction SilentlyContinue))
{
  echo "No ${serviceName} Service detected"
  echo "Installing ${serviceName} Service"
  Start-ChocolateyProcessAsAdmin "install `"${serviceName}`" ${cmdFile}" nssm
}

Start-ChocolateyProcessAsAdmin "set `"${serviceName}`" Start SERVICE_DEMAND_START" nssm

First we need to create a command (.cmd) file which starts our java application. Installing a service calling this command file is done via a helper called nssm. We set it to starting manual because we want to start and stop it periodically with the help of a task.

For enabling a reinstall we first stop an existing service.

$installDir = "c:\examples"
$serviceName = 'My Project'
$packageDir = "$installDir\my_project"

if (Test-Path -path $packageDir) {
  Write-Host $(Get-Service "$serviceName" -ErrorAction SilentlyContinue).Status

  if ($(Get-Service "$serviceName" -ErrorAction SilentlyContinue).Status -eq "Running") {
    Start-ChocolateyProcessAsAdmin "Stop-Service `"${serviceName}`""
    Start-Sleep 2
  }
}

Next we install a task with help of the build in schtasks command.

$serviceName = 'My Project'
$installDir = "c:\examples"
$packageDir = "$installDir\my_project"
$cmdFile = "$packageDir\$packageName.cmd"

echo "Installing ${serviceName} Task"
Start-ChocolateyProcessAsAdmin "schtasks /create /f /ru system /sc hourly /st 00:30 /tn `"${serviceName}`" /tr  `"$cmdFile`""

Stopping and deleting the task enables us to reinstall.

$packageName = 'myproject'
$serviceName = 'My Project'
$installDir = "c:\examples"
$packageDir = "$installDir\my_project"

if (Test-Path -path $packageDir) {
  Write-Host "Stopping and deleting current version of ${packageName}"
  Start-ChocolateyProcessAsAdmin "schtasks /delete /f /tn `"${serviceName}`" "
  Start-Sleep 2
  Start-ChocolateyProcessAsAdmin "schtasks /end /f /tn `"${serviceName}`" "
  Remove-Item -recurse $(Join-Path $packageDir "\*") -exclude *.conf, *-bak*, *-old*
}

tl;dr

Putting it all together looks like this:

$ErrorActionPreference = 'Stop'; # stop on all errors

$packageName = 'myproject'
$serviceName = 'My Project'
$installDir = "c:\examples"
$packageDir = "$installDir\my_project"
$cmdFile = "$packageDir\$packageName.cmd"
$currentDatetime = Get-Date -format yyyyddMMhhmm
$scriptDir = "$(Split-Path -parent $MyInvocation.MyCommand.Definition)"
$installFile = (Join-Path $scriptDir -ChildPath "..\archives\$packageName.jar") | Resolve-Path


if (Test-Path -path $packageDir) {
  Write-Host "Stopping and deleting current version of ${packageName}"
  Start-ChocolateyProcessAsAdmin "schtasks /delete /f /tn `"${serviceName}`" "
  Start-Sleep 2
  Start-ChocolateyProcessAsAdmin "schtasks /end /f /tn `"${serviceName}`" "
  Remove-Item -recurse $(Join-Path $packageDir "\*") -exclude *.conf, *-bak*, *-old*

  Write-Host $(Get-Service "$serviceName" -ErrorAction SilentlyContinue).Status

  if ($(Get-Service "$serviceName" -ErrorAction SilentlyContinue).Status -eq "Running") {
    Write-Host "Stopping and deleting current version of ${packageName}"
    Start-ChocolateyProcessAsAdmin "Stop-Service `"${serviceName}`""
    Start-Sleep 2
  }

  if ($(Get-Service "$serviceName"  -ErrorAction SilentlyContinue).Status -ne "Running") {
    Write-Host "Cleaning ${packageDir} directory"
    Remove-Item -recurse $(Join-Path $packageDir "\*") -exclude *.conf, *-bak*, *-old*
  }
}
 
Write-Host "Making sure $installDir is in place"
if (!(Test-Path -path $installDir)) {New-Item $installDir -Type Directory  | Out-Null}

Write-Host "Making sure $packageDir is in place"
if (!(Test-Path -path $packageDir)) {New-Item $packageDir -Type Directory  | Out-Null}

Write-Host "Installing ${packageName} to ${packageDir}"
Copy-Item $installFile $packageDir

if (!(Test-Path ($cmdFile)))
{
    $cmdcontent = @"
cd /d ${packageDir}
java -jar ${packageName}.jar >> output.log 2>&1
"@
    echo "Dropping a ${packageName}.cmd file"
    Set-Content $cmdFile $cmdcontent -Encoding ASCII -Force
}

if (!(Get-Service "${serviceName}" -ErrorAction SilentlyContinue))
{
  echo "No ${serviceName} Service detected"
  echo "Installing ${serviceName} Service"
  Start-ChocolateyProcessAsAdmin "install `"${serviceName}`" ${cmdFile}" nssm
}

Start-ChocolateyProcessAsAdmin "set `"${serviceName}`" Start SERVICE_DEMAND_START" nssm

echo "Installing ${serviceName} Task"
Start-ChocolateyProcessAsAdmin "schtasks /create /f /ru system /sc hourly /st 00:30 /tn `"${serviceName}`" /tr  `"$cmdFile`""

Finally

Now we just need to create the package in our build script. The package will be named my_project.version.nupkg.
On our build machine we need to install choco. On the target machine we need the following tools installed:
chocolatey and nssm (for service management). Now we can create the package with:

  choco pack --version=${version}

Copy it to the target machine and install the current version with:

choco install -f -y c:\\installations\\${archive.name} --version=${version}

Put these steps inside a build script and use your favourite contininuous integration platform and voila.
Done.

deploy

Automatic deployment of (Grails) applications

What was your most embarrassing moment in your career as a software engineer? Mine was when I deployed an application to production and it didn’t even start. Stop using manual deployment and learn how to automate your (Grails) deployment

What was your most embarrassing moment in your career as a software engineer? Mine was when I deployed an application to production and it didn’t even start.

Early in my career deploying an application usually involved a fair bunch of manual steps. Logging in to a remote server via ssh and executing various commands. After a while repetitive steps were bundled in shell scripts. But mistakes happened. That’s normal. The solution is to automate as much as we can. So here are the steps to automatic deployment happiness.

Build

One of the oldest requirements for software development mentioned in The Joel Test is that you can build your app in one step. With Grails that’s easy just create a build file (we use Apache Ant here but others will do) in which you call grails clean, grails test and then grails war:

<project name="my_project" default="test" basedir=".">
  <property name="grails" value="${grails.home}/bin/grails"/>
  
  <target name="-call-grails">
    <chmod file="${grails}" perm="u+x"/>
    <exec dir="${basedir}" executable="${grails}" failonerror="true">
      <arg value="${grails.task}"/><arg value="${grails.file.path}"/>
      <env key="GRAILS_HOME" value="${grails.home}"/>
    </exec>
  </target>
  
  <target name="-call-grails-without-filepath">
    <chmod file="${grails}" perm="u+x"/>
    <exec dir="${basedir}" executable="${grails}" failonerror="true">
      <arg value="${grails.task}"/><env key="GRAILS_HOME" value="${grails.home}"/>
    </exec>
  </target>

  <target name="clean" description="--> Cleans a Grails application">
    <antcall target="-call-grails-without-filepath">
      <param name="grails.task" value="clean"/>
    </antcall>
  </target>
  
  <target name="test" description="--> Run a Grails applications tests">
    <chmod file="${grails}" perm="u+x"/>
    <exec dir="${basedir}" executable="${grails}" failonerror="true">
      <arg value="test-app"/>
      <arg value="-echoOut"/>
      <arg value="-echoErr"/>
      <arg value="unit:"/>
      <arg value="integration:"/>
      <env key="GRAILS_HOME" value="${grails.home}"/>
    </exec>
  </target>

  <target name="war" description="--> Creates a WAR of a Grails application">
    <property name="build.for" value="production"/>
    <property name="build.war" value="${artifact.name}"/>
    <chmod file="${grails}" perm="u+x"/>
    <exec dir="${basedir}" executable="${grails}" failonerror="true">
      <arg value="-Dgrails.env=${build.for}"/><arg value="war"/><arg value="${target.directory}/${build.war}"/>
      <env key="GRAILS_HOME" value="${grails.home}"/>
    </exec>
  </target>
  
</project>

Here we call Grails via the shell scripts but you can also use the Grails ant task and generate a starting build file with

grails integrate-with --ant

and modify it accordingly.

Note that we specify the environment for building the war because we want to build two wars: one for production and one for our functional tests. The environment for the functional tests mimic the deployment environment as close as possible but in practice you have little differences. This can be things like having no database cluster or no smtp.
Now we can put all this into our continuous integration tool Jenkins and every time a checkin is made out Grails application is built.

Test

Unit and integration tests are already run when building and packaging. But we also have functional tests which deploy to a local Tomcat and test against it. Here we fetch the test war of the last successful build from our CI:

<target name="functional-test" description="--> Run functional tests">
  <mkdir dir="${target.base.directory}"/>
  <antcall target="-fetch-file">
    <param name="fetch.from" value="${jenkins.base.url}/job/${jenkins.job.name}/lastSuccessfulBuild/artifact/_artifacts/${test.artifact.name}"/>
    <param name="fetch.to" value="${target.base.directory}/${test.artifact.name}"/>
  </antcall>
  <antcall target="-run-tomcat">
    <param name="tomcat.command.option" value="stop"/>
  </antcall>
  <copy file="${target.base.directory}/${test.artifact.name}" tofile="${tomcat.webapp.dir}/${artifact.name}"/>
  <antcall target="-run-tomcat">
    <param name="tomcat.command.option" value="start"/>
  </antcall>
  <chmod file="${grails}" perm="u+x"/>
  <exec dir="${basedir}" executable="${grails}" failonerror="true">
    <arg value="-Dselenium.url=http://localhost:8080/${product.name}/"/>
    <arg value="test-app"/>
    <arg value="-functional"/>
    <arg value="-baseUrl=http://localhost:8080/${product.name}/"/>
    <env key="GRAILS_HOME" value="${grails.home}"/>
  </exec>
</target>

Stopping and starting Tomcat and deploying our application war in between fixes the perm gen space errors which are thrown after a few hot deployments. The baseUrl and selenium.url parameters tell the functional plugin to look at an external running Tomcat. When you omit them they start the Tomcat and Grails application themselves in their process.

Release

Now all tests passed and you are ready to deploy. So you fetch the last build … but wait! What happens if you have to redeploy and in between new builds happened in the ci? To prevent this we introduce a step before deployment: a release. This step just copies the artifacts from the last build and gives them the correct version. It also fetches the lists of issues fixed from our issue tracker (Jira) for this version as a PDF. These lists can be sent to the customer after a successful deployment.

Deploy

After releasing we can now deploy. This means fetching the war from the release job in our ci server and copying it to the target server. Then the procedure is similar to the functional test one with some slight but important differences. First we make a backup of the old war in case anything goes wrong and we have to rollback. Second we also copy the context.xml file which Tomcat needs for the JNDI configuration. Note that we don’t need to copy over local data files like PDF reports or serach indexes which were produced by our application. These lie outside our web application root.

<target name="deploy">
  <antcall target="-fetch-artifacts"/>

  <scp file="${production.war}" todir="${target.server.username}@${target.server}:${target.server.dir}" trust="true"/>
  <scp file="${target.server}/context.xml" todir="${target.server.username}@${target.server}:${target.server.dir}/${production.config}" trust="true"/>

  <antcall target="-run-tomcat-remotely"><param name="tomcat.command.option" value="stop"/></antcall>

  <antcall target="-copy-file-remotely">
    <param name="remote.file" value="${tomcat.webapps.dir}/${production.war}"/>
    <param name="remote.tofile" value="${tomcat.webapps.dir}/${production.war}.bak"/>
  </antcall>
  <antcall target="-copy-file-remotely">
    <param name="remote.file" value="${target.server.dir}/${production.war}"/>
    <param name="remote.tofile" value="${tomcat.webapps.dir}/${production.war}"/>
  </antcall>
  <antcall target="-copy-file-remotely">
    <param name="remote.file" value="${target.server.dir}/${production.config}"/>
    <param name="remote.tofile" value="${tomcat.conf.dir}/Catalina/localhost/${production.config}"/>
  </antcall>

  <antcall target="-run-tomcat-remotely"><param name="tomcat.command.option" value="start"/></antcall>
</target>

Different Environments: Staging and Production

If you look closely at the deployment script you notice that uses the context.xml file from a directory named after the target server. In practice you have multiple deployment targets not just one. At the very least you have what we call a staging server. This server is used for testing the deployment and the deployed application before interrupting or corrupting the production system. It can even be used to publish a pre release version for the customer to try. We use a seperate job in our ci server for this. We separate the configurations needed for the different environments in directories named after the target server. What you shouldn’t do is to include all those configurations in your development configurations. You don’t want to corrupt a production application when using the staging one or when your tests run or even when you are developing. So keep configurations needed for the deployment environment separate and separate from each other.

Celebrate

Now you can deploy over and over again with just one click. This is something to celebrate. No more headaches, no more bitten finger nails. But nevertheless you should take care when you access a production system even it is automatically. Something you didn’t foresee in your process could go wrong or you could make a mistake when you try out the application via the browser. Since we need to be aware of this responsibility everybody who interacts with a production system has to wear our cowboy hats. This is a conscious step to remind oneself to take care and also it reminds everybody else that you shouldn’t disturb someone interacting with a production system. So don’t mess with the cowboy!

The vigilant’s hat

We put on a cowboy hat every time we connect to a live server. This article describes why.

In the german language, there is a proverb that means “being alert” or “being on guard”. It’s called “auf der Hut sein” and would mean, if translated without context, “being on hat”. That doesn’t make sense, even to germans. But it’s actually directly explainable if you know that the german word “Hut” has two meanings. It most of the time means the hat you put on your head. But another form of it means “shelter”, “protection” or “guard”. It turns up in quite a few derived german words like “Obhut” (custody) or “Vorhut” (vanguard). So it isn’t so strange for germans to think of a hat when they need to stay alert and vigilant.

Vigilant developers

Being mindful and careful is a constant state of mind for every developer. The computer doesn’t accept even the slightest fuzziness of thought. But there is a moment when a developer really has to take care and be very very precautious: When you operate on a live server. These machines are the “real” thing, containing the deployed artifacts of the project and connecting to the real database. If you make an error on this machine, it will be visible. If you accidentally wipe some data, it’s time to put the backup recovery process to the ultimate test. And you really should have that backup! In fact, you should never operate on a live server directly, no matter what.

Learning from Continuous Delivery

One of the many insights in the book “Continuous Delivery” by Jez Humble and David Farley is that you should automate every step that needs to take place on a live server. There is an ever-growing list of tools that will help you with this task, but in its most basic form, you’ll have to script every remote action, test it thoroughly and only then upload it to the live server and execute it. This is the perfect state your deployment should be in. If it isn’t yet, you will probably be forced to work directly on the live server (or the real database) from time to time. And that’s when you need to be “auf der Hut“. And you can now measure your potential for improvement in the deployment process area in “hat time”.

cowboy hats in action

We ain’t no cowboys!

In our company, there is a rule for manual work on live servers: You have to wear a hat. We bought several designated cowboy hats for that task, so there’s no excuse. If you connect to a server that isn’t a throw-away test instance, you need to wear your hat to remind you that you’re responsible now. You are responsible for the herd (the data) and the ranch (the server). You are responsible for every click you make, every command you issue and every change you make. There might be a safety net to prevent lethal damage, but this isn’t a test. You should get it right this time. As long as you wear the “live server hat”, you should focus your attention on the tasks at hand and document every step you make.

Don’t ask, they’ll shoot!

But the hat has another effect that protects the wearer. If you want to ask your collegue something and he’s wearing a cowboy hat, think twice! Is it really important enough to disturb him during the most risky, most stressful times? Do you really need to shout out right now, when somebody concentrates on making no mistake? In broadcasting studios, there is a sign saying “on air”. In our company, there is a hat saying “on server”. And if you witness more and more collegues flocking around a terminal, all wearing cowboy hats and seeming concerned, prepare for a stampede – a problem on a live server, the most urgent type of problem that can arise for developers.

The habit of taking off the hat after a successful deployment is very comforting, too. You physically alter your state back to normal. You switch roles, not just wardrobe.

Why cowboy hats?

We are pretty sure that the same effects can be achieved with every type of hat you can think of. But for us, the cowboy hat combines ironic statement with visual coolness. And there is no better feeling after a long, hard day full of deployments than to gather around the campfire and put the spurs aside.