Packaging RPMs for a variety of target platforms, part 2

In part 1 of our series covering the RPM package management system we learned the basics and built a template SPEC file for packaging software. Now I want to give you some deeper advice on building packages for different openSUSE releases, architectures and build systems. This includes hints for projects using cmake, qmake, python, automake/autoconf, both platform dependent and independent.

Use existing makros and definitions

RPM provides a rich set of macros for generic access to directory paths and programs providing better portability over different operating system releases. Some popular examples are /usr/lib vs. /usr/lib64 and python2.6 vs. python2.7. Here is an exerpt of macros we use frequently:

  • %_lib and %_libdir for selection of the right directory for architecture dependent files; usually [/usr/]lib or [/usr/]lib64.
  • %py_sitedir for the destination of python libraries and %py_requires for build and runtime dependencies of python projects.
  • %setup, %patch[#], %configure, %{__python} etc. for preparation of the build and execution of helper programs.
  • %{buildroot} for the destination directory of the build artifacts during the build

Use conditionals to enable building on different distros and releases

Sometimes you have to use %if conditional clauses to change the behaviour depending on

  • operating system version
    %if %suse_version < 1210
      Requires: libmysqlclient16
    %else
      Requires: libmysqlclient18
    %endif
    
  • operating system vendor
    %if "%{_vendor}" == "suse"
    BuildRequires: klogd rsyslog
    %endif
    

because package names differ or different dependencies are needed.

Try to be as lenient as possible in your requirement specifications enabling the build on more different target platforms, e.g. use BuildRequires: c++_compiler instead of BuildRequires: g++-4.5. Depend on virtual packages if possible and specify the versions with < or > instead of = whenever reasonable.

Always use a version number when specifying a virtual package

RPM does a good job in checking dependencies of both, the requirements you specify and the implicit dependencies your package is linked against. But if you specify a virtual package be sure to also provide a version number if you want version checking for the virtual package. Leaving it out will never let you force a newer version of the virtual package if one of your packages requires it.

Build tool specific advices

  • qmake: We needed to specify the INSTALL_ROOT issuing make, e.g.:
    qmake
    make INSTALL_ROOT=%{buildroot}/usr
    
  • autotools: If the project has a sane build system nothing is easier to package with RPM:
    %build
    %configure
    make
    
    %install
    %makeinstall
    
  • cmake: You may need to specify some directory paths with -D. Most of the time we used something like:
    %build
    cmake -DCMAKE_INSTALL_PREFIX=%{_prefix} -Dlib_dir=%_lib -G "Unix Makefiles" .
    make
    

Working with patches

When packaging projects you do not fully control, it may be neccessary to patch the project source to be able to build the package for your target systems. We always keep the original source archive around and use diff to generate the patches. The typical workflow to generate a patch is the following:

  1. extract source archive to source-x.y.z
  2. copy extracted source archive to a second directory: cp -r source-x.y.z source-x.y.z-patched
  3. make changes in source-x.y.z-patched
  4. generate patch with: cd source-x.y.z; diff -Naur . ../source-x.y.z-patched > ../my_patch.patch

It is often a good idea to keep separate patches for different changes to the project source. We usually generate separate patches if we need to change the build system, some architecture or compiler specific patches to the source, control-scripts and so on.

Applying the patch is specified in the patch metadata fields and the prep-section of the SPEC file:

Patch0: my_patch.patch
Patch1: %{name}-%{version}-build.patch

...

%prep
%setup -q # unpack as usual
%patch0 -p0
%patch1 -p0

Conclusion
RPM packaging provides many useful tools and abstractions to build and package projects for a wide variety of RPM-based operation systems and releases. Knowing the macros and conditional clauses helps in keeping your packages portable.

In the next and last part of this series we will automate building the packages for different target platforms and deploying them to a repository server.

Summary of the Schneide Dev Brunch at 2012-03-25

If you couldn’t attend the Schneide Dev Brunch in March 2012, here are the main topics we discussed for you to review.

This summary is a bit late and my only excuse it that the recent weeks were packed with action. But the good news is: The Schneide Dev Brunch is still alive and gaining traction with an impressive number of participants for the most recent event. The Schneide Dev Brunch is a regular brunch in that you gather together to have a late breakfast or early dinner on a sunday, only that all attendees want to talk about software development (and various other topics). If you bring a software-related topic along with your food, everyone has something to share. We were able to sit in the sun on our roofgarden and enjoy the first warm spring weekend.

We had to do introductory rounds because there were quite some new participants this time. And they brought good topics and insights with them. Let’s have a look at the topics we discussed:

Checker Framework

This isn’t your regular java framework, meant to reside alongside all the other jar files in your dependency folder. The Checker framework enhances java’s type system with “pluggable types”. You have to integrate it in your runtime, your compiler and your IDE to gain best results, but after that you’re nothing less than a superhero among regulars. Imagine pluggable types as additional layers to your class hierarchy, but in the z-axis. You’ll have multiple layers of type hierachies and can include them into your code to aid your programming tasks. A typical use case is the compiler-based null checking ability, while something like Perl’s taint mode is just around the corner.

But, as our speaker pointed out, after a while the rough edges of the framework will show up. It still is somewhat academic and lacks integration sometimes. It’s a great help until it eventually becomes a burden.

Hearing about the Checker framework left us excited to try it sometimes. At least, it’s impressive to see what you can do with a little tweaking at the compiler level.

Getting Stuck

A blog entry by Jeff Wofford inspired one of us to talk about the notion of “being stuck” in software development. Jeff Wofford himself wrote a sequel to the blog entry, differentiating four kinds of stuck. We could relate to the concept and have seen it in the wild before. The notion of “yak shaving” entered the discussion soon. In summary, we discussed the different types of being stuck and getting stuck and what we think about it. While there was no definite result, everyone could take away some insight from the debate.

Zen to Done

One topic was a review of the Zen to Done book on self-organization and productivity improvement. The methodology can be compared to “Getting Things Done“, but is easier to begin with. It defines a bunch of positive habits to try and establish in your everyday life. Once you’ve tried them all, you probably know what works best for you and what just doesn’t resonate at all. On a conceptional level, you can compare Zen to Done to the Clean Code Developer, both implementing the approach of “little steps” and continuous improvement. Very interesting and readily available for your own surveying. There even exists a german translation of the book.

Clean Code Developer mousepads

Speaking of the Clean Code Developer. We at the Softwareschneiderei just published our implementation of mousepads for the Clean Code Developer on our blog. During the Dev Brunch, we reviewed the mousepads and recognized the need for an english version. Stay tuned for them!

Book: Making software

The book “Making software” is a collection of essays from experienced developers, managers and scientists describing the habits, beliefs and fallacies of modern software development. Typical for a book from many different authors is the wide range of topics and different quality levels in terms of content, style and originality. The book gets a recommendation because there should be some interesting reads for everyone inside. One essay was particularly interesting for the reviewer: “How effective is Test-Driven Development?” by Burak Turhan and others. The article treats TDD like a medicine in a clinical trial, trying to determine the primary effects, the most effective dosage and the unwanted side effects. Great fun for every open-minded developer and the origin of a little joke: If there was a pill you could take to improve your testing, would a placebo pill work, too?

Book: Continuous Delivery

This book is the starting point of this year’s hype: “Continuous Delivery” by Jez Humble and others. Does it live up to the hype? In the opinion of our reviewer: yes, mostly. It’s a solid description of all the practices and techniques that followed continuous integration. The Clean Code Developer listed them as “Continuous Integration II” until the book appeared and gave them a name. The book is a highly recommened read for the next years. Hopefully, the practices become state-of-the-art for most projects in the near future, just like it went with CI. The book has a lot of content but doesn’t shy away from repetition, too. You should read it in one piece, because later chapters tend to refer to earlier content quite often.

Three refactorings to grace

The last topic was the beta version of an article about the difference that three easy refactorings can make on test code. The article answered the statement of a participant that he doesn’t follow the DRY principle in test code in a way. It is only available in a german version right now, but will probably be published on the blog anytime soon in a proper english translation.

Epilogue

This Dev Brunch was a lot of fun and had a lot more content than listed here. Some of us even got sunburnt by the first real sunny weather this year. We are looking forward to the next Dev Brunch at the Softwareschneiderei. And as always, we are open for guests and future regulars. Just drop us a notice and we’ll invite you over next time.

Gamification in Software Development

During the last three years gamification became quite popular in everyday applications, e.g. marketing or social media. A simple, but often observed technique is to award users with badges for specific actions and achievements. This technique can be used in pretty simple ways, e.g. member titles in forums based on the number of posts, but may also be rather elaborate, e.g. StackOverflow’s system of granting badges to users based on on their reputation and other aspects. Some companies even announced to, or already do, include gamification aspects in consumer and business software, e.g. SAP or Microsoft.

Besides adding fun and a little competition to everyday activities, gamification can also be useful by encouraging users to explore the features of software and, by doing so, discover functionality they are yet unaware of*.

Considering software development, there are also some gamification plugins for IDEs and other tools, which are worth to take a look at. The following provides an incomplete list:

If you happen to know of any other, please leave a comment, so I can update and extend this list.


*Btw: Did you know, that JIRA has keyboard shortcuts?

Performance Hogs Sometimes Live in Most Unexpected Places

Surprises when measuring performance are common – but sometimes you just can’t believe it.

When we develop software we always apply the best practice of not optimizing prematurely. This plays together with other best practices like writing the most readable code, or YAGNI.

‘Premature’ means different things in different situations. If you don’t have performance problems it means that there is absolutely no point in optimizing code. And if you do have performance problems it means that Thou Shalt Never Guess which code to optimize because software developers are very bad at this. The keyword here is profiling.

Since we don’t like to be “very bad” at something we always try to improve our skills in this field. The skill of guessing which code has to be optimized, or “profiling in your head” is no different in this regard.

So most of the times in profiling sessions, I have a few unspoken guesses at which parts of the code the profiler will point me to. Unfortunately, I have to say that  I am very often very surprised by the outcome.

Surprises in performance fixing sessions are common but they are of different quality. One rather BIG surprise was to find out that std::string::find of the C++ standard library is significantly slower (by factor > 10) than its C library counterpart strstr (discovered with gcc-4.4.6 on CentOS 6, verified with eglibc-2.13 and gcc-4.7).

Yes, you read right and you may not believe it. That was my reaction, too, so I wrote a little test program containing only two strings and calls to std::string::find and std::strstr, respectively. The results were – and I’ve no problem repeating myself here – a BIG surprise.

The reason for that is that std::strstr uses a highly optimized string matching algorithm version whereas std::string::find works with straight-forward memory comparison.

So when doing profiling sessions, always be prepared for shaking-your-world-view kind of surprises. They can even come from your beloved and highly regarded standard library.

UPDATE: See this stackoverflow question for more information.

Clean Code OSX / Cocoa Development – Setting up CI and unit testing

To start with the tool chain used by clean code development you need a continuous integration server.
Here we install Jenkins on OS X (Lion) for Cocoa development (including unit testing of course).

Prerequisites: Xcode 4 and Java 1.6 installed

To start with the tool chain used by clean code development you need a continuous integration server.
Here we install Jenkins on OS X (Lion) for Cocoa development (including unit testing of course).

Installing Jenkins

Installing Jenkins is easy if you have homebrew installed:

brew update
brew install jenkins

and start it:

java -jar /usr/local/Cellar/jenkins/1.454/lib/jenkins.war

Open your browser and go to http://localhost:8080.

Installing the Xcode plugin

Click on Manage Jenkins -> Manage Plugins
and install the following plugins:

  • Git plugin
  • Xcode plugin (not the SICCI one)

Setup Job

On the Jenkins start page navigate to New Job -> Freestyle

Choose Git as your Version control system (or what is appropriate for you). If you want to run a local git build use a file URL, supposing your project is in a directory named MyProject inside your home directory the URL would look like:

file://localhost//Users/myuser/MyProject/

Add a Xcode build step under Build -> Add build step -> Xcode
and enter your main target (which is normally your project name)
Target: MyProject
Configuration: Debug

If you got Xcode 4.3 installed you may run into

error: can't exec '/Developer/usr/bin/xcodebuild' (No such file or directory)

First you need to install the Command Line Tools Xcode 4 via Downloads Preference Pane in Xcode (you need a developer account) and run

sudo xcode-select -switch /Applications/Xcode.app/Contents/Developer

Done!
Now you can build your project via Jenkins.

GHUnit Tests

Since we want to do clean code development we need unit tests. Nowadays you have two options: OCUnit or GHUnit. OCUnit is baked into Xcode right from the start and for using it in Jenkins you just create an additional build step with your unit testing target. So why use GHUnit (besides having a legacy project using it)? For me GHUnit has one significant advantage over OCUnit: you can run an individual test. And with some additions and tweaks you have support in Xcode, too.

So if you want to use GHUnit start with installing the Xcode Templates.
In Xcode you select your targets and create a new target via New Target -> Add Target -> GHUnit -> GHUnit OSX Test Bundle with OCMock
This creates a new directory. If you use automatic reference counting (ARC), replace GHUnitTestMain.m with the one from Tae

Copy RunTests.sh into UnitTests/Supported Files which copies the file into your UnitTests directory. Make it executable from the terminal with

chmod u+x RunTests.sh

In Xcode navigate to your unit test target and in Build Phases add the following under Run Script

$TARGETNAME/RunTests.sh

In Jenkins add a new Xcode build step to your job with Job -> Configure -> Add Build Step -> Xcode
Enter your unit test target into the Target field, set the configuration to Debug and add the follwing custom xcodebuild arguments:

GHUNIT_CLI=1 GHUNIT_AUTORUN=1 GHUNIT_AUTOEXIT=1 WRITE_JUNIT_XML=YES

At the time of this writing there exists a bug that the custom xcodebuild arguments are not persisted after the first run.

At the bottom of the page check Publish JUnit Test Report and enter

build/test-results/*.xml.

Ready to start!

Clean Code Developer at your fingertips

You’ve probably already heard about the Clean Code Developer initiative. We’re donating a full spectrum of mousepad designs for your educational support.

We are participants in the Clean Code Developer (CCD) movement. This initiative provides a way to perpetually learn, train, reflect and act on the most important topics of today’s software development by formulating a value system and a learning path. The learning path is subdivided in different grades, associated with colors. Every Clean Code Developer progresses continually through the grades, focussing on the principles and practices of the current grade.

If you want a tongue-in-cheek explanation of what the Clean Code Developer is in one sentence: It’s a sight-seeing tour to the most prominent topics every professional software developer should know. But other than your usual tourist rip-off, you can just stay seated and enjoy another round without ever paying anything except attention.

Visualize it

An important aspect of learning and deliberate practice is proper visualization. We invest a lot of work at our workplace, our software and the interaction with our customers to make things visible. When we reflected on our Clean Code Developer practice, we knew that it lacked visualization.

The proposed equipment for a Clean Code Developer is a desktop background picture, a mousepad with an image of all grades at once and some rubber wristbands in the colors of the grades. The wristbands serve as a reminder and a self-assessment tool. The desktop background picture is nice, but only visible if we don’t perform actual work. This let us concentrate on the mousepad.

Duplicate if necessary

The mousepad is the most prominent “advertising” space on the typical work desktop. We want to advertise the content of our current Clean Code Developer grade to ourself. The combination of these two thoughts is not one mousepad, but one for every grade. Imagine six mousepads in the colors of the grades, displaying your currently most important topics right under your fingertips.

We liked the idea so much that we worked on it. The result is a collection of mousepads for every Clean Code Developer to enjoy.

Iterative design

It took us several full cycles of planning, design, layout and proof-reading to have the first version of mousepads produced. It took only a few hours of real-world testing to start the second iteration to further improve the design. Right now, we are on the third iteration. The first iteration had the five colored CCD grades printed on real mousepads. The second iteration added the mousepad for the white grade and a little stand-up display for the initial black grade. The third iteration incorporated the official Clean Code Developer logo, the website URL and improved some details.

Here are some promotional photos of the five first-iteration mousepads:

This slideshow requires JavaScript.

As you can see, we chose to print ultra-slim mousepads to test if it’s feasible to use them stacked all at once (it isn’t, your mileage may vary) or use them even if you aren’t used to mousepads at all (it depends, really). You might want to print the images onto the mousepad you prefer best.

Do it yourself

Yes, you’ve read it right. We are donating the mousepad images back to the community. You can download everything right here:

All documents are bare of any company logo or other advertising and free for your constructive usage. There is only one catch really: the documents are in german language. This might not be apparent at first because we really like the original english technical terms, but some content might need translation for non-german speakers. If you are interested to produce an all-english version, drop us a line.

Acknowledgements

These mousepads wouldn’t exist without the help and inspiration of many co-workers. First of all, the founders of the Clean Code Developer movement, Ralf Westphal and Stefan Lieser, provided all the content of the mousepads. Without their groundbreaking work, we probably wouldn’t have thought of this. The design and production is owed to Hannegret Lindner from the Hannafaktur, a small graphic design agency. We admire her endurance with our iterative approach. And finally, the initial inspiration sparked in a creative discussion with Eric Wolf and Benjamin Trautwein from ABAS Software AG.

It’s your turn now

We are very curious about your story, photo or action still with the mousepads (or the little stand-up display). You can also just share your thoughts about the whole idea or submit an improvement. We’d love to hear from you.

Dependencies: Let’s have just one more

A few days back, I evaluated some libraries to be used in a C++ based application. At first glance, one of these looked particularly good. Lots of well written and detailed documentation, a nice to use API and quite some success stories. I decided to give it a try, which was exactly when I encountered a first minor inconvenience. While the library was available as pre-built release for a vast amount of operating systems, 32 bit as well as 64 bit, there was no official, pre-built release for the required 64 bit Windows. Thus, I had to compile it myself. No problem so far.

For this case, the documentation even had a section listing the dependencies required for building the library. Due to this list being not very long, I was rather enthusiastic to finally be able to try the library.

To cut it short, that list was all but complete.

I spent the better part of the afternoon trying to get the build done. All in vain. When I resolved one dependency, another until then unknown dependency arose, then the next, and so on. When I reached the point where a dependency required Fortran to be built (no joke!) I eventually decided to abandon the nice looking library in favor of another one, which isn’t nearly as all-embracing and nice, but at least won’t take me even deeper into dependency hell.

This rather frustrating experience made me wonder, whether the authors of the library even once tried to build it on another than the development machine? And if so, why didn’t they bother to include a complete list of the dependencies into the documentation?

Clang, The Friendly Compiler

Clang C/C++ compiler can be called The Friendly Compiler, since it makes it much easier to find and understand compile errors and potential bugs in your code. Go use it!

A while back I suggested to make friends with your compiler as a basis for developing high quality code. My focus then was GCC since it was and still is the compiler I use most of the time. Well, turns out that although GCC may be a reasonably good companion on the C/C++ development road, there are better alternatives.

Enter Clang: I had heard about Clang a few times in the past but never gave it a real shot. That changed after I watched Chandler Carruth’s talk at GoingNative 2012.

First of all I was stunned by the quote from Richard Stallman about GCC being deliberatly designed to make it hard to use it in non-free software. I always wondered why IDEs like KDevelop keep reinventing the wheel all the time by implementing their own C/C++ parsers instead of using already existing and free GCC code. This was the answer: THEY SIMPLY COULDN’T!!

One main point of Chandler’s talk was the quality of diagnostic messages of Clang. GCC is a friend that although telling you exactly what’s wrong with your code, it often does it with complicated sentences hidden in walls of text.

Clang on the other hand, tries very hard to comprehend what you really wanted to write, it speaks in much more understandable words and shows you the offending code locations with nice graphics.

You could say that compared to Clang, which is empathic, understanding, pragmatic and always tries to be on the same page with you, GCC comes across more like an arrogant, self-pleasing and I’m-more-intelligent-than-you kinda guy.

Where GCC says: “What? That should be a template instantiation? Guess what, you’re doing WRONG!! “, Clang is more like: “Ok my friend, now let’s sit down together and analyse step-by-step what’s the problem here. I’ll make us tea.”

You’ll find many examples of Clangs nice diagnostic output in Chandler’s talk. Here is another one, as a little teaser:

struct A
{
  std::string _str1;
  std::string _str2;
};

struct AHasher
{
  std::size_t operator() (const A& a)
  {
    return std::tr1::hash()(a._str1) ^
      std::tr1::hash()(a._str2);
  }
};
...
typedef std::tr1::unordered_map<A, int> AMap;
...

What’s wrong with this code? Yes, exactly: the operator in AHasher must be const. Errors with const correctness are typical, easy-to-overlook kind of problems in day-to-day programming. GCCs reaction to something like that is that something discards qualifiers. This may be perfectly right, and after a while you even get used to it. But as you can see with Clang, you can do much better.

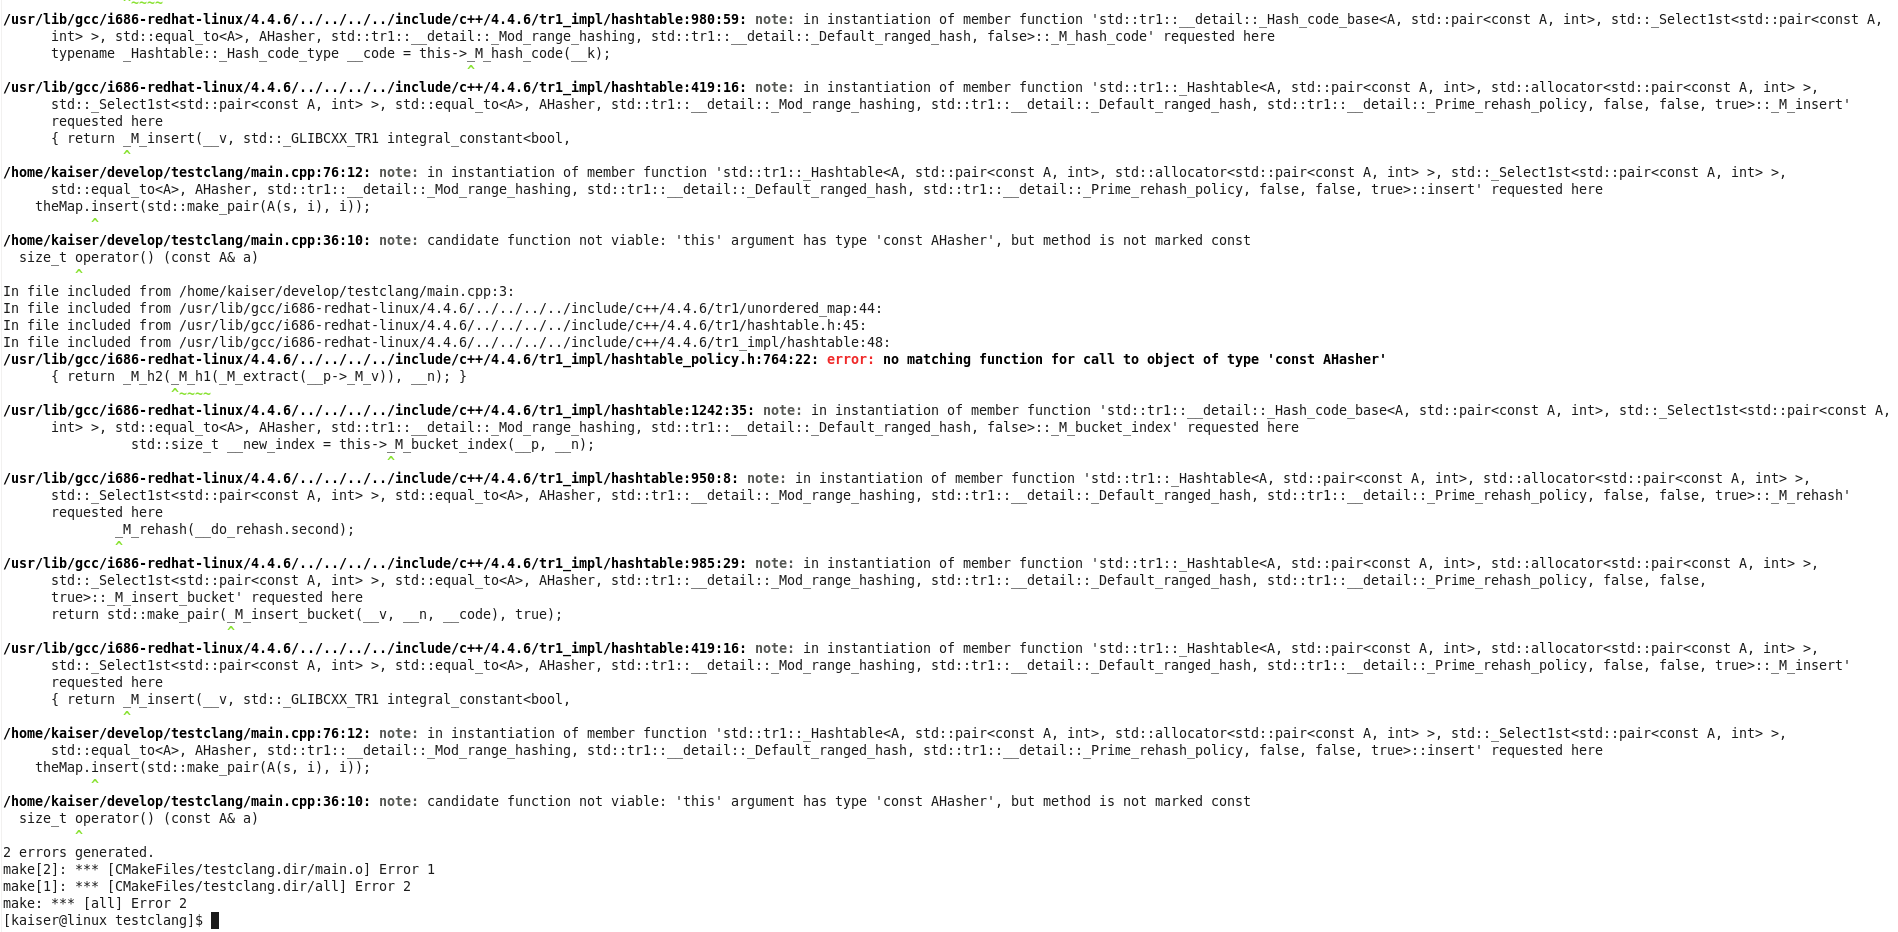
The following two screenshots directly compare GCCs and Clangs output compiling the code above. Because there is a template instantiation involved, GCC covers you in its typical wall of text, before it actually tells you what’s wrong (last line).

CLang’s output is much better formated, it shows you the template instantiation steps much more cleanly and in the last line it tells you to the point what is really wrong: …but method is not marked const. Yeah!


Take your programming course with a grain of salt, please

If you are cursed with silly rules in your programming course, we offer you some word of encouragement to find a mentor and keep your mental sanity and programming habits.

Lately, we had a talk with one of our former interns who now happens to study informatics at university. He presented some code he had written for his programming course and we did a team code review. The review itself was a lot of fun and sparked quite a few discussions. At one point, we assessed the different implementation styles of a method, changing the rather complex single return code into an early return method. Our former intern (now student) listened to the solution and stated: “I am not allowed to do that.”

There was a sudden silence, as everyone tried to comprehend what that means.

The student explained: “my course instructor prefers the single return approach over the early return style”. Well, that’s one thing, we can handle different opinions. “And”, he continued, “he announced there will be a painful deduction of points if we don’t comply to this style.” When the course tried to discuss this point, the explanation given was: “the single return style is superior because the other style is frowned upon.”

We couldn’t believe it. But, as it turns out, there are many rules like the one above in this programming course. And nearly every rule is highly debatable if not plain wrong (in our perception).

There is no problem with the presentation of certain rules in a beginner’s programming course. Novices need clear and precise rules to learn, according to the Dreyfus Model of Skill Acquisition. The concept just doesn’t work for students that aren’t on the Novices level anymore. These students are explicitely forbidden to create more advanced solutions. They are discouraged to look into different programming styles because it will only harm their grades.

We can think of a possible explanation for this scenario: The assignments have to be evaluated by the course instructors. It takes a lot of hard work (and time) to evaluate hundreds of totally different solutions for the same problem. If the solutions are mostly similar in style and concepts, the evaluation is a lot easier and can be done without full understanding of the code.

This is a rather poor explanation. It says “don’t be too advanced in your field of study or you will be too troublesome to attend to”. This is essentially an anesthetization by decree. But the real problem arises when you realize that there won’t be any continuative programming courses. They will never teach you all the more advanced concepts or rectify the silly rules that should get you along as a beginner. After you’ve successfully mastered this course, the studying focusses on the more academic topics of our field. The next possibility to develop your programming skills in a professional setting is your first software development job.

We don’t have a practical solution to this problem. One obvious solution would be to have more instructors evaluate less assignment solutions in the same time, enabling them to dive deeper in the code and give better personalized feedback. This scenario lacks at least enough capable instructors. The reality shows that Novices level students (in the sense of the Dreyfus Model) are often taught by Advanced Beginner level instructors (called a “tutor”).

But we have a word of encouragement for all you students out there, feeling dumbed down by your instructors: It’s not your fault! Take your programming course rules with a (big) grain of salt and talk to other developers. If you don’t know anybody already in the industry, try to make contact with some fellow open source developer on the web. It’s really just the advice “Find a Mentor” from the book Apprenticeship Patterns (highly recommended for aspiring software developers) applied in real life.

Because if you don’t actively unlearn all these arbitrary rules or at least put them into perspective, you’ll start your professional developer career with the burden of some really antic code quirks.

Good luck and tell us your story, if you want.

The Impatient Acceptance Test

When implementing new features it is always a good idea to test them – preferably with automated acceptance tests. Yet, there is a vast number of pitfalls to be avoided when doing so in order to put the testing effort to proper use. Just last week, I encountered a new one (at least for me): The impatient test.

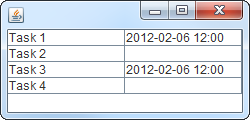
The new feature was basically a long taking background operation which presents its result in a table on the GUI. If the operation succeeded, date and time are displayed in the accordant cell of the table, if not, the cell is left untouched (e.g. left empty if there was no successful run yet, or, if there was, the date of the last successful run is shown).

During the test, four tasks were to be completed by the background operation, two of which were supposed to succeed and the others to fail. So, the expected result was something like:

Expected result

Having obeyed  the “fail-first” guideline and having seen the test pass later on, I was quite sure the test and the feature worked as intended. Yet, manual testing proved otherwise. With the exact same scenario, task 4 always succeeded.

In fact, there was a bug that caused task 4 to result in a false-positive. But why did the automated test not uncover this flaw? Let’s recall what the test does:

  1. Prepare the test environment and the application
  2. Start the background operation comprised of tasks 1-4
  3. Wait
  4. Evaluate/assert the results
  5. Clean up

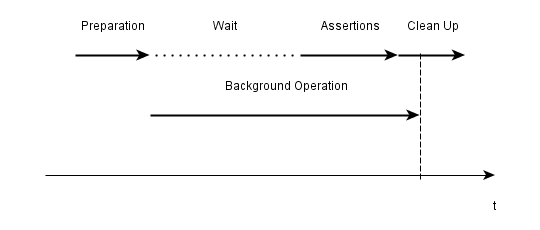
Some investigation unveiled that the problem was caused by the fact that the test just did not wait long enough for the background operation to finish properly, e.g. the results were evaluated before task 4 was finished. Thus, the false-positive occurred just after the test checked whether it was there:

Timeline of the test
Results being evaluated before everything is finished

After having spotted the source of the problem, several possible solutions ranging from “wait longer in the test” to “explicitly display unfinished runs in the application” came to mind. The most elegant and practical of which is to have the test waiting for the background operation to finish instead of just waiting a given period. Even though this required some more infrastructure.

Though acceptance testing is a great tool for developing software, this experience reminded me that there is also the possibility of flawed, or not completely correct, tests luring you into a false sense of security if you pay too few attention. Manual testing in addition to automated testing may help to avoid these pitfalls.