Functional tests for Grails with Geb and geckodriver

Previously we had many functional tests using the selenium-rc plugin for Grails. Many were initially recorded using Selenium IDE, then refactored to be more maintainable. These refactorings introduced “driver” objects used to interact with common elements on the pages and runners which improved the API for walking through a multipage process.

Selenium-rc got deprecated quite a while ago and support for Firefox broke every once in a while. Finally we were forced to migrate to the current state-of-the-art in Grails functional testing: Geb.

Generally I can say it is really a major improvement over the old selenium API. The page concept is similar to our own drivers with some nice features:

  • At-Checkers provide a standardized way of checking if we are at the expected page
  • Default and custom per page timeouts using atCheckWaiting
  • Specification of relevant content elements using a JQuery-like syntax and support for CSS-selectors
  • The so-called modules ease the interaction with form elements and the like
  • Much better error messages

While Geb is a real improvement over selenium it comes with some quirks. Here are some advice that may help you in successfully using geb in the context of your (grails) webapplication.

Cross-plattform testing in Grails

Geb (or more specifically the underlying webdriver component) requires a geckodriver-binary to work correctly with Firefox. This binary is naturally platform-dependent. We have a setup with mostly Windows machines for the developers and Linux build slaves and target systems. So we need binaries for all required platforms and have to configure them accordingly. We have simply put them into a folder in our project and added following configuration to the test-environment in Config.groovy:

environments {
  test {
    def basedir = new File(new File('.', 'infrastructure'), 'testing')
    def geckodriver = 'geckodriver'
    if (System.properties['os.name'].toLowerCase().contains('windows')) {
      geckodriver += '.exe'
    }
    System.setProperty('webdriver.gecko.driver', new File(basedir, geckodriver).canonicalPath)
  }
}

Problems with File-Uploads

If you are plagued with file uploads not working it may be a Problem with certain Firefox versions. Even though the fix has landed in Firefox 56 I want to add the workaround if you still experience problems. Add The following to your GebConfig.grooy:

driver = {
  FirefoxProfile profile = new FirefoxProfile()
  // Workaround for issue https://github.com/mozilla/geckodriver/issues/858
  profile.setPreference('dom.file.createInChild', true)
  new FirefoxDriver(profile)
}

Minor drawbacks

While the Geb-DSL is quite readable and allows concise tests the IDE-support is not there. You do not get much code assist when writing the tests and calling functions of the page objects like in our own, code based solution.

Conclusion

After taking the first few hurdles writing new functional tests with Geb really feels good and is a breeze compared to our old selenium tests. Converting them will be a lot work and only happen on a case-by-case basis but our coverage with Geb is ever increasing.

How I start a project – the next steps

The next steps after the initial meetings I use to bring a project on the way to success.

After the initial meetings with the project stakeholders my next step is to get a big picture of the processes the project tries to improve. Every (enterprise) software implements processes or workflows stemming from the business side. Since I want to improve the work for the people using the software I take the user’s perspective and try to understand it and describe it from their perspective.
For this task my go-to-tool is the user journey map. My first draft starts with a handful of steps outlining the main functions performed by the major actors. These are normally just 5 – 7 steps and serve as an overview and communication starter:

Often some users or other systems interact inside one process. Important is to concentrate on the big picture, the big steps of the process. These are the ones you need to get right, details and deviations from the process come after that. The point of all the drawings and documents I use is to foster a shared understanding between the stakeholders (including the users) and the team. We as a whole need to talk about the same things with the same language. If one step has different name we have to rename it to match the name used by the stakeholders. This is crucial. The same applies to the names used in the user interface. These must be the ones used by the users, not some internal words, not even synonyms.
From the big picture I iterate through the assumptions and getting more detailed on the way. Assumptions can make or break a project. Even if I am pretty sure I need to verify which means often ask or observe the user. The method for getting a good answer depends on the kind of assumption. But I need to verify. I usually use a wiki to record assumptions in the form of open questions like

  • which device will be used for this process?
  • will step 3 always be the next step?
  • how does the user hold the device?

These question get more detailed in the course of the project. Even when implementing the solution in code questions will arise. These need to be verified. Sometimes the question can be answered by the defined goals: which solution helps the user reaching his goals. If I cannot answer the question from the collected information, I need to ask questions, test it with prototypes, observe the user or do some research.
Usually along the way I use a prototype, mockup or demo to show how I understand the problem of the users. Again this is a great point for build a shared understanding. Sometimes I need a picture and often a simulation of the steps and actions involved. These interactive prototypes help to spark discussions about details I didn’t think of in the first place. Details that matter. Details that when overseen or seen too late can defer or break the project. When there are still in demo form or in a prototype the stakeholders find it easier to discuss things and the amount of work done is minimal. These demos evolve over time and are the basis for the solution later on. This does not mean that I reuse the code, but I reuse the insights gained from them.
Also prototypes are great for spikes evaluating a solution, the feasibility of a technology or testing assumptions. Prototypes are not only for the start of the project but can be used throughout. Sometimes something quick has to be tested without compromising the application as a whole. Here small and separate prototypes can be used.

Keeping connections alive with libcurl

libcurl is quite a comfortable option to transfer files across a variety of network protocols, e.g. HTTP, FTP and SFTP.

It’s really easy to get started: downloading a single file via http or ftp takes only a couple of lines.

Drip, drip..

But as with most powerful abstractions, it is a bit leaky. While it does an excellent job of hiding such steps as name resolution and authentication, these steps still “leak out” by increasing the overall run-time.

In our case, we had five dozen FTP servers and we needed to repeatedly download small files from all of them. To make matters worse, we only had a small time window of 200ms for each transfer.

Now FTP is not the most simple protocol. Essentially, it requires the client to establish a TCP control connection, that it uses negotiate a second data connection and initiate file transfers.

This initial setup phase needs a lot of back and forth between server and client. Naturally, this is quite slow. Ideally, you would want to do the connection setup once and keep both the control and the data connection open for subsequent transfers.

libcurl does not explicitly expose the concept of an active connection. Hence you cannot explicitly tell the library not to disconnect it. In a naive implementation, you would download multiple files by simply creating an easy session object for each file transfer:

for (auto file : FILE_LIST)
{
  std::vector<uint8_t> buffer;
  auto curl = curl_easy_init();
  if (!curl)
    return -1;
  auto url = (SERVER+file);
  curl_easy_setopt(curl, CURLOPT_URL,
    url.c_str());
  curl_easy_setopt(curl, CURLOPT_WRITEFUNCTION,
    appendToVector);
  curl_easy_setopt(curl, CURLOPT_WRITEDATA,
    &buffer);
  if (curl_easy_perform(curl) != CURLE_OK)
    return -1;

  process(buffer);
  curl_easy_cleanup(curl);
}

That does indeed reset the connection for every single file.

Re-use!

However, libcurl can actually keep the connection open as part of a connection re-use mechanism in the session object. This is documented with the function curl_easy_perform. If you simply hoist the easy session object out of the loop, it will no longer disconnect between file transfers:

auto curl = curl_easy_init();
if (!curl)
  return -1;

for (auto file : FILE_LIST)
{
  std::vector<uint8_t> buffer;
  auto url = (SERVER+file);
  curl_easy_setopt(curl, CURLOPT_URL, 
    url.c_str());
  curl_easy_setopt(curl, CURLOPT_WRITEFUNCTION, 
    appendToVector);
  curl_easy_setopt(curl, CURLOPT_WRITEDATA, 
    &buffer);
  if (curl_easy_perform(curl) != CURLE_OK)
    return -1;

  process(buffer);
}
curl_easy_cleanup(curl);

libcurl will now cache the active connection in the session object, provided the files are actually on the same server. This improved the download timings of our bulk transfers from 130ms-260ms down to 30ms-40ms, quite the enormous gain. The timings now fit into our 200ms time window comfortably.

Using PostgreSQL with Entity Framework

The most widespread O/R (object-relational) mapper for the .NET platform is the Entity Framework. It is most often used in combination with Microsoft SQL Server as database. But the architecture of the Entity Framework allows to use it with other databases as well. A popular and reliable is open-source SQL database is PostgreSQL. This article shows how to use a PostgreSQL database with the Entity Framework.

Installing the Data Provider

First you need an Entity Framework data provider for PostgreSQL. It is called Npgsql. You can install it via NuGet. If you use Entity Framework 6 the package is called EntityFramework6.Npgsql:

> Install-Package EntityFramework6.Npgsql

If you use Entity Framework Core for the new .NET Core platform, you have to install a different package:

> Install-Package Npgsql.EntityFrameworkCore.PostgreSQL

Configuring the Data Provider

The next step is to configure the data provider and the database connection string in the App.config file of your project, for example:

<configuration>
  <!-- ... -->

  <entityFramework>
    <providers>
      <provider invariantName="Npgsql"
         type="Npgsql.NpgsqlServices, EntityFramework6.Npgsql" />
    </providers>
  </entityFramework>

  <system.data>
    <DbProviderFactories>
      <add name="Npgsql Data Provider"
           invariant="Npgsql"
           description="Data Provider for PostgreSQL"
           type="Npgsql.NpgsqlFactory, Npgsql"
           support="FF" />
    </DbProviderFactories>
  </system.data>

  <connectionStrings>
    <add name="AppDatabaseConnectionString"
         connectionString="Server=localhost;Database=postgres"
         providerName="Npgsql" />
  </connectionStrings>

</configuration>

Possible parameters in the connection string are Server, Port, Database, User Id and Password. Here’s an example connection string using all parameters:

Server=192.168.0.42;Port=5432;Database=mydatabase;User Id=postgres;Password=topsecret

The database context class

To use the configured database you create a database context class in the application code:

class AppDatabase : DbContext
{
  private readonly string schema;

  public AppDatabase(string schema)
    : base("AppDatabaseConnectionString")
  {
    this.schema = schema;
  }

  public DbSet<User> Users { get; set; }

  protected override void OnModelCreating(DbModelBuilder builder)
  {
    builder.HasDefaultSchema(this.schema);
    base.OnModelCreating(builder);
  }
}

The parameter to the super constructor call is the name of the configured connection string in App.config. In this example the method OnModelCreating is overridden to set the name of the used schema. Here the schema name is injected via constructor. For PostgreSQL the default schema is called “public”:

using (var db = new AppDatabase("public"))
{
  var admin = db.Users.First(user => user.UserName == "admin")
  // ...
}

The Entity Framework mapping of entity names and properties are case sensitive. To make the mapping work you have to preserve the case when creating the tables by putting the table and column names in double quotes:

create table public."Users" ("Id" bigserial primary key, "UserName" text not null);

With these basics you’re now set up to use PostgreSQL in combination with the Entity Framework.


Evolution of programming languages

Programming languages evolve over time. They get new language features and their standard library is extended. Sounds great, doesn’t it? We all know not going forward means your go backward.

But I observe very different approaches looking at several programming ecosystems we are using.

Featuritis

Java and especially C# added more and more “me too” features release after release making relatively lean languages quite complex multi-paradigm languages. They started object oriented and added generics, functional programming features and declarative programming (LINQ in C#) and different UI toolkits (AWT, Swing, JavaFx in Java; Winforms, WPF in C#) to the mix.

Often the new language features add their own set of quirks because they are an afterthought and not carefully enough designed.

For me, this lack of focus makes said language less attractive than more current approaches like Kotlin or Go.

In addition, deprecation often has no effect (see Java) where 20 year old code and style still works which increases the burden further . While it is great from a business perspektive in that your effort to maintain compatibility is low it does not help your code base. Different styles and old ways of doing something tend to remain forever.

Revolution

In Grails (I know, it is not a programming language, but I has its own ecosystem) we see more of a revolution. The core concept as a full stack framework stays the same but significant components are changed quite rapidly. We have seen many changes in technology like jetty to tomcat, ivy to maven, selenium-rc to geb, gant to gradle and the list goes on.

This causes many, sometimes subtle, changes in behaviour that are a real pain when maintaining larger applications over many years.

Framework updates are often a time-consuming hassle but if you can afford it your code base benefits and will eventually become cleaner.

Clean(er) evolution

I really like the evolution in C++. It was relatively slow – many will argue too slow – in the past but it has picked up pace in the last few years. The goal is clearly stated and only features that support it make it in:

  • Make C++ a better language for systems programming and library building
  • Make C++ easier to teach and learn
  • Zero-Cost abstractions
  • better Tool-support

If you cannot make it zero-cost your chances are slim to get your feature in…

C at its core did not change much at all and remained focused on its merits. The upgrades mostly contained convenience features like line comments, additional data type definitions and multithreading.

Honest evolution – breaking backwards compatibility

In Python we have something I would call “honest evolution”. Python 3 introduced some breaking changes with the goal of a cleaner and more consistent language. Python 2 and 3 are incompatible so the distinction in the version number is fair. I like this approach of moving forward as it clearly communicates what is happening and gets rid of the sins in the past.

The downside is that many systems still come with both, a Python 2 and a Python 3 interpreter and accompanying libraries. Fortunately there are some options and tools for your code to mitigate some of the incompatibilities, like the __future__ module and python-six.

At some point in the future (expected in 2020) there will only support for Python 3. So start making the switch.

Quick and dirty is a skill

This post is a reminder, first and foremost to myself, that it is important to work according to what’s essential right now: quality or speed.

Being clean coders we build our software based on quality and reflect on how we do it. We set internal standards in code and UIs, we write tests, we polish.
But there are times when all this focus on quality is obstructive. Times when we need to learn something. For example: at a start of a project when fundamental questions like is it feasible, how should this interaction work, what’s the right order of steps are unanswered, learning needs to be as cheap as possible.
Here quick and dirty is important. The problem is our ego. We want to polish it, we want to build real software with a sound structure. But quality takes time. The problem is quality is not important when answering the fundamental project questions, learning is. May be a mockup in Powerpoint is enough? (not even writing code? ugh). A simple sketch on a piece of paper. Or maybe just a quick demo hacked together in an afternoon.
I know these suggestions may insult our pride. But we need to focus on what’s important: sometimes that’s quality, sometimes that’s speed.
Decades ago when I started coding, quick and dirty wasn’t a problem. Everything I wrote was quick and dirty. I was learning all the time. Over time I got better at developing software, structuring applications and building robust systems. But quick and dirty was lost along the way.
When you write something for the purpose of learning it can happen that you are wrong and all the code has to be thrown away. If it was just 2 hours patching something together that’s okay, but what if you spent a whole week? Just like writing quality software, quick and dirty is a skill in itself and as with other skills we need to practice it.
But beware this is not only a problem at the start of a project: often as developers we tend to overthink something, we plan for every possible outcome, imagine scenarios with weirdly acting users or systems. This is the time to stop and implement something to learn. To get feedback. Not to overanalyse or overdesign. Just release something and test it with real users, it doesn’t need to be part of the software in production, just use a demo or a staging environment. But if you need to learn something, focus on that, not on quality.

A Tale of Two Languages

Recently, I presented my mysteriously titled talk “A Tale of Two Languages” at our local C++ user group. Before the talk, I was not really sure whether it would resonate with my audience. But it did, and helped to engage people in a healthy discussion about how to use C++.

Essentially, the talk was about how I am using two different modes or dialects of C++ to write and maintain applications. The title suggests two languages – and it sure can be thought of that way, but for now I’m using the word “modes” to distinguish it from the term programming languages.

You write the application in one mode, while keeping the style relatively easy. In the other mode, you make sure that you can write easy and efficient code in the other, while leveraging the full power of C++.

I call the first application mode and the second library mode.

Library mode

As I said before, this the power mode. One of C++’s design paradigms is self-extension. You are extending the language from the language itself. It’s a very powerful mechanism, the same one that drives the standard library. It’s also why C++ does not have the need for a built-in string type.

This power is a bit of a double-edged sword. On the one hand, it allows you to adapt the language specifically for your needs, for example with application specific value types. For a 3D application, a well designed 2d vector or point type will make your code easier and probably faster. On the other hand, a badly designed type on this level will haunt your application for years to come. I have seen both.

That’s a simple example though. More powerful primitives, such as domain-specific-language like constructs also belong into this mode. In general, things in this mode are less discoverable and less maintainable, but they strive to improve discoverability, efficiency and maintainability on the other side. As a consequence, this code needs more stringent documentation and specification.

Application mode

This is the mode that you use to write the majority of your application. Application mode is all about agility and leveraging opportunities. You intentionally restrict yourself in order to keep your development speed up. Simplicity trumps most other qualities in this mode. If you need another quality to be the defining factor, for example because you need some code to be a little more complex in order to run faster, you should put it into library mode instead.

Unlike code in library mode, this code needs to speak for itself. Therefore, documentation is usually nothing but a duplication.

One important aspect is that this code should be devoid of all subtleties.

Parameter passing and its consequences

That last bit is especially uncommon in C++, where most decisions are really a catch-22. Hence the resulting code hints at the struggles endured while writing it.

For example, to write an efficient function in C++, you need to decide whether to pass each parameter by value, or by reference, or by a pointer. The decision on which to use depends largely on your implementation, i.e. what you are doing with the parameter after it was passed to the function. That usually couples your implementation too tightly to its interface and degrades programmer productivity by giving too many options.

Using a shared-ownership smart-pointer such as std::shared_ptr by default is a good middle ground here. It does the right thing most of the time and is not to far off at most other times. Many other mainstream languages, such as python, go this route. Some frameworks, such as Qt, use that semantic as well.
Like const-correctness, passing all parameters in a std::shared_ptr is viral. Object thus passed need to be created on a the stack, preferably with std::make_shared. You will also store those smart pointers in other objects, so shared_ptr will have quite a lot of screen space. Therefore I usually make an alias:

template using Ptr = std::shared_ptr;

If it’s going to be the default, it should not clutter your code. Since objects are transported in a Ptr by default, they usually do not even need a copy constructor or other “value-like” semantics. These objects are less about maintaining invariants, and more about implementing abstract interfaces and bundling functionality in maintainable chunks. I usually use boost::noncopyable to mark them, though Herb Sutter’s Metaclasses proposal could make this even nicer.
Note that you can still promote them to value types in library mode, should the need arise. But they will become more costly to maintain.

Other simplifications

There are plenty of other things to avoid in application mode. Writing templated types makes your code inherently non-local and dependent on a type that can be anywhere. Note that instantiation of templates from library mode is fine – at that point, all the facts are known.

Another thing that makes your code non-local, and therefore unfitting for application mode, is overloading. Especially in the presence of ADL. For example, which functions are in your actual overload set depends on which headers you include and which using-directives and declarations are active. Sometimes, that is desirable. But not in application mode.

Resolution

Since using this “two modes” approach, I have found that my productivity is much higher – even in older code that went through a lot of evolution. The code does not actually get a lot slower, even with all the smart pointers. In fact, I am sure that I could only optimize a few cases because the design in application mode is a lot more flexible, and the structure more visible.

Text editing tricks

Multiple cursors

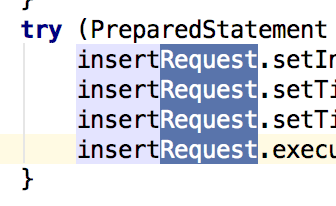
Recently I was in a pair programming session, when I noticed that there were three cursors blinking in the editor window of the IDE. I initially assumed it was a bug in the IDE (which is not that uncommon), but it acutally turned out it was a feature. In IntelliJ based IDEs you can place multiple cursors in the editor window, start typing and the typed text gets inserted at all of these positions. To achieve this press Shift+Alt while clicking the mouse to position the cursor carets.

When I start using a new IDE I usually look up and memorize the shortcuts for refactoring operations like “rename” or “extract method” or other essential operations like “quick fix”.

But of course there are many other neat tricks for advanced text editing in most IDEs and programming editors. Here are some of them, in this case for IntelliJ based IDEs.

Rectangular selection

Rectangular selection

This one comes in handy when you have to select a column of text, for example a common prefix of keys in a properties file. I initially knew this type of selection from Vim, but many other programming editors allow it too. For a rectangular selection in IntelliJ based IDEs press Ctrl+Shift+Alt (Shift+Alt+Cmd on Mac) and drag the mouse pointer.

Multiselection

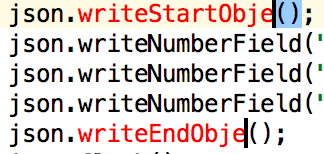
Similar to the multiple cursors feature mentioned at the beginning of this post, you can also select multiple parts of a text at once and then cut, copy or delete them. To achieve this multi-selection press Shift+Alt while selecting text.

Multiple selction

Extending selection

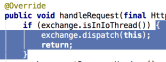
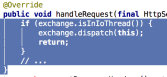
By pressing Ctrl+W repeatedly within a fragment of code the selection will progressively extend. First the current expression under the cursor is selected, then the surrounding code block, then the code block surrounding this code block, etc.

Extending selection

Conclusion

Take some time and look up some of the more advanced text editing capabilities of your IDE or text editor. Adopt them if you find them helpful and share them with your colleagues, for example in a pair programming session.

How do I start a project

On my quest to build better software for people and their needs I try to move my current agile project approach to a more user centered and outcome oriented one.

This starts right at the beginning of a project. After getting the go from the client I start with meeting the project leads on the client side, the ones who will make decisions and control the way of the project.
I like to take an assumption driven process or learning focussed one to ask questions and clear my assumptions on my way.
The first questions I have are:

  • who will use the software
  • who will be affected by the software/project
  • what are their goals/expected outcomes, what if they could choose only one
  • what do they expect from the software
  • what will happen if the project stalls or even fails

The people using the software aka the users are one of the main focus during the project but also the people who get benefits from the software without directly using it are really important and should not be neglected. These can be the people responsible for operating the software or managers getting reports from actual users. I keep them in mind so that other parts which are often missed during a user centered approach are considered.
All these people have some expectations how the software will affect them, some even have goals or need something to come out of the project. These outcomes cover a great range: from measureable business goals like increasing revenue or retention rate, to personal benefits like visibility. It is important to get a rough priority, I use a narrowing question like ‘what if you could choose only one’.
Besides from goals and outcomes people have also imaginations how the software will be used by them, in which context and how often.
These are the positive effects of the project and the software but all is not sunshine, so I also look at what will happen if the project is delayed, stops or even *shudder* fails. These are the risks that I need to consider and may be even plan for.
All these questions help me frame the project from the end. I know what goals to aim for and in which direction the journey goes.
This is my first step to build a shared understanding among the project participants. The steps to learn about what picture they have in mind. My questions and their answers help me to clarify the direction. After that I need to plan the first phase. For this I have to clear my mind and start with a beginner’s mind to find my hidden assumptions. Every assumption I or other have need to be called out explicitly. I have to capture it and formulate a corresponding learning step.

But this is a topic for another post…

The definition of done

From large to small, from projects to issues, a team needs to define when they are considered done.

From large to small, from projects to issues, a team needs to define when they are considered done.
This decision differs from team to team, some have steps to done, others just one state. Even the words used in your issue tracker reflect your choices: what does ‘fixed’ mean, what is ‘closed’ used for…
Even some practices like test driven development define a state of done: the code is done if all tests are green and it is refactored.

What’s your definition of done?

Let’s take a look at some examples:

  • tests are green and code is refactored
  • QA says ok
  • customer/stakeholder/product owner accepts the issue
  • developer thinks the code reflects the description in the issue
  • a predefined spec, maybe even with an acceptance test, is fulfilled
  • no bugs were found while clicking through
  • the code is merged with the master branch
  • the continuous integration tool has found no errors

The problem with this ‘definition of done’s is that either they look for an external person to accept by their opinion/guideline or concentrate on some output. But the people needing the software do not want the software in its own regard. They want to reach a goal through the software. The software is a mean to an end: their goals. Without defining the goals and needs beforehand you are either doomed to guess them and are at the mercy of arbitariness (from your point of view) or concentrate on some measurable output like code, tests or a completed feature.

Defining what the user wants to do with this new feature or project should be the first thing in a project right after the initial introductions. Who will use the app or the feature? (the intended audience, the users) What do they expect from it? (the benefits) What goal do they want to reach?
With this questions and answers you have a target. After completing the issues or project you can see if the target has been reached, if the goals are met. It might be the same with an acceptance process from a stakeholder but here you know the target beforehand not after.