Calculating the Number of Segments for Accurate Circle Rendering

A common way to draw circles with any kind of vector graphics API is by approximating it with a regular polygon, e.g. as a regular polygon with 32 sides. The problem with this approach is that it might look good in one resolution, but crude in another, as the approximation becomes more visible. So how do you pick the right number of sides N 
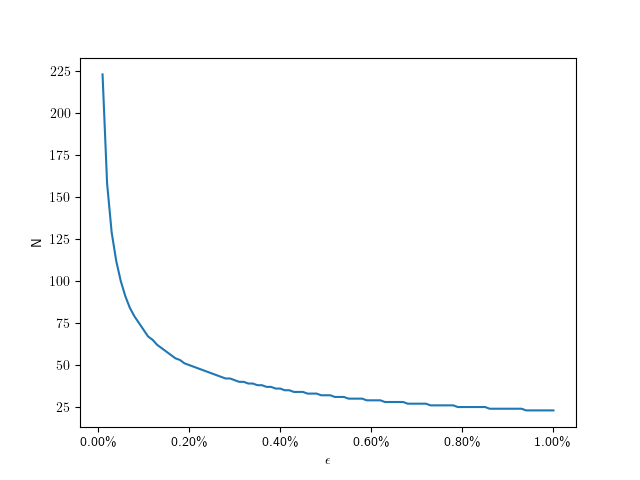
for the job? For that, let’s look at the error that this approximation has.

A whole bunch of math

I define the ‘error’ of the approximation as the maximum difference between the ideal circle shape and the approximation. In other words, it’s the difference of the inner radius and the outer radius of the regular polygon. Conveniently, with a step angle \alpha=\frac{2\pi}{N} the inner radius is just the outer radius r multiplied by the cosine of half of that: r\times\cos\frac{\alpha}{2}. So the error is r-r\times\cos\frac{\pi}{N}. I find it convenient to use relative error \epsilon for the following, and set r=1:

\epsilon=1-cos\frac{\pi}{N}

The following plot shows that value for N going from 4 to 256:

Plot showing the relative error numbers of subdivision

As you can see, this looks hyperbolic and the error falls off rather fast with an increasing number of subdivisions. This function lets use figure out the error for a given number of subdivisions, but what we really want is he inverse of that: Which number of subdivisions do we need for the error to be less than a given value. For example, assuming a 1080p screen, and a half-pixel error on a full-size (r=540
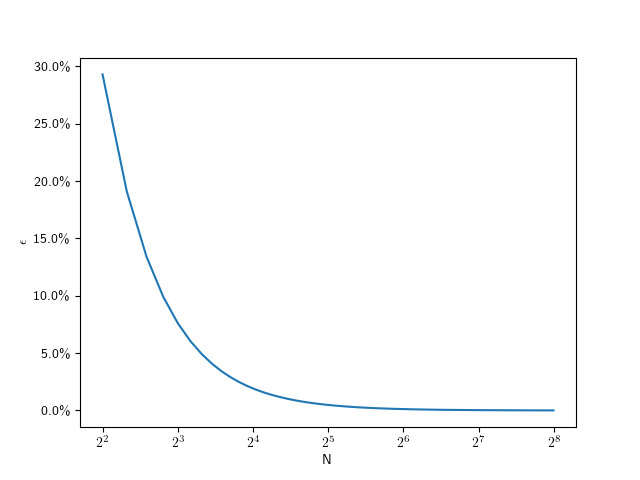
) circle, that means we should aim for a relative error of 0.1\%. So we can solve the error equation above for N. Since the number of subdivisions should be an integer, we round it up:

N=\lceil\frac{\pi}{\arccos{(1-\epsilon)}}\rceil

So for 0.1\% we need only 71 divisions. The following plot shows the number of subdivisions for error values from 0.01\% to 1\%:

Here are some specific values:

\epsilonN
0.01%223
0.1%71
0.2%50
0.4%36
0.6%29
0.8%25
1.0%23

Assuming a fixed half-pixel error, we can plug in \epsilon=\frac{0.5}{radius} to get:

N=\lceil\frac{\pi}{\arccos{(1-\frac{0.5}{radius})}}\rceil

The following graph shows that function for radii up to full-size QHD circles:

Give me code

Here’s the corresponding code in C++, if you just want to figure out the number of segments for a given radius:

std::size_t segments_for(float radius, float pixel_error = 0.5f)
{
  auto d = std::acos(1.f - pixel_error / radius);
  return static_cast<std::size_t>(std::ceil(std::numbers::pi / d));
}

How to improve this() by using super()

I have a particular programming style regarding constructors in Java that often sparks curiosity and discussion. In this blog post, I want to note my part in these discussions down.

Let’s start with the simplest example possible: A class without anything. Let’s call it a thing:

public class Thing {
}

There is not much you can do with this Thing. You can instantiate it and then call methods that are present for every Object in Java:

Thing mine = new Thing();
System.out.println(
    mine.hashCode()
);

This code tells us at least two things about the Thing class that aren’t immediately apparent:

  • It inherits methods from the Object class; therefore, it extends Object.
  • It has a constructor without any parameters, the “default constructor”.

If we were forced to write those two things in code, our class would look like this:

public class Thing extends Object {
    
    public Thing() {
        super();
    }
}

That’s a lot of noise for essentially no signal/information. But I adopted one rule from it:

Rule 1: Every production class has at least one constructor explicitly written in code.

For me, this is the textual anchor to navigate my code. Because it is the only constructor (so far), every instantiation of the class needs to call it. If I use “Callers” in my IDE on it, I see all clients that use the class by name.

Every IDE has a workaround to see the callers of the constructor(s) without pointing at some piece of code. If you are familiar with such a feature, you might use it in favor of writing explicit constructors. But every IDE works out of the box with the explicit constructor, and that’s what I chose.

There are some exceptions to Rule 1:

  • Test classes aren’t instantiated directly, so they don’t benefit from a constructor. See also https://schneide.blog/2024/09/30/every-unit-test-is-a-stage-play-part-iii/ for a reasoning why my test classes don’t have explicit constructors.
  • Record classes are syntactic sugar that don’t benefit from an explicit constructor that replaces the generated one. In fact, record classes use much of their appeal once you write constructors for them.
  • Anonymous inner types are oftentimes used in one place exclusively. If I need to see all their clients by using the IDE, my code is in a very problematic state, and an explicit constructor won’t help.

One thing that Rule 1 doesn’t cover is the first line of each constructor:

Rule 2: The first line of each constructor contains either a super() or a this() call.

The no-parameters call to the constructor of the superclass is done regardless of my code, but I prefer to see it in code. This is a visual cue to check Rule 3 without much effort:

Rule 3: Each class has only one constructor calling super().

If you incorporate Rule 3 into your code, the instantiation process of your objects gets much cleaner and free from duplication. It means that if you only exhibit one constructor, it calls super() – with or without parameters. If you provide more than one constructor, they form a hierarchy: One constructor is the “main” or “core” constructor. It is the one that calls super(). All the other constructors are “secondary” or “intermediate” constructors. They use this() to call the main constructor or another secondary constructor that is an intermediate step towards the main constructor.

If you visualize this construct, it forms a funnel that directs all constructor calls into the main constructor. By listing its callers, you can see all clients of your class, even those that use secondary constructors. As soon as you have two super() calls in your class, you have two separate ways to construct objects from it. I came to find this possibility way more harmful than useful. There are usually better ways to solve the client’s problem with object instantiation than to introduce a major source of current or future duplication (and the divergent change code smell). If you are interested in some of them, leave a comment, and I will write a blog entry explaining some of them.

Back to the funnel:

if you don’t see the funnel yet, let me abstract the situation a bit more:

This is how it looks in source code:

public class Thing {
    
    private final String name;
    
    public Thing(int serialNumber) {
        this(
            "S/N " + serialNumber
        );
    }
    
    public Thing(String name) {
        super();
        this.name = name;
    }
}

I find this structure very helpful to navigate complex object construction code. But I also have a heuristic that the number of secondary constructors (by visually counting the this() calls) is proportional to the amount of head scratching and resistance to change that the class will induce.

As always, there are exceptions to the rule:

  • Some classes are just “more specific names” for the same concept. Custom exception types come to mind (see the code example below). It is ok to have several super() calls in these classes, as long as they are clearly free from additional complexity.
  • Enum types cannot have the super() call in the main constructor. I don’t write a comment as a placeholder; I trust that enum types are low-complexity classes with only a few private constructors and no shenanigans.

This is an example of a multi-super-call class:

public class BadRequest extends IOException {

    public BadRequest(String message, Throwable cause) {
        super(message, cause);
    }

    public BadRequest(String message) {
        super(message);
    }
}

It clearly does nothing more than represent a more specific IOException. There won’t be many reasons to change or even just look at this code.

I might implement a variation to my Rule 2 in the future, starting with Java 22: https://openjdk.org/jeps/447. I’m looking forward to incorporating the new possibilities into my habits!

As you’ve seen, my constructor code style tries to facilitate two things:

  • Navigation in the project code, with anchor points for IDE functionality.
  • Orientation in the class code with a standard structure for easier mental mapping.

It introduces boilerplate or cruft code, but only a low amount at specific places. This is the trade-off I’m willing to make.

What are your ideas about this? Leave us a comment!

Experimenting with CMake’s unity builds

CMake has an option, CMAKE_UNITY_BUILD, to automatically turn your builds into unity-builds, which is essentially combining multiple source files into one. This is supposed to make your builds more efficient. You can just enable enable it while executing the configuration step of your CMake builds, so it is really easy to test. It might just work without any problems. Here are some examples with actual numbers of what that does with build times.

Project A

Let us first start with a relatively small project. It is a real project we have been developing, that reads sensor data, transports it over the network and displays it using SDL and Dear ImGui. I’m compiling it with Visual Studio (v17.13.6) in CMake folder mode, using build insights to track the actual time used. For each configuration, I’m doing a clean rebuild 3 times. The steps are the number of build statements that ninja runs.

Unity Build#StepsTime 1Time 2Time 3
OFF4013.3s13.4s13.6s
ON2810.9s10.7s9.7s

That’s a nice, but not massive, speedup of 124,3% for the median times.

Project A*

Project A has a relatively high number of non-compile steps: 1 step is code generation, 6 steps are static library linking, and 7 steps are executable linking. That’s a total of 14 non-compile steps, which are not directly affected by switching to unity builds. 5 of the executables in Project A are non-essential, basically little test programs. So in an effort to decrease the relative number of non-compile steps, I disabled those for the next test. Each of those also came with an additional source file, so the total number of steps decreased by 10. This really only decreased the relative amount of non-compile steps from 35% to 30%, but the numbers changes quite a bit:

Unity Build#StepsTime 1Time 2Time 3
OFF309.9s10.0s9.7s
ON189.0s8.8s9.1s

Now the speedup for the median times was only 110%.

Project B

Project B is another real project, but much bigger than Project A, and much slower to compile. It’s a hardware orchestration system with a web interface. As the project size increases, the chance for something breaking when enabling unity builds also increases. In no particular order:

  • Include guards really have to be there, even if that particular header was not previously included multiple times
  • Object files will get a lot bigger, requiring /bigobj to be enabled
  • Globally scoped symbols will name-clash across files. This is especially true for static globals or things in unnamed namespaces, which basically don’t do their job anymore. More subtly, things moved into the global namespace will also clash, such as the classes with the same name moved into the global namespace via using namespace.

In general, that last point will require the most work to resolve. If all fails, you can disable unity build on a target via set_target_properties(the_target PROPERTIES UNITY_BUILD OFF) or even just skip specific files for unity build inclusion via SKIP_UNITY_BUILD_INCLUSION. In Project B, I only had to do this for files generated by CMakeRC. Here are the results:

Unity Build#StepsTime 1Time 2Time 3
OFF416279.4s279.3s284,0s
ON11873.2s76.6s74.5s

That’s a massive speedup of 375%, just for enabling a build-time switch.

When to use this

Once your project has a certain size, I’d say definitely use this on your CI pipeline, especially if you’re not doing incremental builds. It’s not just time, but also energy saved. And faster feedback cycles are always great. Enabling it on developer machines is another matter: it can be quite confusing when the files you’re editing do not correspond to what the build system is building. Also, developers usually do more incremental builds where the advantages are not as high. I’ve also used hybrid approaches where I enable unity builds only for code that doesn’t change that often, and I’m quite satisfied with that. Definitely add an option to turn that off for debugging though. Have you had similar experiences with unity builds? Do tell!

Java enum inheritance preferences are weird

Java enums were weird from their introduction in Java 5 in the year 2004. They are implemented by forcing the compiler to generate several methods based on the declaration of fields/constants in the enum class. For example, the static Enum::valueOf(String) method is only present after compilation.

But with the introduction of default methods in Java 8 (published 2014), things got a little bit weirder if you combine interfaces, default methods and enums.

Let’s look at an example:

public interface Person {

  String name();
}

Nothing exciting to see here, just a Person type that can be asked about its name. Let’s add a default implementation that makes clearly no sense at all:

public interface Person {

  default String name() {
    return UUID.randomUUID().toString();
  }
}

If you implement this interface in a class and don’t overwrite the name() method, you are the weird one:

public class ExternalEmployee implements Person {

  public ExternalEmployee() {
    super();
  }
}

We can make your weirdness visible by creating an ExternalEmployee and calling its name() method:

public class Main {

  public static void main(String[] args) {
    ExternalEmployee external = new ExternalEmployee();
    System.out.println(external.name());
  }
}

This main method prints the “name” of your external employee on the console:

1460edf7-04c7-4f59-84dc-7f9b29371419

Are you sure that you hired a human and not some robot?

But what if we are a small startup company with just a few regular employees that can be expressed by a java enum?

public enum Staff implements Person {

  michael,
  bob,
  chris,
  ;
}

You can probably predict what this little main method prints on the console:

public class Main {

  public static void main(String[] args) {
    System.out.println(
      Staff.michael.name()
    );		
  }
}

But, to our surprise, the name() method got overwritten, without us doing or declaring to do so:

michael

We ended up with the “default” generated name() method from the Java enum type. In this case, the code generated by the compiler takes precedence over the default implementation in the interface, which isn’t what we would expect at first glance.

To our grief, we can’t change this behaviour back to a state that we want by overwriting the name() method once more in our Staff class (maybe we want our employees to be named by long numbers!), because the generated name() method is declared final. From the source code of the enum class:

/**
 * @return the name of this enum constant
 */
public final String name() {
  return name;
}

The only way out of this situation is to avoid the names of methods that are generated in an enum type. For the more obscure ordinal(), this might be feasible, but name() is prone for name conflicts (heh!).

While I can change my example to getName() or something, other situations are more delicate, like this Kotlin issue documents: https://youtrack.jetbrains.com/issue/KT-14115/Enum-cant-implement-an-interface-with-method-name

And I’m really a fan of Java’s enum functionality, it has the power to be really useful in a lot of circumstances. But with great weirdness comes great confusion sometimes.

Useful browser features for the common Web Dev

Once every while, I stumble upon some minor thing ingrained in modern browsers that make some specific problem so much easier. And while the usual Developer Tools offer tons of capabilities, these are so wildly spread and grouped that you easily get used to just ignoring most of them.

So this bunch of things come to my mind that seem not to be super-common knowledge. Maybe you benefit from some of it.

Disclaimer: The browsers I know of have their Dev Tools available via pressing F12 and a somewhat similar layout, even though particular words will differ. My naming here relates to the current Chrome, so your experience might differ.

Disabling the Browser cache

Your Browser caches many resources because the standard user usually prefers speed, is used that the browser endlessly hogs memory anyway, and most resources usually do not change that often anyway.

During development, this might lead to confusion because of course, you do change your sources often (in fact, that is your job), and the browser needs to know that fact.

For that, let it be known:

The "Network Tab" has a Checkbox "Disable Cache".
And the Dev Tools have to be open for it to work.

This is usually so much the default setting on my working machines that I need to remember myself on it when I troubleshoot something on someone else’s machine. Spread the word.

Also, browsers have a Hard-Reload-Feature, like under Chrome, to cleaning the Cache before the reload without having to do so for the whole browser.

Hard-Reload: Ctrl + Shift + R

I’ve read that this is also Chrome’s behaviour when pressing F5 while the Dev Tools are open, but anyway. Take extra care that your customer does not of that feature, because sometimes they might be frustrated about a failed update of your app that is actually just a cached version.

Inspect Network Requests

Depending on the complexity of your web app, or what external dependencies you are importing, it might be that the particular order and content of network requests is not trivial anymore.

Now the “Network” tab (you know it already) is interesting on its own, but remember that it only displays the requests since opening the Dev Tools, i.e. some Page Reload (hard or soft) might be required.

And – this appears somewhat changing between browser updates, don’t ask me why that is necessary – this is good to know:

  • The first column of that list shows only the last part of each request URL, but if you click on it, a very helpful window appears with details of the Request Headers, Payload and Response
  • make sure that in the filters above, the “Fetch/XHR” is active
  • And then some day I found, that
Right-Clicking a request gives you options for Copy, e.g. Copy as fetch, to so you can repeat the exact request from javascript-code for debugging etc.

Inspecting volatile elements

The “Elements” tab (called “Inspector” in other browsers) is quite straightforward to find mistakes in styling or the rendered HTML itself – you see the whole current HTML structure, click your element in there and to the right, from bottom to top you see the CSS rules applied.

But sometimes, it can be hard to inspect elements that change on mouse interaction, and it is good to know that (again, this holds for Chrome), first,

There is a shortcut like Ctrl + Shift + C to get into the Inspector without extra mouse movements

Now think of a popup that vanishes when hovering away. You might do it by using Ctrl + Shift + C to open the Inspector, then using the Keyboard to navigate within (especially with the Tab and Cursor keys), but here’s a small trick I thought of that helped me a lot:

Add (temporarily) an on-click-handler to your popup that calls window.alert(...);

With that, you can open your popup, press Ctrl + Shift + C, then click the popup, and the alert() will now block any events and you can use your mouse to inspect all you want.

In easer cases you could just disable the code that makes the popup go away, but in that case I had, this wasn’t an option either.

Now that I think of it, I could also have used debugger; instead of the alert(), but the point is that you have to block javascript execution only after interacting with the popup element.

The performance API

I have no idea why I discovered that only recently, but if precision in timing is important – e.g. measuring the impact of a possible change on performance, one does not have to resort to Date.now() with its millisecond resolution, but

there is performance.now() to give you microsecond precision for time measurements.

It can afford that by not having the epoch “zero” of Jan 1th 1970 as reference, and instead, the moment of starting your page.

The Performance API has a lot more stuff – which I didn’t need yet.

A FPS Monitor, and a whole world of hidden features

If you do graphics programming or live data visualization of some measurement, it might be of interest to see that. There’s a whole hidden menu at least in Chrome, and you can access it by focussing the Dev Tools, then

  • press Ctrl + Shift + P
  • Enter “FPS” and select
  • Now you have a nice overlay over your page.

Even if you are not in the target group of that specific feature, it might be interesting to know that there is a whole menu of many particular (sometimes experimental) features built into all these browsers. They differ from browser to browser, and version to version, and of course, plugins can do a lot more,

but it might just be worth the idea to think that maybe your work flow can benefit from any of that stuff.

Local Javascript module development

https://www.viget.com/articles/how-to-use-local-unpublished-node-packages-as-project-dependencies/

yalc: no version upgrade, no publish etc.

Building an application using libraries – called packages or modules in Javascript – is a common practice since decades. We often use third-party libraries in our projects to not have to implement everything ourselves.

In this post I want to describe the less common situation where we are using a library we developed on our own and/or are actively maintaining. While working on the consuming application we need to change the library sometimes, too. This can lead to a cumbersome process:

  1. Need to implement a feature or fix in the application leads to changes in our library package.
  2. Make a release of the library and publish it.
  3. Make our application reference the new version of our library.
  4. Test everything and find out, that more changes are needed.
  5. Goto 1.

This roundtrip-cycle takes time, creates probably useless releases of our library and makes our development iterations visible to the public.

A faster and lighter alternative

Many may point to npm link or yarn link but there are numerous problems associated with these solutions, so I tried the tool yalc.

After installing the tool (globally) you can make changes to the library and publish them locally using yalc publish.

In the dependent project you add the local dependency using yalc add <dependency_name>. Now we can quickly iterate without creating public releases of our library and test everything locally until we are truly ready.

This approach worked nicely for me. yalc has a lot more features and there are nice guides and of course its documentation.

Conclusion

Developing several javascript modules locally in parallel is relatively easy provided the right tooling.

Do you have similar experiences? Do you use other tools you would recommend?

Integrating API Key Authorization in Micronaut’s OpenAPI Documentation

In a Java Micronaut application, endpoints are often secured using @Secured(SecurityRule.IS_AUTHENTICATED), along with an authentication provider. In this case, authentication takes place using API keys, and the authentication provider validates them. If you also provide Swagger documentation for users to test API functionalities quickly, you need a way for users to specify an API key in Swagger that is automatically included in the request headers.

For a general guide on setting up a Micronaut application with OpenAPI Swagger and Swagger UI, refer to this article.

The following article focuses on how to integrate API key authentication into Swagger so that users can authenticate and test secured endpoints directly within the Swagger UI.

Accessing Swagger Without Authentication

To ensure that Swagger is always accessible without authentication, update the application.yml file with the following settings:

micronaut:  
  security:
    intercept-url-map:
      - pattern: /swagger/**
        access:
          - isAnonymous()
      - pattern: /swagger-ui/**
        access:
          - isAnonymous()
    enabled: true

These settings ensure that Swagger remains accessible without requiring authentication while keeping API security enabled.

Defining the Security Schema

Micronaut supports various Swagger annotations to configure OpenAPI security. To enable API key authentication, use the @SecurityScheme annotation:

import io.swagger.v3.oas.annotations.security.SecurityScheme;
import io.swagger.v3.oas.annotations.enums.SecuritySchemeIn;
import io.swagger.v3.oas.annotations.enums.SecuritySchemeType;

@SecurityScheme(
    name = "MyApiKey",
    type = SecuritySchemeType.APIKEY,
    in = SecuritySchemeIn.HEADER,
    paramName = "Authorization",
    description = "API Key authentication"
)

This defines an API key security scheme with the following properties:

  • Name: MyApiKey
  • Type: APIKEY
  • Location: Header (Authorization field)
  • Description: Explains how the API key authentication works

Applying the Security Scheme to OpenAPI

Next, we configure Swagger to use this authentication scheme by adding it to @OpenAPIDefinition:

import io.swagger.v3.oas.annotations.info.*;
import io.swagger.v3.oas.annotations.security.SecurityRequirement;

@OpenAPIDefinition(
    info = @Info(
        title = "API",
        version = "1.0.0",
        description = "This is a well-documented API"
    ),
    security = @SecurityRequirement(name = "MyApiKey")
)

This ensures that the Swagger UI recognizes and applies the defined authentication method.

Conclusion

With these settings, your Swagger UI will display an Authorization field in the top-left corner.

Users can enter an API key, which will be automatically included in all API requests as a header.

This is just one way to implement authentication. The @SecurityScheme annotation also supports more advanced authentication flows like OAuth2, allowing seamless token-based authentication through a token provider.

By setting up API key authentication correctly, you enhance both the security and usability of your API documentation.

How React components can know their actual dimensions

Every once in a while, styling a Web Application can be oh so frustrating quite interesting because stuff that appears easy does actually not comply with any of your suggestions. And there are some fields that ambush me more often than I’d like to admit, and with each application there appears some unique quirk that makes a universal solution hard.

Right now, I’m thinking about a CSS-only nested layout of several areas on your available screen that need to make good use of the available space, but still be somewhat dynamic in order to be maintainable.

Web Apps are especially delicate in layout things because if you ask most customers, a fully responsive layout is never the goal (as in, way too expensive for their use case), but no matter how often you make them assure you that there is only a small set of target resolutions, there will be one day where something changed and well-yeah-these-ones-too-of-course.

It is also commonly encountered that “looking good” is “not that important”, but as progress goes, everyone still knows that that was a pure lie.

Of course, this is a manifestation of Feature Creep, but one that is hard to argue about. And we do not want to argue with customers anyway, we want to solve their problems with as little friction as possible.

So by now, one would have thought that CSS would have evolved quite enough in order to at least place dynamic content somewhat predictable. There are flexbox and grid displays and these are useful as hell, but still.

And while, for some reason or another, the width of dynamic nested content can usually be accounted for in some pure CSS solution that one can find in under a day’s work; getting the height quite right is a problem that is officially harder than all multi-order corrections I ever encountered in my studies of quantum field theory. Only solvable in some oversimplified use-cases.

The limits of “height: 100%;” are reached in cases where content is dominated by its content instead of their container; as in nested <svg> elements that love to disagree about the meaning of “100%”. Dynamic SVG content is especially more cumbersome because you neither want distorted nor cut-off content, and you can try to get along with viewBox and preserveAspectRatio, but even then.

Maybe it won’t budge, and maybe that’s the point where I find it acceptable to read the actual DOM elements even from within a React component, an approach that is usually as dangerous as it is intrusive,

but is it a code smell if it is rather concise and reliantly does the job?

const useHeightAwareRef = () => {
    const [height, setHeight] = useState({
        initialized: false,
        value: null,
    });
    const ref = useRef(null);

    useEffect(() => {
        if (!ref.current || height.initialized) {
            return;
        }

        const adjustHeight = () => {
            const rect = ref.current?.getBoundingClientRect();
            setHeight({
                value: rect?.height ?? null,
                initialized: true
            });
        };

        adjustHeight();
        window.addEventListener("resize", adjustHeight);
        return () => {
            window.removeEventListener("resize", adjustHeight);
        };
    }, [height.initialized]);

    return {
        height: height.initialized ? height.value : null,
        ref
    };
};

// then use this like:

const SomeNestedContent = () => {
    const {height, ref} = useHeightAwareRef();

    return (
        <div ref={ref}>
        {
            height &&
            <svg height={height} width={"100%"}>
                { /* ... Dragons be here ... */ }
            </svg>
        }
        </div>
    );
};

I find this worthfile to have in your toolbox. If you manage your super-dynamic* content in some other super-responsive** fashion in a way that is super-arguable*** to your customer, sure, go by it. But remember, at some point each, possibly,

  • (*) your customer might have data outside the mutually agreed use cases,
  • (**) your customer might have screens outside the mutually agreed ones,
  • (***) your customer might have less patience / time than originally intended,

so maybe move the idea of “there must be one super-elegant pure-CSS solution in the year of 2025” back into your dreams and shoehorn that <svg> & friends into where they belong :´)

String Representation and Comparisons

Strings are a fundamental data type in programming, and their internal representation has a significant impact on performance, memory usage, and the behavior of comparisons. This article delves into the representation of strings in different programming languages and explains the mechanics of string comparison.

String Representation

In programming languages, such as Java and Python, strings are immutable. To optimize performance in string handling, techniques like string pools are used. Let’s explore this concept further.

String Pool

A string pool is a memory management technique that reduces redundancy and saves memory by reusing immutable string instances. Java is a well-known language that employs a string pool for string literals.

In Java, string literals are automatically “interned” and stored in a string pool managed by the JVM. When a string literal is created, the JVM checks the pool for an existing equivalent string:

  • If found, the existing reference is reused.
  • If not, a new string is added to the pool.

This ensures that identical string literals share the same memory location, reducing memory usage and enhancing performance.

Python also supports the concept of string interning, but unlike Java, it does not intern every string literal. Python supports string interning for certain strings, such as identifiers, small immutable strings, or strings composed of ASCII letters and numbers.

String Comparisons

Let’s take a closer look at how string comparisons work in Java and other languages.

Comparisons in Java

In this example, we compare three strings with the content “hello”. While the first comparison return true, the second does not. What’s happening here?

String s1 = "hello";
String s2 = "hello";
String s3 = new String("hello");

System.out.println(s1 == s2); // true
System.out.println(s1 == s3); // false

In Java, the == operator compares references, not content.

First Comparison (s1 == s2): Both s1 and s2 reference the same object in the string pool, so the comparison returns true.

Second Comparison (s1 == s3): s3 is created using new String(), which allocates a new object in heap memory. By default, this object is not added to the string pool, so the object reference is unequal and the comparison returns false.

You can explicitly add a string to the pool using the intern() method:

String s1 = "hello";
String s2 = new String("hello").intern();

System.out.println(s1 == s2); // true

To compare the content of strings in Java, use the equals() method:

String s1 = "hello";
String s2 = "hello";
String s3 = new String("hello");

System.out.println(s1.equals(s2)); // true
System.out.println(s1.equals(s3)); // true
Comparisons in Other Languages

Some languages, such as Python and JavaScript, use == to compare content, but this behavior may differ in other languages. Developers should always verify how string comparison operates in their specific programming language.

s1 = "hello"
s2 = "hello"
s3 = "".join(["h", "e", "l", "l", "o"])

print(s1 == s2)  # True
print(s1 == s3)  # True

print(s1 is s2)  # True
print(s1 is s3)  # False

In Python, the is operator is used to compare object references. In the example, s1 is s3 returns False because the join() method creates a new string object.

Conclusion

Different approaches to string representation reflect trade-offs between simplicity, performance, and memory efficiency. Each programming language implements string comparison differently, requiring developers to understand the specific behavior before relying on it. For example, some languages differentiate between reference and content comparison, while others abstract these details for simplicity. Languages like Rust, which lack a default string pool, emphasize explicit memory management through ownership and borrowing mechanisms. Languages with string pools (e.g., Java) prioritize runtime optimizations. Being aware of these nuances is essential for writing efficient, bug-free code and making informed design choices.

Python desktop applications with asynchronous features (part 1)

The Python world has this peculiar characteristic that for nearly all ideas that exist out there in the current programming world, there is a prepared solution that appears well-rounded at first and when you then try to “just plug it together”, after a certain while you encounter some most specific cases that make all the “just” go up in smoke and leave you with some hours of research.

That is also, why now, for quite some of these “solutions” there seem to be various similar-but-distinct packages that you better care to understand; which is again, hard, because every Python developer always likes to advertise their package with very easy sounding words.

But that is the fun of Python. If I choose it as suitable for a project, this is the contract I sign 🙂

So I recently ran into a surprisingly non-straightforward case with no simple go-to-solution. Maybe you know one and then I’ll be thankful to try that and discuss it through; sometimes one is just blind from all the options. (It’s also what you sign when choosing Python. I cope.)

Now, I thought a lot about my use case and I will split these findings up into multiple blog posts – thinking asynchronously (“async”) is tricky in many languages, but the Python way, again, is to hide its intricacies in very carefully selected places.

A desktop app with TPC socket HANDLING

As long as your program is a linear script, you do not need async features. But if there is some thing to be done for a longer time (or endless), you cannot afford to wait for it or otherwise intervene.

E.g for our desktop application (employing Python’s very basic tkinter) we sooner or later run into the tk.mainloop() , which, from the OS thread it was called from, is a endless loop that draws the interface, handles input events, updates the interface, repeat. This is blocking, i.e. that thread can now only do other stuff from the event handlers acting on that interface.

You might know: Any desktop UI framework really hates if you try to update its interface from “outside the UI thread”. Just think of any order of unpredictable behaviour if you would e.g. draw a button, then handle its click event and while you’re at it, a background thread removes that button – etc.

The good thing is, you will quickly be told not to do such a thing, the bad thing is, you might end up with an unexpected or difficult to parse error and some question marks about what else to do.

The UI-thread problem is a specific case of “doing stuff in parallel requires you to really manage who can actually access a given resource”. Just google race condition. If you think about it, this holds for managing projects / humans in general, but also for our desktop app that allows simple network connections via TCP socket.

Now the first clarifications have to be done. Python gives you

  • on any tkinter widget, you have “.after()” to call any function some time in the future, i.e. you enqueue that function call to be executed after a time has passed; so this is nice for making stuff happen in the UI thread.
  • But even small stuff like writing some characters to a file might delay the interface reaction time and people nowadays have no time for that (maybe I’m just particularly impatient.)
  • Python’s standard library gives us packages like threading, asyncio and multiprocessing package, now for long enough to consider them mature.
  • There are also more advanced solutions, like looking into PyQt, or the mindset “everything is a Web App nowadays”, and they might equip you with asynchronous handling from the start, but remember – The Schneiderei in Softwareschneiderei means that we prefer tailor-made software over having to integrating bloated dependencies that we neither know nor want to maintain all year long.

We conclude with shining our light to the general choice in this project, and a few reasons why.

  1. What Python calls “threads” are not the same thing as what operating systems understands as a thread (which also differs) among them. See also the Python Global Interpreter Lock. We do not want to dive into all of that.
  2. multiprocessing is the only way to do anything outside the current sytem process, which is what you need for running CPU-heavy tasks in parallel. It’s out our use case, and while it is more “true parallel” it comes with slower startup, more expensive communication costs and also some constraints for such exchange (e.g. to serializable data).
  3. We are IO-bound, i.e. we have no idea when the next network package arrives, so we want to wait in separate event loops that would be blocking on their own (i.e. “while True”, similar to what tkinter does with our main thread.).
  4. Because we have the main thread stolen by tkinter anyway, we would use a threading.Thread anyway to allow concurrency, but then we face the choice to construct everything with Threads or to employ the newer asyncio features.

The basic block to do that would use a threading.Thread:

class ListenerThread(threading.Thread):

    # initialize somehow

    def run(self):
        while True:
            wait_for_input()
            process_input()
            communicate_with_ui_thread()


# usage like
#   listener = ListenerThread(...) 
#   listener.start(...)

Now to think naively, the pseudo-code communicate_with_ui_thread() could then either lead to the tkinter .after() calls, or employ callback functions passed either in the initialization or the .start() call of the thread. But sadly, it was not as easy as that, because you run several risks of

  • just masking your intention and still executing your callbacks blockingly (that thread can freeze the UI)
  • still pass UI widget references to your background loop (throwing bad not-the-main-thread-error exceptions)
  • have memory leaks in the background gobble up more than you ever wanted
  • Lock starvation: bad error telling you RuntimeError: can't allocate lock
  • deadlocks, by interdependent callbacks

This list is surely not exhaustive.

So what are the options? Let me discuss these in an upcoming post. For now, let’s just linger all these complications in your brain for a while.