Improved automated instance construction in C++

In my last blog post, I wrote about how I am automatically deducing constructor parameters in my dependency injection container. The approach had a major drawback: It worked only for 2 or more parameters, since there was an ambiguity with copy- or move-constructors with exactly one parameter.

Right after I wrote that post, I actually found a solution to that problem in the Boost.DI FAQ, which explains how to do that in its CPPnow 2016 slides. It restricts the type conversion operator by using SFINEA on an unused template parameter. I did not even know that was possible! It defines the templated conversion operator very similar to this:

template <class T,
  class = std::enable_if_t<!std::is_same<std::remove_cvref_t<T>, Exclude>{}>>
operator T&() const
{
  return p_->get<std::remove_cvref_t<T>>();
}

Since this is a bit more involved than the bare templated conversion operator from last time, repeating it would be bad. In the last version, I used 3 helper types, the inferred_locator, mimic and the provider_wrapper, but that can be streamlined into one class:

template <typename Exclude> struct mimic
{
  mimic(std::size_t)
  {
  }

  mimic(service_provider const& p, std::size_t)
  : p_(&p)
  {
  }

  template <class T, class = std::enable_if_t<!std::is_same<std::remove_cvref_t<T>, Exclude>{}>> operator T&() const
  {
    return p_->get<std::remove_cvref_t<T>>();
  }

  service_provider const* p_{ nullptr };
};

Note that is uses some unused extra size_t parameters, which make the parameter expansion easier in the next step. Now can use that for the SFINEA in the recursive construction:

// Actual dependency injection..
template <class T, std::size_t Head, std::size_t... Rest> constexpr auto
make_injected_(service_provider const& p, std::index_sequence<Head, Rest...>,
    decltype(T{ mimic<T>{ Head }, mimic<T>{ Rest }... }) * = nullptr)
{
  return std::make_unique(mimic<T>(p, Head), mimic<T>(p, Rest)...);
}

// Trivial no-dependency case
template <class T> constexpr auto
make_injected_(service_provider const& p, std::index_sequence<>)
{
  return std::make_unique<T>();
}

// Fallback to try with fewer parameters
template <class T, std::size_t... Rest> constexpr auto make_injected_(service_provider const& p, std::index_sequence<Rest...>)
{
  return make_injected_<T>(p, std::make_index_sequence<sizeof...(Rest) - 1>{});
}

template <class T, std::size_t Max = 16> auto
make_injected(service_provider const& p)
{
  return make_injected_<T>(p, std::make_index_sequence<Max>{});
}

Just after I found this solution, my former colleague Dirk Reinbach sent me a very neat C++20 variant to restrict the conversion operator via a concept:

template <typename T, typename U>
concept not_is_same = !std::is_same_v<std::remove_cvref_t<T>, std::remove_cvref_t<U>>;

template <typename Exclude> struct mimic
{
  /* other members... */
  template <not_is_same<Exclude> T> operator T&() const
  {
    return p_->get<std::remove_cvref_t<T>>();
  }
};

This works just as well, and is more readable, too. I have not measured, but I guess it’s probably also faster to compile, since all things SFINEA are notoriously slow.

Running a containerized ActiveDirectory for developers

If you develop software for larger organizations one big aspect is integrating it with existing infrastructure. While you may prefer simple deployments of services in docker containers a customer may want you to deploy to their wildfly infrastructure for example.

One common case of infrastructure is an Active Directory (AD) or plain LDAP service used for organization wide authentication and authorization. As a small company we do not have such an infrastructure ourselves and it would not be a great idea to use it for development anyway.

So how do you develop and test your authentication module without an AD being available for you?

Fortunately, nowadays this is relatively easy using tools like Docker and Samba. Let us see how to put such a development infrastructure up and where the pitfalls are.

Running Samba in a Container

Samba cannot only serve windows shares or act as an domain controller for Microsoft Windows based networks but includes a full AD implementation with proper LDAP support. It takes a small amount of work besides installing Samba in a container to set it up, so we have two small shell scripts for setup and launch in a container. I think most of the Dockerfile and scripts should be self-explanatory and straightforward:

Dockerfile:

FROM ubuntu:20.04

RUN DEBIAN_FRONTEND=noninteractive apt-get update && DEBIAN_FRONTEND=noninteractive apt-get -y install samba krb5-config winbind smbclient 
RUN DEBIAN_FRONTEND=noninteractive apt-get update && DEBIAN_FRONTEND=noninteractive apt-get -y install iproute2
RUN DEBIAN_FRONTEND=noninteractive apt-get update && DEBIAN_FRONTEND=noninteractive apt-get -y install openssl
RUN DEBIAN_FRONTEND=noninteractive apt-get update && DEBIAN_FRONTEND=noninteractive apt-get -y install vim

RUN rm /etc/krb5.conf
RUN mkdir -p /opt/ad-scripts

WORKDIR /opt/ad-scripts

CMD chmod +x *.sh && ./samba-ad-setup.sh && ./samba-ad-run.sh

samba-ad-setup.sh:

#!/bin/bash

set -e

info () {
    echo "[INFO] $@"
}

info "Running setup"

# Check if samba is setup
[ -f /var/lib/samba/.setup ] && info "Already setup..." && exit 0

info "Provisioning domain controller..."

info "Given admin password: ${SMB_ADMIN_PASSWORD}"

rm /etc/samba/smb.conf

samba-tool domain provision\
 --server-role=dc\
 --use-rfc2307\
 --dns-backend=SAMBA_INTERNAL\
 --realm=`hostname`\
 --domain=DEV-AD\
 --adminpass=${SMB_ADMIN_PASSWORD}

mv /etc/samba/smb.conf /var/lib/samba/private/smb.conf

touch /var/lib/samba/.setup

Using samba-ad-run.sh we start samba directly instead of running it as a service which you would do outside a container:

#!/bin/bash

set -e

[ -f /var/lib/samba/.setup ] || {
    >&2 echo "[ERROR] Samba is not setup yet, which should happen automatically. Look for errors!"
    exit 127
}

samba -i -s /var/lib/samba/private/smb.conf

With the scripts and the Dockerfile in place you can simply build the container image using a command like

docker build -t dev-ad -f Dockerfile .

We then run it like follows and use the local mounts to preserve the data in the AD we will be using for testing and toying around:

 docker run --name dev-ad --hostname ldap.schneide.dev --privileged -p 636:636 -e SMB_ADMIN_PASSWORD=admin123! -v $PWD/:/opt/ad-scripts -v $PWD/samba-data:/var/lib/samba dev-ad

To have everything running seamlessly you should add the specified hostname – ldap.schneide.dev in our example – to /etc/hosts so that all tools work as expected and like it was a real AD host somewhere.

Testing our setup

Now of course you may want to check if your development AD works as expected and maybe add some groups and users which you need for your implementation to work.

While there are a bunch of tools for working with an AD/LDAP I found the old and sturdy LdapAdmin the easiest and most straightforward to use. It comes as one self-contained executable file (downloadable from Sourceforge) ready to use without installation or other hassles.

After getting the container and LdapAdmin up and running and logging in you should see something like this below:

LdapAdmin Window showing our Samba AD

Then you can browse and edit your active directory to fit your needs allowing you to develop your authentication and authorization module based on LDAP.

I hope you found the above useful for you development setup.

What dependent types can do for you

In a way, this post is also about Test Driven Developement and *Type* Driven Developement. While the two share the same acronym, I always thought of them as different concepts. However, as I recently experienced, when the two concepts are used in a dependently typed language, there is something like a fluid transition between them.

While I will talk about programming in the dependently typed language Agda, not much is needed to follow what is going on – I will just walk through an exercise and explain everything along the way.

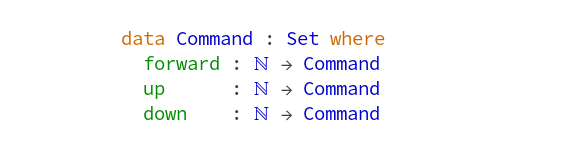
The exercise I want to use, is here. It talks about a submarine, its position and certain commands, that change the position. Examples for commands are forward 1, down 2 and up 3. These ‘values’ can be used just like that with the following definition of the type of commands:

      data Command : Set where
        forward : Nat -> Command
        up      : Nat -> Command
        down    : Nat -> Command

Agda can be used in a very mathy way – this should really be read as saying, that the type of commands is a Set and there are three constructors (highlighted green) which take a natural number as argument and produce a command. So, using that application is just juxtaposition, we can make the following definitions now:

  justSomeCommand = forward 5
   anotherOne = up 1

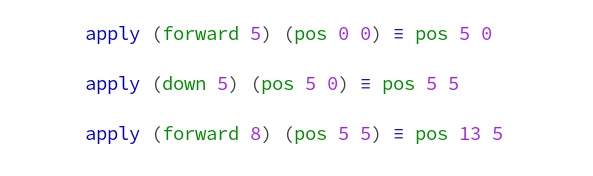
Now the exercise text explains, how these commands can be applied to the position of the submarine. Working as a software developer, I built the habit of turning specifications like that into tests. Since I don’t know any better, I just wrote ‘tests’ in Agda using equations to translate the exercise text – I’ll explain the syntax below:

  apply (forward 5) (pos 0 0) ≡ pos 5 0
  apply (down 5) (pos 5 0) ≡ pos 5 5
  apply (forward 8) (pos 5 5) ≡ pos 13 5

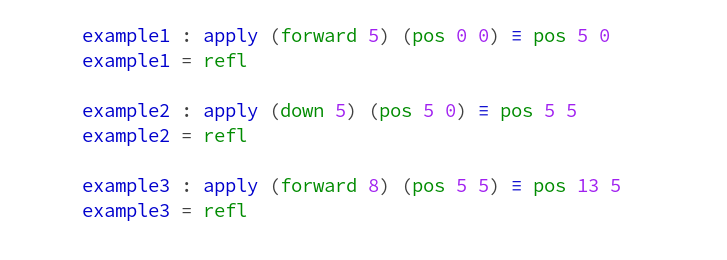
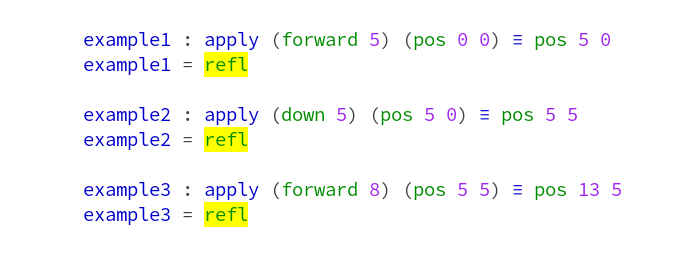
Note that the triple equal sign is different from what we used above. Roughly, this is because it is the proposition, that some tings are equal, while the normal equal sign above, was used to make definitions. The code doesn’t type check as is. We haven’t defined ‘apply’ and it is not valid Agda to just write down equations like that. Let’s fix the latter problem first, by turning it into declarations and definitions. This will actually define elements of the datatypes of equality proofs – but I’m pretty sure you can accept these changes just as boilerplate we have to add to our equations:

  example1 : apply (forward 5) (pos 0 0) ≡ pos 5 0
  example1 = refl

  example2 : apply (down 5) (pos 5 0) ≡ pos 5 5
  example2 = refl

  example3 : apply (forward 8) (pos 5 5) ≡ pos 13 5
  example3 = refl

Now, to make the examples type-check, we have to define ‘pos’ and ‘apply’. Positions can be done analogous to commands:

  data Position : Set where
    pos : Nat -> Nat -> Position

(Here, the type of ‘pos’ just tells us, that it is a function taking two natural numbers as arguments.) Now we are ready to start with ‘apply’:

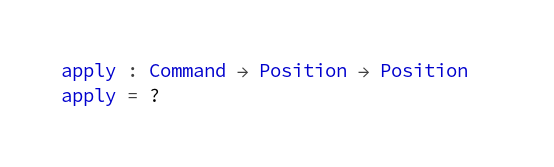
   apply : Command → Position → Position
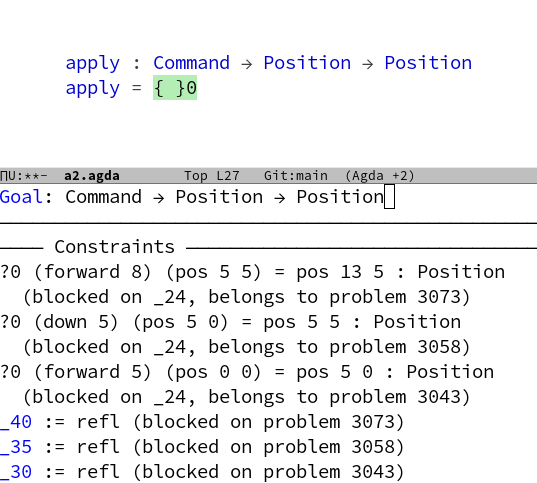
    apply = ?

So apply is a function, that takes a ‘Command’ and a ‘Position’ and returns another ‘Position’. For the definition of ‘apply’ I just entered a questionmark ‘?’. It is one of my favorite features of Agda, that terms can be left out like this before type checking. Agda still checks everything we have given so far and will give us a lot of information about what ‘?’ could be. This is called ‘interacting with a hole’. Because, well, it is a hole in your code and the type checker is there to tell you, which things might fit into this hole. After type checking, the hole and what Agda tells us about it, will look like this:

   apply : Command → Position → Position
    apply = ?

Goal: Command -> Position -> Position

This was type-checked with a couple of imports – see my final version of the code if you want to reproduce. The first thing Agda tells us, is the type of the goal and then there is some mumbling about constraints with some fragments, that look like they have something to do with the examples from above – the latter is actually not information about the hole, but general information about the type checking. So lets look at them to see, if the type checker has to say anything:

The refl terms in the definitions of the examples, are highlighted yellow

Something is yellow! This is Agda’s way to tell us, that it does not have enough information to decide, if everything is okay. Which makes a lot of sense, since we haven’t given a definition of ‘apply’ and these equations are about values computed with ‘apply’. So let us just continue to define ‘apply’ and see if the yellow vanishes. This is analogous to the stage in TDD were your tests don’t pass because your code does not yet compile.

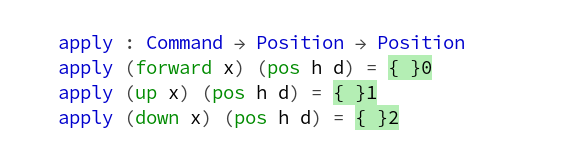
We will use pattern matching on the given ‘Command’ and ‘Position’ to define ‘apply’ – the cases below were generated by Agda (I only changed variable names), and we now have a hole for each case:

  apply : Command → Position → Position
  apply (forward x) (pos h d) = {!!}
  apply (up x) (pos h d) = {!!}
  apply (down x) (pos h d) = {!!}

There are various ways in which Agda can use the information given by types to help us with filling these holes. First of all, we can just ask Agda to make the hole ‘smaller’ if there is a unique canonical way to do so. This will work here, since ‘Position’ has only one constructor. So we get new holes for arguments of the constructor ‘pos’ and can try to fill those.

Let us focus on the first case and see what happens if we enter something not in line with our tests:

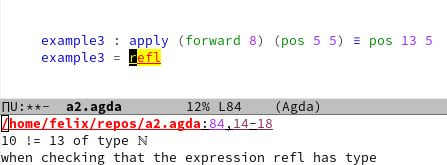
If we ask Agda, if ‘h+d’ fits into the ‘hole’, it will say no and tell us what the problem is in the following way:

While this is essentially the same kind of feedback you would get from a unit test, there are at least two important advantages to note:

  • This is feedback from the type checker and it is combined with other things the type checker can tell you. It means you get a lot of feedback at once, when you ask Agda, if something you wrote fits into a hole.
  • ‘refl’ is only a simple case of the proves you can write in Agda. More complicated ones need some training, but you can go way beyond unit tests and ‘check’ infinitely many cases or even better: all cases.

If you want more, just try Agda yourself! One easy way to do that, is to use Ingo Blechschmidt’s Agdapad, which let’s you try Agda in your browser.

Automated instance construction in C++

I’m currently mostly switching back and forth between C# and C++ projects. One of the things that I’m missing most when switching to C++ is a nice dependency-injection (DI) library. After checking out what was already available, I finally decided I wanted to try to build my own slim type-indexed variant. I quickly started by registering factories and instances in a map on std::type_index, making it possible to both have the DI retain ownership (with std::unique_ptr) or just make a type available via a bare pointer. So I was able to do things like:

// Register an instance
di.insert_unique(std::make_unique<foo_service>());
// Register a factory
di.insert_unique([] {return std::make_unique<bar_service>());
// Register an existing bare pointer
di.insert_bare(my_bare_thingy);

// ... and retrieve them
auto& foo = di.get<foo_service>();

One of the most powerful aspects of a DI library is the ability to transitively setup dependencies. I like constructor injection the most, so I implemented a very naive way like this:

di.insert_unique([](auto& p) { return std::make_unique<complex_service>(
  p.get<base_service1>(), p.get<base_service2>(), p.get<base_service3>());
});

This is pretty verbose and we basically have to repeat all the constructor parameter types. But it’s easy to implement. We can do a little bit better by using a templated type-conversion operator and using it to call the get:

class service_provider
{
  struct inferred_locator
  {
    service_provider const* provider;
    template <class T> operator T&() const
    {
      return provider->get<std::remove_const_t<T>>();
    }
  };
  
  inferred_locator get() const
  {
    return { .provider = this };
  }
  
  /** typed get implementations here... */
};

Now we can reduce the previous registration to:

di.insert_unique([](auto& p) { 
  return std::make_unique<complex_service>(p.get(), p.get(), p.get());
});

That is basically only the number of constructor parameters in a verbose way. We could write a small template that takes the number, creates an std::index_sequence from it and then unpacks each index into an invokation of service_provider::get. But then we would still have to update registrations when adding (or removing) a new dependency to a services’s constructor. With a litte more work, we can actually get this instead:

di.insert_unique<complex_service>();

This partly inspired by Antony Polukhin’s C++ reflection talks, and combines std::index_sequence based unpacking, SFINEA and the templated type-conversion operator:

template <class T, std::size_t Head, std::size_t... Rest>
constexpr auto make_unique_impl(provider_wrapper const& p,
    std::index_sequence<Head, Rest...>,
    decltype(T{ mimic{ Head }, mimic{ Rest }... }) * = nullptr) -> std::unique_ptr<T>
{
    // This next requirement is so we do not accidentally recurse into the copy/move-ctors
    static_assert(sizeof...(Rest) + 1 > 1, "Can only deduce constructors with two or more parameters.");
    return std::make_unique<T>(p(Head), p(Rest)...);
}

template <class T, std::size_t... Rest>
constexpr auto make_unique_impl(provider_wrapper const& p, std::index_sequence<Rest...>) -> std::unique_ptr<T>
{
    // This next requirement is so we do not accidentally recurse into the copy/move-ctors
    static_assert(sizeof...(Rest) > 1, "Can only deduce constructors with two or more parameters.");
    return make_unique_impl<T>(p, std::make_index_sequence<sizeof...(Rest) - 1>{});
}

template <class T, std::size_t Max = 8> auto make_unique(service_provider const& p)
{
    return make_unique_impl<T>(provider_wrapper{ &p }, std::make_index_sequence<Max>{});
}

This uses two new types: mimic, which is only used for SFINEA, takes std::size_t on construction (for the unpacking from the std::index_sequence) and converts to anything (templated type conversion again) and the provider_wrapper, which is a simple adaptor around service_provider that takes an unused std::size_t argument (again, for unpacking). The first overload of make_unique_impl is slightly more specialized (because it has Head and Rest), so the compiler tries it first. If it works, it returns a new instance of the service we want. Otherwise, it will fail without an error due to SFINEA in the unused and defaulted third parameter. The compiler will then try the second overload, which will recurse to a variant with fewer parameters. The outermost make_unique starts this recursion with 8 parameters, because that should be enough for any sane service. I stop this recursion at one constructor parameter, even though that is a useful configuration. This is because I have not yet found a way to avoid calling the copy or move constructors accidentally. If anyone knows how to do that, I’d be very happy to hear how. My workaround right now is to explicitly register a factory in that case.

Packaging Java-Project as DEB-Packages

Providing native installation mechanisms and media of your software to your customers may be a large benefit for them. One way to do so is packaging for the target linux distributions your customers are running.

Packaging for Debian/Ubuntu is relatively hard, because there are many ways and rules how to do it. Some part of our software is written in Java and needs to be packaged as .deb-packages for Ubuntu.

The official way

There is an official guide on how to package java probjects for debian. While this may be suitable for libraries and programs that you want to publish to official repositories it is not a perfect fit for your custom project that you provide spefically to your customers because it is a lot of work, does not integrate well with your delivery pipeline and requires to provide packages for all of your dependencies as well.

The convenient way

Fortunately, there is a great plugin for ant and maven called jdeb. Essentially you include and configure the plugin in your pom.xml as with all the other build related stuff and execute the jdeb goal in your build pipeline and your are done. This results in a nice .deb-package that you can push to your customers’ repositories for their convenience.

A working configuration for Maven may look like this:

<build>
    <plugins>
        <plugin>
            <artifactId>jdeb</artifactId>
            <groupId>org.vafer</groupId>
            <version>1.8</version>
            <executions>
                <execution>
                    <phase>package</phase>
                    <goals>
                        <goal>jdeb</goal>
                    </goals>
                    <configuration>
                        <dataSet>
                            <data>
                                <src>${project.build.directory}/${project.build.finalName}-jar-with-dependencies.jar</src>
                                <type>file</type>
                                <mapper>
                                    <type>perm</type>
                                    <prefix>/usr/share/java</prefix>
                                </mapper>
                            </data>
                            <data>
                                <type>link</type>
                                <linkName>/usr/share/java/MyProjectExecutable</linkName>
                                <linkTarget>/usr/share/java/${project.build.finalName}-jar-with-dependencies.jar</linkTarget>
                                <symlink>true</symlink>
                            </data>
                            <data>
                                <src>${project.basedir}/src/deb/MyProjectStartScript</src>
                                <type>file</type>
                                <mapper>
                                    <type>perm</type>
                                    <prefix>/usr/bin</prefix>
                                    <filemode>755</filemode>
                                </mapper>
                            </data>
                        </dataSet>
                    </configuration>
                </execution>
            </executions>
        </plugin>
    </plugins>
</build>

If you are using gradle as your build tool, the ospackage-plugin may be worth a look. I have not tried it personally, but it looks promising.

Wrapping it up

Packaging your software for your customers drastically improves the user experience for users and administrators. Doing it the official debian-way is not always the best or most efficient option. There are many plugins or extensions for common build systems to conveniently build native packages that may easier for many use-cases.

5 Not-so-Beginner’s React Pitfalls

React, in my opinion, has become quite a useful tool over the years. I admin I haven’t given the other major frameworks a try, but from the look of the resulting code, I only would give Svelte a real chance in the nearer future (in fact, you’d really have to pay me real big money to convince me about Angular).

Now with many of the more useful JS libraries, React is in a state where not only has it survived quite a time (reaching v18 only a few weeks ago), but also breeding a community that harbors a lot of valuable knowledge, enabling one to efecavoid the most common pitfalls at the beginning of your journey. There are lots of resources you can easily find online, from few-hour-courses to several posts in other blogs about the most common traps.

However, in our daily life it appears that there still are some very good points to make about how not to go about React’s unopinionatedness. So these are some of our own findings that I’ve not yet seen overly emphasized, and maybe they are here for your advantage.

1. HAVE YOUR STATES ATOMIC

It might happen that one migrates an older React component where functional programming wasn’t the norm yet, or out of whatever habit, that you declares something like a greedy React state as

const [state, setState] = useState({this: ..., that: ... , ..., ...});

Now your state profits much from immutability (think of this as “your machine then knows that it’s content is clear and unique, given any time”) and therefore you do not need to care about the same-or-not-sameness of state.that when evaluating state.this. Therefore, it is usually advised to split that up into several independent states as

const [this, setThis] = useState(...);
const [that, setThat] = useState(...);
...

That is more readable and everything. However, the most useful rule to build your states is not even to split everything up as small-as-possible, but rather, to have your states atomic. By that, we mean, “not needlessly large, but containing all what might change at the same time”.

One common example is basic data fetching. If you don’t choose to grab for react-query, which I personally like. But if you do e.g. a simple GET request, you usually do not only have “data” (some response), but also at least a “pending” (has the request finished yet?) and an “error” (is this response even usable?) field. These all change at the same time. Thus, they belong to the same entity. That state, designed atomically

const [query, setQuery] = useState({
    pending: false,
    data: null,
    error: null,
});

side note: you might choose not to use the null object as an initial value here because of the known problem of ambivalence with this object. For this illustration, it will suffice.

So, this query state now is atomic. Not to split further without serious consequences, as you will. If you had another, unrelated query, you would not just put it right into the same state entity; but if you had another property of that query (like e.g. a separate field for the status code, …), it would belong.

This helps in having more predictable useEffect, useMemo etc. dependency arrays. You can have an Effect depending on [query] as a whole and this makes complete semantic sense. It would be very hard to predict it’s behaviour, if you mashed multiple queries or whatever-state-you-can-think-of in there.

2.HAVE YOUR EFFECTS ATOMIC & TEAR THEM DOWN

Similarly, it is not super obvious (to the newcomer’s eye at least), that you can have multiple useEffects(). You can adhere to the Single Responsibility principle right there — the only good Effects are the ones that you can grasp in a twinkling of an eye. Use one each for every single thing you want to achieve, don’t lump multiple different things together in a somewhat-“constructor”-type of thinking. This keeps the dependency arrays small and controllable, and there are fewer cases of peculiar “But this CANNOT EVEN happen!!”.

Moreover, Effects have a function designed to clean them up, or the teardown function. If your Effect starts any larger operation and then for some reason your component get’s re-rendered before your operation is finished, you are likely to get hit by that effect in a state where you forgot about it already. You can follow this example

// example: listening to the scroll event
useEffect(() => {
    const handler = (event) => { /* ... */ };
    document.addEventListener('scroll', handler);
    return () => document.removeEventListener('scroll', handler);
}, []);

// or you might do something later in life
useEffect(() => {
    const timeout = setTimeout(() => { /* ... */ }, 5000);
    return () => clearTimeout(timeout);
}, []);

Some asynchronous operations might not have a simple teardown operation, but you can at least tell your Promises to disregard the effect. This is at least responsible for the very ugly

Warning: Can’t perform a React state update on an unmounted component. This is a no-op, but it indicates a memory leak in your application.

If you are responsible, you clean your Browser Console of all of these warnings. It appears if you call a setState-or-similar function at a point where the teardown actually should have happened. This pattern solves that case:

// this example uses a fetch Promise,
// but it also works for stale setTimeout handlers etc.

useEffect(() => {
    let mounted = true;
    fetch('/whatever').then(() => {
        if (mounted) {
            setState(true);
        }
    };
    return () => { mounted = false };
}, []);

// if you do not check for the value of mounted,
// the "memory leak" error can appear, if the
// fetch returns when the component updated meanwhile.

Side note: I also can not recall a single case in which the common React linter rule “exhaustive–deps” was worth ignoring. I had several occasions in which I believed to outsmart the stupid machine, only to end up in much larger problems down the road. Sure, things like Redux’ dispatch() might be cumbersome to include always, but I found that if I just make sure that exhaustive-deps never fires, I am more happy in the long run.

3.USEEFFECT() in too DEEP Functions

Especially in the context of data fetching, it might appear luring to put your useEffect() calls as deep (in the direction of the smallest components) as you can. Even more so, if you don’t have a rigid way of state management.

Now, I feel the point that this appears as “more modular” and flexible, but for me, has happend to situations where way too many requests were sent to our backends. You trade the modularity for the unpredictability of some Effects, so the best way I came to think of it was: Treat useEffect() like a bug.

I’m not saying that using it is wrong. But if you are wary of it’s appearance, this can help. Sometimes, it is just possible to do everything an Effect does – just completely outside React. Maybe, the Effect code can instead live in your index.js (as vanilla JS or otherwise) and just injected into your Root component, e.g. as props or via other libraries. E.g. with a Redux middleware, some effects can run with a higher degree of control about your state.

Remember: Modularity is not bad per se. It’s good. Don’t elevate the most particular effects to the top level of your application, but figure out where they can live well enough so you exactly know when they need to fire.

So far, there hasn’t been a case where I wished that I stuffed my useEffects further down to the virtual DOM leaves, but several, in which elevating them helped me a lot.

4. USE CUSTOM HOOKS with minimal interface

I consider it helpful, even for React beginners, to always be on the lookout of what could be its own React hook. A React Hook is any function that has a name beginning with “use” and for the most time, these consist of some combination of internal useState, useEffect, useContext and useRef definitions.

But their merit is in that they allow for much cleaner, dumber looking Components themselves – consider: dumb components are the best!

If they are only needed once, you can have them co-located next to where they are needed, but even just the act of giving them an own name makes for much more understandable code.

I use custom hooks for a lot of things, e.g.

  • having a State that is persisted in the localStorage / sessionStorage
  • having a State that updates in a debounced / throttled / delayed manner
  • standardizing very basic data fetching
  • accessing the window width at any time (nice for Responsive layout)
  • creating a React ref for an element with an “clicked outside” handler
  • standardized response of messages from connected websockets

I will now spare you the code, but if you have questions about any of these, just drop a comment.

One important point, though: Always have your interface minimal. E.g. if your custom hook has an internal setState(), think hard about whether you pass that function to the outside via the hook return value. Even if you are the only developer on a project, treat yourself as two different instances, one “framework designer” and one “framework consumer”, and as the designer, think hard about what havoc the consumer could do if you allow him too much.

5. Do not duplicate STATE informAtion (especially with react-router)

This applies to every state information, but it’s important to recognize that your URL route is just that: a kind of global state. One that your user can edit directly at any time, leaving the synchronization up to you.

So do not go about it by reading the URL parameters into some state that has it’s own setState! If you define a certain role of a state parameter in your URL, then it is your obligation to have a uni-directional data flow:

  1. From the route, that value flows into your application in a clearly-defined manner,
  2. where you act upon it as you wish, until you need to change it
  3. Then you change the route. Then go back to 1

Of course, one might imagine that in some cases you can not guarantee that. Then maybe do your own synchronization logic, but I would highly advise you to stash that away into e.g. a custom hook, or middleware if you use Redux, so that you can test it thoroughly and it won’t break too soon.

Further note: There are situations where it is quite sensible to have two very similar states, if they have a different responsibility. These are not a bug.

E.g. if you GET a value from a server, then edit it in a controlled <input/> field, and PUT it to the server again, you do not wish to do so on every key press. Then these are not meant to be the same:

  1. the value as you currently know it from the server
  2. the value as it exists inside the <input/>

These are semantically different. They can and should be a different state entity. But if you have something that is utterly dependant on one other state, then chances are you do not really need another entity.

All in all,

that turned out longer than I envisioned it to be become. But I hope it is of any help to any React coders who managed the absolute basics and now are prone to the next-level pitfalls.

The good news is that after a certain bunch of hardships, there is rarely the case of even more surprises. So, manage your state and effects responsibly, especially the asynchronous ones, and the rest are practices that apply for any software development.

Or am I misled?

Reading a conanfile.txt from a conanfile.py

I am currently working on a project that embeds another library into its own source tree via git submodules. This is currently convenient because the library’s development is very much tied to the host project and having them both in the same CMake project cuts down dramatically on iteration times. Yet, that library already has its own conan dependencies in a conanfile.txt. Because I did not want to duplicate the dependency information from the library, I decided to pull those into my host projects requirements programmatically using a conanfile.py.

Luckily, you can use conan’s own tools for that:

from conans.client.loader import ConanFileTextLoader

def load_library_conan(recipe_folder):
    text = Path(os.path.join(recipe_folder, "libary_folder", "conanfile.txt")).read_text()
    return ConanFileTextLoader(text)

You can then use that in your stage methods, e.g.:

    def config_options(self):
        for line in load_library_conan(self.recipe_folder).options.splitlines():
            (key, value) = line.split("=", 2)
            (library, option) = key.split(":", 2)
            setattr(self.options[library], option, value)

    def requirements(self):
        for x in load_library_conan(self.recipe_folder).requirements:
            self.requires(x)

I realize this is a niche application, but it helped me very much. It would be cool if conan could delegate into subfolders natively, but I did not find a better way to do this.

Forced Acronyms are not that S.M.A.R.T.

A while back, I noticed that quite a lot of people are following that trend to unify a bunch of talking points to a more or less memorizable acronym. Sometimes, this is a great mnemonic device to make the essence of a thing clear in seconds – but for some reason, there are few stories acknowledged in which such attempts actually fail.

However, one of the most prominent acronyms in project management is the idea of S.M.A.R.T. goals. That easily dissolves into S for Specific, M for Measureable, and… hm… T is… something about Time, and then there are A and R, and they very clearly… well well. let’s consult wikipedia… span up a multidimensional vector space out of {Achievable, Attainable, Assignable, Agreed, Action-oriented, Ambitious, Aligned with corporate goals, Realistic, Resourced, Reasonable, Results-based}.

Now this is the point where it’s hard to follow. These are somehow too much possibilities, with no clear assignment. There are probably lots of people out there with their very specific memorization and their very specific interpretation of these letters; and it might very well be true that this forced acronym holds some value. In their specific case.

But why shouldn’t we be honest about it? If you have such a situation, you are not communicating clearly anymore. You have gone beyond that point. There is not a clear, concise meaning anymore.

These are the points where you would be honest to leave your brilliant acronym behind. If you ever sit in a seminar where someone wants to teach you some “easily memorizable acronym” with lots of degrees of freedom, open to interpretation and obviously changing over time, just – complain. Of course, everyone is entitled to using their own memory hook (“Eselsbrücke”) in order to remember whatever his or her goal is. That is not my point.

My Issue is with “official” acronyms that are not clear and constant. We as software developers have a responsibility to treat such inconsistencies as very dangerous and more harmful than helpful. With this post, I want to bring the idea out there that one should rather more often complain about a bad acronym than just think “weeeeell, but I really like how it sounds and I don’t care that it’s somewhat tainted.”

Or am I completely bullheaded in that regard? What is your opinion?

PS: If you are German and remember the beginning of 2021, a similar laziness happened there when our government tried to make their Covid rules clear and well-known. Note that this remark does have nothing to do with politics. Anyway: they invented this acronym of “AHA” (which, in German, is also that sound of having a light bulb appear over your head.) Not that bad of an idea. However, one of that “A”s originally meant “you just need a non-medical mask (Alltagsmaske) everywhere” – until some day, it was changed to “you need a medical face mask in everyday life (im Alltag)”. They just thought it clever to keep the acronym, but change one letter to mean its near opposite.

This is dangerous. Grossly negilent. Just for the sake of liking your old acronym too much, you needlessly fails to communicate clearly. Which is, for a government as much as for a software developer, usually your job.

Naming things 😉

Metal in C++ with SDL2

Metal, Cupertino’s own graphics API, is sort of a middle-ground in complexity between OpenGL and Vulkan. I’ve wanted to try it for a while, but the somewhat tight integration into Apple’s ecosystem (ObjectiveC/Swift and XCode) has so far prevented that. My graphics projects are usually using C++ and CMake, so I wanted a solution that worked with that. Apple released Metal-cpp last year and newer SDL2 versions (since 2.0.14) can create a window that supports drawing to it with metal. Here’s how to weld that together (with minimal ObjectiveC).

metal-cpp

I get the metal-cpp code from the linked website (the download is at step 1). I add a library in CMake that builds a single source file that compiles the metal-cpp implementation with the ??_PRIVATE_IMPLEMENTATION macros as described on the page (see step 3). That target also exports the includes to be used later.

SDL window and view

Next, I use conan to install SDL2. After SDL_Init, I call SDL_CreateWindow to create my window. I do not specify SDL_WINDOW_OPENGL (or in the SDL_CreateWindow‘s flags, or next step will fail. After that, I use SDL_Metal_CreateView from SDL_metal.h to create a metal view. This is where things get a little bit icky. I create a metal device using MTL::CreateSystemDefaultDevice(); but I still need to assign it to the view I just created. I’m doing that in ObjectiveC++. In a new .mm file I add a small function to do that:

void assign_device(void* layer, MTL::Device* device)
{
  CAMetalLayer* metalLayer = (CAMetalLayer*) layer;
  metalLayer.device = (__bridge id<MTLDevice>)(device);
}

I use a small .h file to expose this function to my C++ code like any other free function. There’s another helper I create in the .mm file:

CA::MetalDrawable* next_drawable(void* layer)
{
  CAMetalLayer* metalLayer = (CAMetalLayer*) layer;
  id <CAMetalDrawable> metalDrawable = [metalLayer nextDrawable];
  CA::MetalDrawable* pMetalCppDrawable = ( __bridge CA::MetalDrawable*) metalDrawable;
  return pMetalCppDrawable;
}

At the beginning of each frame, I use that together with SDL_Metal_GetLayer to get a texture to render to:

auto surface = next_drawable(SDL_Metal_GetLayer(view));

Next I create a render pass descriptor that starts by clearing that drawable with our fancy red:

MTL::ClearColor clear_color(152.0/255.0, 23.0/255.0, 42.0/255.0, 1.0);
auto pass_descriptor = MTL::RenderPassDescriptor::alloc()->init();
auto attachment = pass_descriptor->colorAttachments()->object(0);
attachment->setClearColor(clear_color);
attachment->setLoadAction(MTL::LoadActionClear);
attachment->setTexture(surface->texture());

And fire that off to the GPU using a command buffer and render encoder:

auto buffer = queue->commandBuffer();
auto encoder = buffer->renderCommandEncoder(pass_descriptor);
encoder->endEncoding();
buffer->presentDrawable(surface);
buffer->commit();

There you have it, a minimal running metal application. Still a long ways from the traditional “Hello Triangle”, but most metal examples that show how to do that can easily be translated to the C++ API. Note that you probably have to take some extra steps to compile metal shaders (aka MSL). You can either load them from source or precompile them using the command line tools.

Serving static resources in Javalin running as servlets

Javalin is a nice JVM-based microframework targetted at web APIs supporting Java and Kotlin as implementation language. Usually, it uses Jetty and runs standalone on the server or in a container.

However, those who want or need to deploy it to a servlet container/application server like Tomcat or Wildfly can do so by only changing a few lines of code and annotating at least one Url as a @WebServlet. Most of your application will continue to run unchanged.

But why do I say only “most of your application”?

Unfortunately, Javalin-jetty and Javalin-standalone do not provide complete feature parity. One important example is serving static resources, especially, if you do not want to only provide an API backend service but also serve resources like a single-page-application (SPA) or an OpenAPI-generated web interface.

Serving static resources in Javalin-jetty

Serving static files is straightforward and super-simple if you are using Javalin-jetty. Just configure the Javalin app using config.addStaticFiles() to specify some paths and file locations and your are done.

The OpenAPI-plugin for Javalin uses the above mechanism to serve it’s web interface, too.

Serving static resources in Javalin-standalone

Javalin-standalone, which is used for deployment to application servers, does not support serving static files as this is a jetty feature and standalone is built to run without jetty. So the short answer is: you can not!

The longer answer is, that you can implement a workaround by writing a servlet based on Javalin-standalone to serve files from the classpath for certain Url-paths yourself. See below a sample implementation in Kotlin using Javalin-standalone to accomplish the task:

package com.schneide.demo

import io.javalin.Javalin
import io.javalin.http.Context
import io.javalin.http.HttpCode
import java.net.URLConnection
import javax.servlet.annotation.WebServlet
import javax.servlet.http.HttpServlet
import javax.servlet.http.HttpServletRequest
import javax.servlet.http.HttpServletResponse

private const val DEFAULT_CONTENT_TYPE = "text/plain"

@WebServlet(urlPatterns = ["/*"], name = "Static resources endpoints")
class StaticResourcesEndpoints : HttpServlet() {
    private val wellknownTextContentTypes = mapOf(
        "js" to "text/javascript",
        "css" to "text/css"
    )

    private val servlet = Javalin.createStandalone()
        .get("/") { context ->
            serveResource(context, "/public", "index.html")
        }
        .get("/*") { context ->
            serveResource(context, "/public")
        }
        .javalinServlet()!!

    private fun serveResource(context: Context, prefix: String, fileName: String = "") {
        val filePath = context.path().replace(context.contextPath(), prefix) + fileName
        val resource = javaClass.getResourceAsStream(filePath)
        if (resource == null) {
            context.status(HttpCode.NOT_FOUND).result(filePath)
            return
        }
        var mimeType = URLConnection.guessContentTypeFromName(filePath)
        if (mimeType == null) {
            mimeType = guessContentTypeForWellKnownTextFiles(filePath)
        }
        context.contentType(mimeType)
        context.result(resource)
    }

    private fun guessContentTypeForWellKnownTextFiles(filePath: String): String {
        if (filePath.indexOf(".") == -1) {
            return DEFAULT_CONTENT_TYPE
        }
        val extension = filePath.substring(filePath.lastIndexOf('.') + 1)
        return wellknownTextContentTypes.getOrDefault(extension, DEFAULT_CONTENT_TYPE)
    }

    override fun service(req: HttpServletRequest?, resp: HttpServletResponse?) {
        servlet.service(req, resp)
    }
}

The code performs 3 major tasks:

  1. Register a Javalin-standalone app as a WebServlet for certain URLs
  2. Load static files bundled in the WAR-file from defined locations
  3. Guess the content-type of the files as good as possible for the response

Feel free to use and modify the code in your project if you find it useful. I will try to get this workaround into Javalin-standalone if I find the time to improve feature-parity between Javalin-jetty and Javalin-standalone. Until then I hopy you find the code useful.