Having a single source of truth is one of the big tenets of programming. It is easy to see why. If you want to figure out something about your program, or change something, you just go to the corresponding source.
One of the consequences of this is usually code duplication, but things can get a lot more complicated very fast, when you think of knowledge duplication or fragmentation, instead of just code. Quite unintuitively, duplication can actually help in this case.
Consider the case where you serialize an enum value, e.g. to a database or a file. Suddenly, you have two conceptual points that ‘know’ about the translation of your enum literals to a numeric or string value: The mapping in your code and the mapping implicitly stored in the serialization. None of these two points can be changed independently. Changing the serialized content means changing the source code and vice-versa.
You could still consider your initial enum to value mapping the single source of truth, but the problem is that you can easily miss disruptive changes. E.g. if you used the numeric value, just reordering the enumerated will break the serialization. If you used the text name of the enum, even a simple rename refactoring will break it.
So to deal with this, I often build my own single source of truth: a unit test that keeps track of such implicit value couplings. That way, the test can tell you when you are accidentally breaking things. Effectively, this means duplicating the knowledge of the mapping to a ‘safe’ space: One that must be deliberately changed, and resists accidentally being broken. And then that becomes my new single source of truth for that mapping.
When building apps that use a SQL database, it’s easy to run into performance problems without noticing. Many of these issues come from the way queries are written and used in the code. Below are seven common SQL mistakes developers make, why they happen, and how you can avoid them.
Not Using Prepared Statements
One of the most common mistakes is building SQL queries by concatenating strings. This approach not only introduces the risk of SQL injection but also prevents the database from reusing execution plans. Prepared statements or parameterized queries let the database understand the structure of the query ahead of time, which improves performance and security. They also help avoid subtle bugs caused by incorrect string formatting or escaping.
// Vulnerable and inefficient
String userId = "42";
Statement stmt = connection.createStatement();
ResultSet rs = stmt.executeQuery("SELECT * FROM users WHERE id = " + userId);
// Safe and performant
String sql = "SELECT * FROM users WHERE id = ?";
PreparedStatement ps = connection.prepareStatement(sql);
ps.setInt(1, 42);
ResultSet rs = ps.executeQuery();
The N+1 Query Problem
The N+1 problem happens when an application fetches a list of items and then runs a separate query for each item to retrieve related data. For example, fetching a list of users and then querying each user’s posts in a loop. This results in one query to fetch the users and N additional queries for their posts. The fix is to restructure the query using joins or batch-fetching strategies, so all the data can be retrieved in fewer queries.
When queries filter or join on columns that do not have indexes, the database may need to scan entire tables to find matching rows. This can be very slow, especially as data grows. Adding the right indexes can drastically improve performance. It’s important to monitor slow queries and check whether indexes exist on the columns used in WHERE clauses, JOINs, and ORDER BY clauses.
Here’s how to create an index on an “orders” table for its “customer_id” column:
CREATE INDEX idx_orders_customer_id ON orders(customer_id);
Once the index is added, the query can efficiently find matching rows without scanning the full table.
Retrieving Too Much Data
Using SELECT * to fetch all columns from a table is a common habit, but it often retrieves more data than the application needs. This can increase network load and memory usage. Similarly, not using pagination when retrieving large result sets can lead to long query times and a poor user experience. Always select only the necessary columns and use LIMIT or OFFSET clauses to manage result size.
Some applications make many small queries in a single request cycle, creating high overhead from repeated database access. Each round-trip to the database introduces latency. Here’s an inefficient example:
for (int id : productIds) {
    PreparedStatement ps = connection.prepareStatement(
        "UPDATE products SET price = price * 1.1 WHERE id = ?"
    );
    ps.setInt(1, id);
    ps.executeUpdate();
}
Instead of issuing separate queries, it’s often better to combine them or use batch operations where possible. This reduces the number of database interactions and improves overall throughput:
PreparedStatement ps = connection.prepareStatement(
    "UPDATE products SET price = price * 1.1 WHERE id = ?"
);

for (int id : productIds) {
    ps.setInt(1, id);
    ps.addBatch();
}
ps.executeBatch();
Improper Connection Pooling
Establishing a new connection to the database for every query or request is slow and resource-intensive. Connection pooling allows applications to reuse database connections, avoiding the cost of repeatedly opening and closing them. Applications that do not use pooling efficiently may suffer from connection exhaustion or high latency under load. To avoid this use a connection pooler and configure it with appropriate limits for the workload.
Unbounded Wildcard Searches
Using wildcard searches with patterns like '%term%' in a WHERE clause causes the database to scan the entire table, because indexes cannot be used effectively. These searches are expensive and scale poorly. To handle partial matches more efficiently, consider using full-text search features provided by the database, which are designed for fast text searching. Here’s an example in PosgreSQL:
SELECT * FROM articles
WHERE to_tsvector('english', title) @@ to_tsquery('database');
By being mindful of these common pitfalls, you can write SQL that scales well and performs reliably under load. Good database performance isn’t just about writing correct queries – it’s about writing efficient ones.
Have you faced any of these problems before? Every project is different, and we all learn a lot from the challenges we run into. Feel free to share your experiences or tips in the comments. Your story could help someone else improve their app’s performance too.
A few years ago, domain specific languages (DSLs) were a really hot topic and “the future”. Now, after the dust has settled there are a bunch of successful and useful examples like LINQ and Gradle but no holy grail buzz anymore.
In some of our projects we did implement some small embedded DSLs (eDSL) if we expected great benefit. Most of the time they are just working silently in the background of our solutions. But sometimes they really shine:
A recent story involving a DSL
A few days ago, I got a request from one of our customers regarding a complex “traffic light”-like system for scientific proposals in a proposal submission system. Each proposal goes through a bunch of phases where different parties have participate. While that sounds relatively simple our system has different proposal types, different roles, different states over time and so on.
All of the above leads to “Starbuck’s menu”-style complexity. And now, after several years in production the customer comes up with some special cases that are counterintuitive.
Expecting the worst I dived into the source code and was delighted to see a quite expressive DSL. Our project and thus also the DSL for the “status overview” feature leveraged the flexible syntax of Groovy (which is also used by Gradle). After a few minutes I could not only understand all the rules for the different status lights but also pin-point the cases in question.
I then moved forward and used the rule definition in our DSL to talk to our customer directly! And after a few more minutes he – as the domain expert – also understood our rule definition and the cause for the irritating display of a certain combination of proposal type, role and phase.
The fix was more or less straightforward and I simply handed that one source file to our customer for future reference.
Here is an excerpt of our status phase rules written in our own DSL:
PhaseRules {
    submission {
        green {
            proposal.isValidated()
        }
        red {
           !proposal.isValidated()
        }
        white {
            false
        }
        user {
            yellow {
                proposal.isCallPhaseIndependent())
            }
            grey {
                false
            }
        }
        scientist {
            yellow {
                false
            }
            grey {
                proposalNeedsValidationByProposer(proposal)
            }
        }
        userOffice {
            yellow {
                false
            }
            grey {
                proposalNeedsValidationByProposer(proposal)
            }
        }
    }

    check {
        green {
            proposal.isValidated() && proposal.hasFeasibilityComment()
        }
        red {
        }
    }
    // more phases, roles, states and rules omitted...
}
In that moment I was very proud of my project team, their decision to implement a DSL for this feature and an appropriate implementation.
It saved me a lot of headaches and quite some time. Furthermore it reinforced our customers trust in the application and improved the transparency and traceability of our solution.
This high level abstraction let both me and the customer ignore all the implementation details and focus on the actual functionality and behaviour correcting/improving the status display for our users.
A good book about leader mentality is “Leaders Eat Last” from Simon Sinek. The book is not about your diet, but your approach towards your subordinates and your peer group.
I don’t want to recapitulate the content of the book – it is worth the read or at least a presentation about it. I want to talk about one specific implementation of the principle in my company that I did even before reading the book, but could only name and highlight after Simon Sinek lend me his analogy.
I’m a software developer and founded a software development company. I hired other software developers and they develop software with me. I might be the founder, owner and director of the company (so, in a short team, the “leader”), but I’m still a fellow developer and understand the developer’s mindset. So I know what a developer wants, because I want it, too.
Except, I make sure that I’m the last one in the company to get it.
Two examples:
We bought our second round of office desks in 2010, when we moved into a new office. They were still traditional desks that could only be height-adjusted with tremenduous effort. We only did it once and settled for “good enough”. Our first electrically height adjustable desk was bought in 2013 because of a specific medical requirement. But it opened the door to the possibility of having the desk at any height throughout the day. You might even work standing up.
We slowly accumulated more electrically height adjustable desks until we had 50 percent classic and 50 percent electric desks. At that point, I bought the other half at once (and they are fancy “gamer nerd” desks, because why not?). The last classic desk in the company was my own. I replaced it with the oldest electric desk in the portfolio. Now I can work while standing up, too.
When the Corona pandemic hit in 2020, we moved to home offices all of a sudden. I wrote about this change several times on this blog. This physical separation led to an increased demand for video calls. I made sure everyone is covered with the basic equipment (webcam, headphones, etc.), including me. But I also experimented with the concept of a “virtual office”. It consisted of a video meeting room that I hung out in all workday. I turned the camera and microphone off, but was instantly present if somebody had a desire to talk to me – just like in the real office. For this use case, I installed an additional monitor on my setup, the fourth one, called the “pandemic display” in a blog post about it. Because I didn’t know if the experiment would work, I bought the smallest and cheapest display available for me.
The experiment went fine and I decided to equip everyone with an additional “videoconference display”. The new models were bigger and better. If an employee didn’t see the benefit of it, I didn’t force them to install one in their home office, but every workplace in the office has at least four monitors. Guess were the original one is still installed? I made sure everybody had a better monitor than me.
With this process, I can guarantee that my employees have the work equipment that is good enough for their boss. Because I have it too – or something inferior. If I feel the need to upgrade my gear, I upgrade everybody else and then lift my things to their level. If I feel comfortable with my gear, so does everybody else (except for individual demands and we have a process installed for that, too).
I love self-regulating systems and this is one: The whole company is equipped in a manner that is sufficient or even better for me to do the work. If I want more or better things, everybody gets the upgrade before me because only then do I allow myself to have the same luxury. No “upward” exception for the boss, and only temporarily “downwards”. My wants and needs define the lower limit of equipment quality for all of us. If I can’t buy it for everyone, I don’t buy it.
That is the whole trick: Equip yourself last or lowest. You can be sure everybody is well-equipped that way. Thanks, Simon!
Java Streams are like clean, connected pipes: data flows from one end to the other, getting filtered and transformed along the way. Everything works beautifully — as long as the pipe stays intact.
But what happens if you cut the pipe? Or if you throw rocks into it?
Both stop the flow, though in different ways. Let’s look at what that means for Java Streams.
Exceptions — Cutting the Pipe in Half
A stream is designed for pure functions. The same input gives the same output without side effects. Each element passes through a sequence of operations like map, filter, sorted. But when one of these operations throws an exception, that flow is destroyed. Exceptions are side effects.
Throwing an exception in a stream is like cutting the pipe right in the middle: some water (data) might have already passed through, but nothing else reaches the end. The pipeline is broken.
Example:
var result = items.stream()
    .map(i -> {
        if(i==0) {
            throw new InvalidParameterException();
        }
        return 10 / i;
    })
    .toList();
If you throws the exception, the entire stream stops. The remaining elements never get processed.
Uncertain Operations — Throwing Rocks into the Pipe
Now imagine you don’t cut the pipe — you just throw rocks into it.
Some rocks are small enough to pass. Some are too big and block the flow. Some hit the walls and break the pipe completely.
That’s what happens when you perform uncertain operations inside a stream that might fail in expected ways — for example, file reads, JSON parsing, or database lookups.
Most of the time it works, but when one file can’t be read, you suddenly have a broken flow. Your clean pipeline turns into a source of unpredictable errors.
The compiler does not allow checked exceptions like IOException in streams. Unchecked exceptions, such as RuntimeException, are not detected by the compiler. That’s why this example shows a common “solution” of catching the checked exception and converting it into an unchecked exception. However, this approach doesn’t actually solve the underlying problem; it just makes the compiler blind to it.
Uncertain operations are like rocks in the pipe — they don’t belong inside. You never know whether they’ll pass, get stuck, or destroy the stream.
How to Keep the Stream Flowing
There are some strategies to keep your stream unbroken and predictable.
Prevent problems before they happen
If the failure is functional or domain-specific, handle it before the risky operation enters the stream.
Example: division by zero — a purely data-related, predictable issue.
var result = items.stream()
    .filter(i -> i != 0)
    .map(i -> 10 / i)
    .toList();
Keep the flow pure by preparing valid data up front.
Represent expected failures as data
This also applies to functional or domain-specific failures. If a result should be provided for each element even when the operation cannot proceed, use Optional instead of throwing exceptions.
var result = items.stream()
    .collect(Collectors.toMap(
        i -> i,
        i -> {
            if(i == 0) {
                return Optional.empty();
            }
            return Optional.of(10 / i);
        }
    ));
Now failures are part of the data. The stream continues.
Keep Uncertain Operations Outside the Stream
This solution is for technical failures that cannot be prevent — perform it before starting the stream.
Fetch or prepare data in a separate step that can handle retries or logging. Once you have stable data, feed it into a clean, functional pipeline.
var responses = fetchAllSafely(ids); // handle exceptions here

responses.stream()
    .map(this::transform)
    .toList();
That way, your stream remains pure and deterministic — the way it was intended.
Conclusion
A busted pipe smells awful in the basement, and exceptions in Java Streams smell just as bad. So keep your pipes clean and your streams pure.
that the published “Single File” contains of quite a handful of files. So do I, having studied physics and all that, have an outdated knowledge of the concept of “single”? Or is there a very specific reason for any of the files that appear that and it just has to be? I really needed to figure that out for a small web server application (so, ASP.NET), and as we promised our customer a small, simple application; all the extra non-actually-single files were distracting spam at least, and at worst it would suggest a level of complexity to them that wasn’t helpful, or suggest a level of we-don’t-actually-care when someone opens that directory.
So what I found to do a lot was to extend my .csproj file with the following entries, which I want to explain shortly:
The first block gets rid of any *.pdb file, which stands for “Program Debug Database” – these contain debugging symbols, line numbers, etc. that are helpful for diagnostics when the program crashes. Unless you have a very tech-savvy customer that wants to work hands-on when a rare crash occurs, end users do not need them.
The Second block gets rid of the files aspnetcorev2_inprocess.dll and web.config. These are the Windows “Internet Information Services” module and configuration XML that can be useful when an application needs tight integration with the environmental OS features (authentication and the likes), but not for a standalone web application that just does a simple thing.
And then the last two blocks can be understood nearly as simple as they are written – while a customer might find an appsettings.json useful, any appsettings.Development.json is not relevant in their production release,
and for a ASP.NET application, any web UI content conventionally lives in a wwwroot/ folder. While the app needs them, they might not need to be visible to the customer – so the combination of <Content Remove…/> and <EmbeddedResource Include…/> does exactly that.
Maybe this can help you, too, in publishing cleaner packages to your customers, especially when “I just want a simple tool” should mean exactly that.
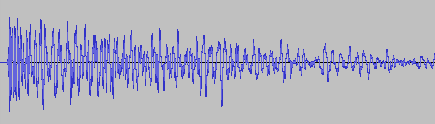
A couple of weeks ago, I asked my brother to test out my new game You Are Circle (please wishlist it and check out the demo, if that’s up your alley!) and among lots of other valuable feedback, he mentioned that the explosion sound effects had a weird click sound at the end that he could only hear with his headphones on. For those of you not familiar with audio signal processing, those click or pop sounds usually appear when the ‘curvy’ audio signal is abruptly cut off1. I did not notice it on my setup, but he has a lot of experience with audio mixing, so I trusted his hearing. Immediately, I looked at the source files in audacity:
They looked fine, really. The sound slowly fades out, which is the exact thing you need to do to prevent clicks & pops. Suspecting the problem might be on the playback side of his particular setup, I asked him to record the sound on his computer the next time he tested and then kind of forgot about it for a bit.
Fast-forward a couple of days. Neither of us had followed up on the little clicky noise thing. While doing some video captures with OBS, I noticed that the sound was kind of terrible in some places, the explosions in particular. Maybe that was related?
While building a new version of my game, Compiling resources... showed up in my console and it suddenly dawned on me: What if my home-brew resource compiler somehow broke the audio files? I use it to encode all the .wav originals into Ogg Vorbis for deployment. Maybe a badly configured encoding setup caused the weird audio in OBS and for my brother? So I looked at the corresponding .ogg files, and to my surprise, it indeed had a small abrupt cut-off at the end. How could that happen? Only when I put both the original and the processed file next to each other, did I see what was actually going on:
It’s only half the file! How did that happen? And what made this specific file so special for it to happen? This is one of many files that I also convert from stereo to mono in preprocessing. So I hypothesized that might be the problem. No way I missed all of those files being cut in half though, or did I? So I checked the other files that were converted from stereo to mono. Apparently, I did miss it. They were all cut in half. So I took a look at the code. It looked something like this:
while (keep_encoding)
{
  auto samples_in_block = std::min(BLOCK_SIZE, input.sample_count() - sample_offset);
  if (samples_in_block != 0)
  {
    auto samples_per_channel = samples_in_block / channel_count;
    auto channel_buffer = vorbis_analysis_buffer(&dsp_state, BLOCK_SIZE);
    auto input_samples = input.samples() + sample_offset;

    if (convert_to_mono)
    {
      for (int sample = 0; sample < samples_in_block; sample += 2)
      {
        int sample_in_channel = sample / channel_count;
        channel_buffer[0][sample_in_channel] = (input_samples[sample] + input_samples[sample + 1]) / (2.f * 32768.f);
      }
    }
    else
    {
      for (int sample = 0; sample < samples_in_block; ++sample)
      {
        int channel = sample % channel_count;
        int sample_in_channel = sample / channel_count;
        channel_buffer[channel][sample_in_channel] = input_samples[sample] / 32768.f;
      }
    }

    vorbis_analysis_wrote(&dsp_state, samples_per_channel);
    sample_offset += samples_in_block;
  }
  else
  {
    vorbis_analysis_wrote(&dsp_state, 0);
  }

  /* more stuff to encode the block using the ogg/vorbis API... */
}
Not my best work, as far as clarity and deep nesting goes. After staring at it for a while, I couldn’t really figure out what was wrong with it. So I built a small test program to debug into, and only then did I see what was wrong.
It was terminating the loop after half the file, which now seems pretty obvious given the outcome. But why? Turns out it wasn’t the convert_to_mono at all, but the whole loop. What’s really the problem here is mismatched and imprecise terminology.
What is a sample? The audio signal is usually sampled several thousand times (44.1kHz, 48kHz or 96kHz are common) per second to record the audio waves. One data point is called a sample. But that is only enough of a definition if the sound has a single channel. But all those with convert_to_mono==true were stereo, and that’s exactly were the confusion is in this code. One part of the code thinks in single-channel samples, i.e. a single sampling time-point has two samples in a stereo file, while the other part things in multi-channel samples, i.e. a single sampling time-point has only one stereo sample, that consists of multiple numbers. Specifically this line:
auto samples_in_block = std::min(BLOCK_SIZE, input.sample_count() - sample_offset);
samples_in_block and sample_offset use the former definition, while input.sample_count() uses the latter. The fix was simple: replace input.sample_count() with input.sample_count() * channel_count.
But that meant all my stereo sounds, even the longer music files, were missing the latter half. And this was not a new bug. The code was in there since the very beginning of the git history. I just didn’t hear its effects. For the sound files, many of them have a pretty long fade out in the second half, so I can kind of get why it was not obvious. But the music was pretty surprising. My game music loops, and apparently, it also loops if you cut it in half. I did not notice.
So what did I learn from this? Many of my assumptions while hunting down this bug were wrong:
My brother’s setup did not have anything to do with it.
Just because the original source file looked fine, I thought the file I was playing back was good as well.
The bad audio in OBS did not have anything to do with this, it was just recorded too loud.
The ogg/vorbis encoding was not badly configured.
The convert_to_mono switch or the special averaging code did not cause the problem.
I thought I would have noticed that almost all my sounds were broken for almost two years. But I did not.
What really cause the problem was an old programming nemesis, famously one of the two hard things in computer science: Naming things. There you have it. Domain language is hard.
I think this is because this sudden signal drop equates to a ‘burst’ in the frequency domain, but that is just an educated guess. If you know, please do tell. ↩︎
There is a long-standing tradition to fill unknown text fields with placeholder data. In graphic design, these texts are called “dummy text”. In the german language, the word is “Blindtext”, which translates directly as “blind text”. The word means that while some text is there, the meaning of it can’t be seen.
A popular dummy text is the latin sounding “Lorem ipsum dolor sit amet”, which isn’t actually valid latin. It has no meaning other than being text and taking up space.
While developing software user interfaces, we often deal with smaller input areas like textfields (instead of text areas that could hold a sizeable portion of “lorem ipsum”) or combo boxes. If we don’t know the actual content yet, we tend to fill it with placeholder data that tries to reflect the software’s domain. And by doing that, we can make many mistakes that seem small because they can easily be fixed – just change the text – but might have negative effects that can just as easily be avoided. But you need to be aware of the subtle messages your placeholders send to the reader.
In this series, we will look at a specific domain example: digital invoices. The mistakes and solutions aren’t bound to any domain, though. And we will look at user interfaces and the corresponding source code, because you can fool yourself or your fellow developers with placeholder data just as easily as your customer.
We start with a relatively simple mistake: Letting your placeholder data appear to be real.
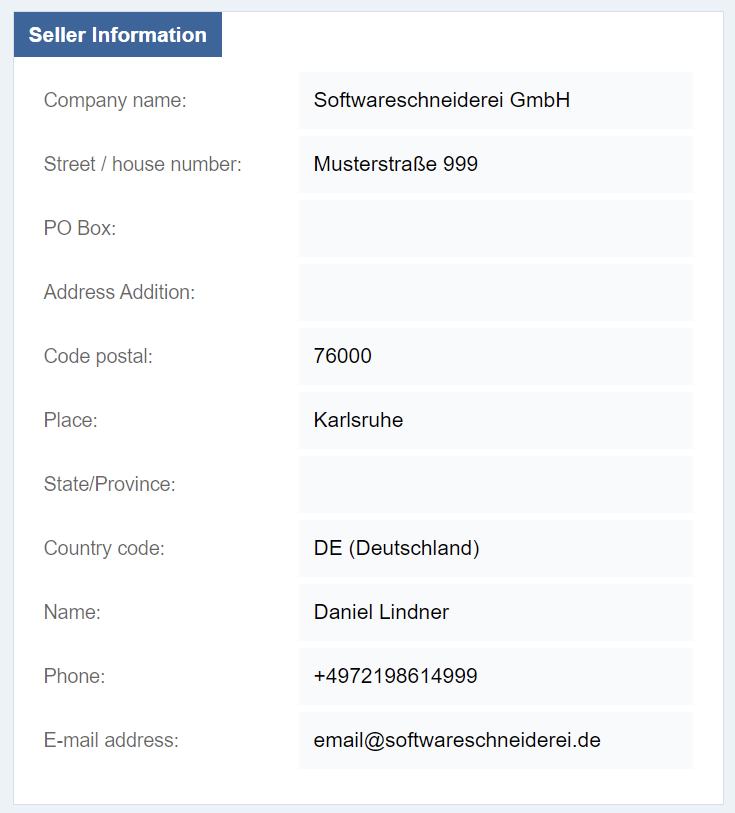
The digital (or electronic) invoice is a long-running effort to reduce actual paper document usage in the economy. With the introduction of the european norm EN 16931, there is a chance of a unified digital format used in one major economic region. Several national interpretations of the norm exist, but the essential parts are identical. You can view invoices following the format with a specialized viewer application like the Quba viewer. One section of the data is the information about the invoice originator, or the “seller” in domain terms:
You can see the defined fields of the norm (I omitted a few for simplicity – a mistake we will discuss later in detail) and a seemingly correct set of values. It appears to be the address of my company, the Softwareschneiderei GmbH.
If you take a quick look at the imprint of our home page, you can already spot some differences. The street is obviously wrong and the postal code is a near miss. But other data is seemingly correct: The company name is real, the country code is valid and my name has no spelling error.
And then, there are those placeholder texts that appear to be correct, but really aren’t. I don’t encourage you to dial the phone number, because it is a real number. But it won’t connect to a phone, because it is routed to our fax machine (we don’t actually have a “machine” for that, it’s a piece of software that will act like a fax). Even more tricky is the e-mail address. It could very well be routed, but actually isn’t.
Both placeholder texts serve the purpose of “showing it like it might be”, but appear to be so real and finalized that they lose the “placeholder” characteristics. If you show the seller data to me, I will immediately spot the wrong street and probably the wrong postal code, but accept the phone number as “real”. But is isn’t real, it is just very similar to the real one.
How can you avoid placeholders that look too real?
One possibility is to fake the data completely until given the real values:
These texts have the same “look and feel” and the same lengths as the near-miss entries, but are readily recognizable as made-up values.
There is only one problem: If you mix real and made-up values, you present your readers a guessing game for each entry: real or placeholder? If it is no big deal to change the placeholders later on, resist the urge to be “as real as possible”. You can change things like the company name from “Softwareschneiderei GmbH” to “Your Company Name Here Inc.” or something similar and it won’t befuddle anybody because the other texts are placeholders, too. You convey the information that this section is still “under construction”. There is no “80% done” for these things. The section is fully real or not. Introducing situations like “the company name and the place are already real, but the street, postal code and anything else isn’t” doesn’t clear anything and only makes things more complicated.
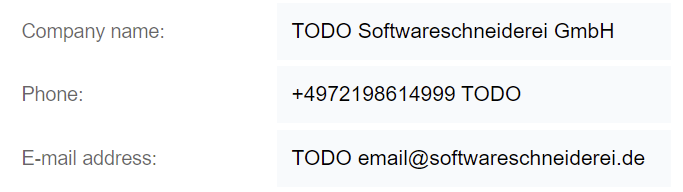
But I want to give you another possibility to make the placeholders look less real:
Add a prefix or suffix that communicates that the entry is in a state of flux:
That way, you can communicate that you know, guess or propose a value for the field, but it still needs approval from the customer. Another benefit is that you can search for “TODO” and list all the decisions that are pending.
If, for some reason, it is not possible to include the prefix or suffix with a separator, try to include it as visible (and searchable) as possible:
This are the two ways I make my placeholder text convey the information that they are, indeed, just placeholders and not the real thing yet.
Maybe there are other possibilities that you know of? Describe them in a comment below!
In the first part of this series, we looked at two mistakes:
Your placeholders look too real
You mix real data with placeholders
And we discussed three solutions:
Make your placeholders unmistakably fake
Give your placeholders a “TODO” prefix or suffix
Demote your real data to placeholders as long as there is still an open question
In the next part of this series, we will look at the code side of the problem and discover that we can make our lives easier there as well.
There are many good reasons to write unit tests for your code. Most of them are abstract enough that it might be hard to see the connection to your current work:
Increase the test coverage
Find bugs
Guide future changes
Explain the code
etc.
I’m not saying that these goals aren’t worth it. But they can feel remote and not imperative enough. If your test coverage is high enough for the (mostly arbitrary) threshold, can’t we let the tests slip a bit this time? If I don’t know about future changes, how can I write guidelining tests for them? Better wait until I actually know what I need to know.
Just like that, the tests don’t get written or not written in time. Writing them after the fact feels cumbersome and yields subpar tests.
Finding motivation by stating your motivation
One thing I do to improve my testing habit is to state my motivation why I’m writing the test in the first place. It seemed to boil down to two main motivations:
#Requirement: The test ensures that an explicit goal is reached, like a business rule that is spelled out in the requirement text. If my customer wants the value added tax of a price to be 19 % for baby food and 7 % for animal food, that’s a direct requirement that I can write unit tests for.
#Bugfix: The test ensures the perpetual absence of a bug that was found in production (or in development and would be devastating in production). These tests are “tests that should have been there sooner”. But at least, they are there now and protect you from making the same mistake twice.
A code example for a #Requirement test looks like this:
/**
 * #Requirement: https://ticket.system/TICKET-132
 */
@Test
void reduced_VAT_for_animal_food() {
    var actual = VAT.addTo(
        new NetPrice(10.00),
        TaxCategory.animalFood
    );
    assertEquals(
        new GrossPrice(10.70),
        actual
    );
}
If you want an example for a #Bugfix test, it might look like this:
/**
 * #Bugfix: https://ticket.system/TICKET-218
 */
@Test
void no_exception_for_zero_price() {
    try {
        var actual = VAT.addTo(
            NetPrice.zero,
            TaxCategory.general
        );
        assertEquals(
            GrossPrice.zero,
            actual
        );
    } catch (ArithmeticException e) {
        fail(
            "You messed up the tax calculation for zero prices (again).",
            e
        );
    }
}
In my mind, these motivations correlate with the second rule of the “ATRIP rules for good unit tests” from the book “Pragmatic Unit Testing” (first edition), which is named “Thorough”. It can be summarized like this:
all mission critical functionality needs to be tested
for every occuring bug, there needs to be an additional test that ensures that the bug cannot happen again
The first bullet point leads to #Requirement-tests, the second one to #Bugfix-tests.
An overshadowed motivation
But recently, we discovered a third motivation that can easily be overshadowed by #Requirement:
#Assumption: The test ensures a fact that is not stated explicitly by the requirement. The code author used domain knowledge and common sense to infer the most probable behaviour of the functionality, but it is a guess to fill a gap in the requirement text.
This is not directly related to the ATRIP rules. Maybe, if one needs to fit it into the ruleset, it might be part of the fifth rule: “Professional”. The rule states that test code should be crafted with care and tidyness, that it is relevant even if it doesn’t get shipped to the customer. But this correlation is my personal opinion and I don’t want my interpretation to stop you from finding your own justification why testing assumptions is worth it.
How is an assumption different from a requirement? The requirement is written down somewhere else, too and not just in the code. The assumption is necessary for the code to run and exhibit the requirements, but it’s only in the code. In the mind of the developer, the assumption is a logical extrapolation from the given requirements. “It can’t be anything else!” is a typical thought about it. But it is only “written down” in the mind of the developer, nowhere else.
And this is a perfect motivation for a targeted unit test that “states the obvious”. If you tag it with #Assumption, it makes it clear for the next developer that the actual content of the corresponding coded fact is more likely to change than other facts, because it wasn’t required directly.
So if you come across an unit test that looks like this:
/**
 * #Assumption: https://ticket.system/TICKET-132
 */
@Test
void normal_VAT_for_clothing() {
    var actual = VAT.addTo(
        new NetPrice(10.00),
        TaxCategory.clothing
    );
    assertEquals(
        new GrossPrice(11.90),
        actual
    );
}
you know that the original author made an educated guess about the expected functionality, but wasn’t explicitly told and is not totally sure about it.
This is a nice way to make it clear that some of your code is not as rigid or expected as other code that was directly required by a ticket. And by writing an unit test for it, you also make sure that if anybody changes that assumed fact, they know what they are doing and are not just guessing, too.
In PostgreSQL, the SERIAL keyword is commonly used to create auto-incrementing primary keys. While it remains supported and functional, newer versions of PostgreSQL (version 10 and later) offer a more standardized and flexible alternative: the GENERATED … AS IDENTITY syntax.
Limitations of SERIAL
When you define a column as SERIAL, PostgreSQL automatically creates and links a sequence to that column behind the scenes. But this linkage is not explicitly part of the table definition. This can complicate schema management and make the behavior of the column less transparent.
The SERIAL keyword is also not part of the official SQL standard, which may be a concern in environments where cross-database compatibility is important. Additionally, the column remains writable, meaning it’s possible to insert values manually, potentially leading to inconsistencies or conflicts.
Identity Columns
The GENERATED … AS IDENTITY syntax addresses these concerns by making the auto-increment behavior explicit and standards-compliant. An identity column is defined as follows:
CREATE TABLE users (
  id INT GENERATED ALWAYS AS IDENTITY PRIMARY KEY,
  username TEXT NOT NULL
);
This syntax makes it clear that the column is managed by the system. PostgreSQL offers two modes for identity columns:
GENERATED ALWAYS: PostgreSQL always generates a value. Manual insertion requires an override.
GENERATED BY DEFAULT: The application can supply a value, or PostgreSQL will use the next sequence value automatically.
To insert a value manually into an ALWAYS identity column, you must use the OVERRIDING SYSTEM VALUE clause:
INSERT INTO users (id, username)
  VALUES (999, 'admin') OVERRIDING SYSTEM VALUE;
Managing Sequences
Since identity columns integrate the sequence into the column definition, managing them is more straightforward. For example, to reset the sequence:
ALTER TABLE users ALTER COLUMN id RESTART WITH 1000;
The sequence is tied to the column, making it easier to inspect, back up, and restore using tools like pg_dump. This helps avoid issues that can arise with the implicit sequences used by SERIAL.
Conclusion
The GENERATED AS IDENTITY syntax offers clearer semantics, better standards compliance, and more predictable behavior than SERIAL. For new database designs, it is generally the preferred choice. While SERIAL continues to be supported, identity columns provide more transparency and control, especially in environments where portability and schema clarity are important.