

There is a long-standing tradition to fill unknown text fields with placeholder data. In graphic design, these texts are called “dummy text”. In the german language, the word is “Blindtext”, which translates directly as “blind text”. The word means that while some text is there, the meaning of it can’t be seen.
A popular dummy text is the latin sounding “Lorem ipsum dolor sit amet”, which isn’t actually valid latin. It has no meaning other than being text and taking up space.
While developing software user interfaces, we often deal with smaller input areas like textfields (instead of text areas that could hold a sizeable portion of “lorem ipsum”) or combo boxes. If we don’t know the actual content yet, we tend to fill it with placeholder data that tries to reflect the software’s domain. And by doing that, we can make many mistakes that seem small because they can easily be fixed – just change the text – but might have negative effects that can just as easily be avoided. But you need to be aware of the subtle messages your placeholders send to the reader.
In this series, we will look at a specific domain example: digital invoices. The mistakes and solutions aren’t bound to any domain, though. And we will look at user interfaces and the corresponding source code, because you can fool yourself or your fellow developers with placeholder data just as easily as your customer.
We start with a relatively simple mistake: Letting your placeholder data appear to be real.
The digital (or electronic) invoice is a long-running effort to reduce actual paper document usage in the economy. With the introduction of the european norm EN 16931, there is a chance of a unified digital format used in one major economic region. Several national interpretations of the norm exist, but the essential parts are identical. You can view invoices following the format with a specialized viewer application like the Quba viewer. One section of the data is the information about the invoice originator, or the “seller” in domain terms:
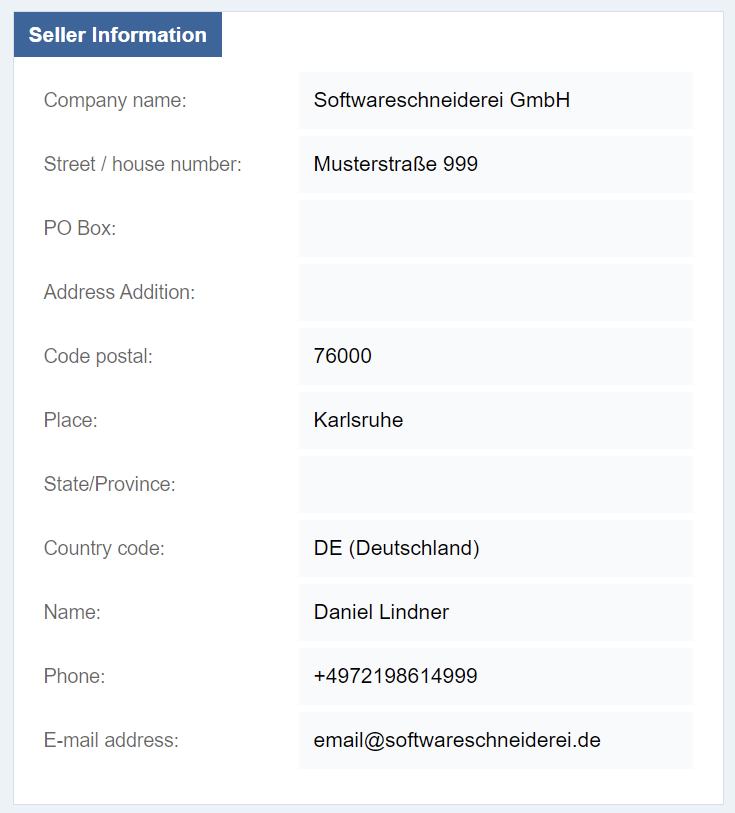
You can see the defined fields of the norm (I omitted a few for simplicity – a mistake we will discuss later in detail) and a seemingly correct set of values. It appears to be the address of my company, the Softwareschneiderei GmbH.
If you take a quick look at the imprint of our home page, you can already spot some differences. The street is obviously wrong and the postal code is a near miss. But other data is seemingly correct: The company name is real, the country code is valid and my name has no spelling error.
And then, there are those placeholder texts that appear to be correct, but really aren’t. I don’t encourage you to dial the phone number, because it is a real number. But it won’t connect to a phone, because it is routed to our fax machine (we don’t actually have a “machine” for that, it’s a piece of software that will act like a fax). Even more tricky is the e-mail address. It could very well be routed, but actually isn’t.
Both placeholder texts serve the purpose of “showing it like it might be”, but appear to be so real and finalized that they lose the “placeholder” characteristics. If you show the seller data to me, I will immediately spot the wrong street and probably the wrong postal code, but accept the phone number as “real”. But is isn’t real, it is just very similar to the real one.
How can you avoid placeholders that look too real?
One possibility is to fake the data completely until given the real values:

These texts have the same “look and feel” and the same lengths as the near-miss entries, but are readily recognizable as made-up values.
There is only one problem: If you mix real and made-up values, you present your readers a guessing game for each entry: real or placeholder? If it is no big deal to change the placeholders later on, resist the urge to be “as real as possible”. You can change things like the company name from “Softwareschneiderei GmbH” to “Your Company Name Here Inc.” or something similar and it won’t befuddle anybody because the other texts are placeholders, too. You convey the information that this section is still “under construction”. There is no “80% done” for these things. The section is fully real or not. Introducing situations like “the company name and the place are already real, but the street, postal code and anything else isn’t” doesn’t clear anything and only makes things more complicated.
But I want to give you another possibility to make the placeholders look less real:
Add a prefix or suffix that communicates that the entry is in a state of flux:
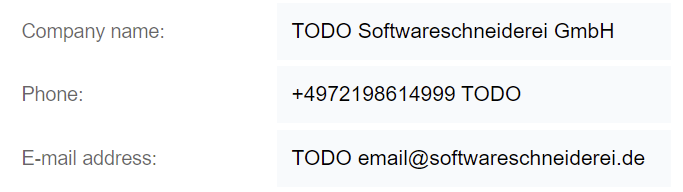
That way, you can communicate that you know, guess or propose a value for the field, but it still needs approval from the customer. Another benefit is that you can search for “TODO” and list all the decisions that are pending.
If, for some reason, it is not possible to include the prefix or suffix with a separator, try to include it as visible (and searchable) as possible:

This are the two ways I make my placeholder text convey the information that they are, indeed, just placeholders and not the real thing yet.
Maybe there are other possibilities that you know of? Describe them in a comment below!
In the first part of this series, we looked at two mistakes:
- Your placeholders look too real
- You mix real data with placeholders
And we discussed three solutions:
- Make your placeholders unmistakably fake
- Give your placeholders a “TODO” prefix or suffix
- Demote your real data to placeholders as long as there is still an open question
In the next part of this series, we will look at the code side of the problem and discover that we can make our lives easier there as well.


