Today, almost everything produces periodically data: A car, cloud-connected smart-home solutions, your “smart” refrigerator and yourself using a fitness tracker. This data has to be stored in a certain way to be usable. We want fast access, beautiful charts and different aggregations over time.
There a several options both free and commercial for storing such time-series data like InfluxDB, Prometheus or TimescaleDB. They are optimised for this kind of data taking advantage of different time-series properties:
Storing is (mostly) append-only
Data points have a (strict) ordering in time
Data points often have fixed and variable meta data in addition to the data value itself
In one of our projects we have to store large quantities of data every 200ms. Knowing PostgreSQL as a powerful relational database management system we opted for TimescaleDB that promises time-series features for an SQL database.
Ingestion, probably the biggest problem of traditional (SQL) databases, of the data worked as expected from the beginning. We were able to insert new data at a constant rate without degrading performance.
The problem
However we got severe performance problems when querying data after some time…
So one of the key points of using a time-series database strangely did not work for us… Fortunately, since Timescale is only an extension to PostgreSQL we could use just use explain/explain analyse with our slow queries to find out what was going on.
It directly showed us that *all* chunks of our hypertable were queried instead of only the ones containing the data we were looking for. Checking our setup and hypertable definition showed that Timescale itself was working as expected and chunking the data correctly on the time axis.
After a bit more analysis and thought is was clear: The problem was our query! We used something like start_time <= to AND from <= end_time in our where clause to denote the time interval containing the requested data. Here start_time is the partition column of our hypertable.
This way we were forcing the database to look at all chunks from long ago until our end-time timestamp.
The solution
Ok, so we have to reformulate our where clause that only the relevant chunks are queried. Timescale can easily do this when we do something like start_time >= from AND start_time < to where from and to are the start and end of our desired interval. That way usually only one or only a few chunks of the hypertable are search and everything is lighning-fast even with billions of rows in our hypertable.
Of course the results of our two queries are not 100% the same sematically. But you can easily achieve the desired results by correctly calculation the start and end of the time-series data to fetch.
Conclusion
Time-series databases are powerful tools for todays data requirements. As with other tools you need some understanding of the underlying concepts and sometimes even implementation to not accidently defeat the purpose and features of the tools.
Used in the correct way they enable you to work with large amounts of data in a performant way todays users would expect. We had similar experiences with full text search engines like solr and ElasticSearch, too.
In one of our applications, users can maintain info button texts themselves. For this purpose, they can insert the desired info button text in a text field when editing. The end user then sees the text as a HTML element.
Now, for better structuring, the customer wants to make lists inside the text field. So there was a need to frame lines beginning with a hyphen with the <li></li> HTML tags.
I used JavaScript to realize this issue. This was my first use of regular expressions in JavaScript, so I had to learn their language-specific specials. In the following article, I explain the general syntax and my solution.
General syntax
For the replacement, you can either specify a string to search for or a regular expression. To indicate that it is a regular expression, the expression is enclosed in slashes.
let searchString = "Test";
let searchRegex = /Test/;
It is also possible to put individual parts of the regular expression in brackets and then use them in the replacement part with $1, $2, etc.
let hello = "Hello Tom";
let simpleBye = hello.replace(/Hello/, "Bye");
//Bye Tom
let bye = hello.replace(/Hello (.*)/, "Bye $1!");
//Bye Tom!
In general, with replace, the first match is replaced. With replaceAll, all occurrences are replaced. But these rules just work for searching strings. With regular expressions, modifiers decide if all matches were searched and replaced. To find and replace all of them, you must add modifiers to the expression.
Modifiers
Modifiers are placed at the end of a regular expression and define how the search is performed. In the following, I present just a few of the modifiers.
The modifier i is used for case-insensitive searching.
let hello = "hello Tom";
let notFound = hello.replaceAll(/Hello/, "Bye");
//hello Tom
let found= hello.replaceAll(/Hello/i, "Bye");
//Bye Tom
To find all occurrences, independent of whether replace or replaceAll is called, the modifier g must be set.
let hello = "Hello Tom, Hello Anna";
let first = hello.replaceAll(/Hello/, "Bye");
//Bye Tom, Hello Anna
let replaceAll = hello.replaceAll(/Hello/g, "Bye");
//Bye Tom, Bye Anna
let replace = hello.replace(/Hello/g, "Bye");
//Bye Tom, Bye Anna
Another modifier can be used for searching in multi-line texts. Normally, the characters ^ and $ are for the start and end of the text. With the modifier m, the characters also match at the start and end of the line.
let hello = `Hello Tom,
hello Anna,
hello Paul`;
let byeAtBegin = hello.replaceAll(/^Hello/gi, "Bye");
//Bye Tom,
//hello Anna,
//hello Paul
let byeAtLineBegin = hello.replaceAll(/^Hello/gim, "Bye");
//Bye Tom,
//Bye Anna,
//Bye Paul
Solution
With this toolkit, I can now convert the hyphens into HTML <li></li>. I also remove the line breaks at the end because, in real code, they will be replaced with <br/> in the next step, and I do not want empty lines between the list points.
let infoText = `This is an important field. You can input:
- right: At the right side
- left: At the left side`;
let htmlInfo = infoText.replaceAll(/^-(.*)\n/gm, "<li>$1</li>");
//This is an important field. You can input:
//<li>right: At the right side</li><li>left: At the left side</li>
If you are familiar with the syntax and possibilities of JavaScript, it offers good functions, such as taking over parts of the regular expression.
A great many things changed in the transition from conan 1.x to conan 2.x. For me, as an application-developer first, the main thing was how I consume packages. The two IDEs I use the most in C++ are Visual Studio and CLion, so I needed a good workflow with those. For Visual Studio, I am using its CMake integration, otherwise known as “folder mode”, which lets you directly open a project with a CMakeLists.txt file in it, instead of generating a solution and opening that. The deciding factor for me is that that uses Ninja as a build tool instead of MSBuild, which often is a lot faster. I have had projects with 3.5x build-time speed ups. As an added bonus, CLion supports very much the same workflow, which reduces friction when switching between platforms.
Visual Studio
First, we’re going to need some local profiles. I typically treat them as ‘build configurations’, with one profile for debug and release on each platform. I put them under version control with the project. A good starting point to create them is conan profile detect, which guesses your environment. To create a profile to a file, go to your project folder and use something like:
conan profile detect --name ./windows_release
Note the ./ in the name, which will instruct conan to create a profile in the current working directory instead of in your user settings. For me, this generates the following profile:
Conan will warn you, that this is only a guess and you should make sure that the values work for you. I usually bump up the compiler.cppstd to at least 20, but the really important change is to change the CMake generator to Ninja, after which the profile should look something like this:
Copy and edit the build_type to create a corresponding profile for debug builds.
While conanfile.txt still works for specifying your dependencies, I now recommend directly using conanfile.py from the get go, as some options like overriding dependencies are now exclusive to it. Here’s an example installing the popular logging library spdlog:
from conan import ConanFile
from conan.tools.cmake import cmake_layout


class ProjectRecipe(ConanFile):
    settings = "os", "compiler", "build_type", "arch"
    generators = "CMakeToolchain", "CMakeDeps"

    def requirements(self):
        self.requires("spdlog/1.14.1")

    def layout(self):
        cmake_layout(self)
Note that I am using cmake_layout to setup the folder structure, which will make conan put the files it generates in build/Release for the windows_release profile we created.
Now it is time to install the dependencies using conan install. Make sure you have a clean project before this, e.g. there are no other build/config folders like build/, out/ and .vs/. Specifically, do not open the project in Visual Studio before doing that, as it will create another build setup. You already need the CMakeLists.txt at this point, but it can be empty. For completeness, here’s one that works with the conanfile.py from above:
This will install the dependencies and even tell you what to put in your CMakeLists.txt to use them. More importantly for the Visual Studio integration, it will create a CMakeUserPresets.json file that will allow Visual Studio to find the prepared build folder once you open the project. If there is no CMakeLists.txt when you call conan install, this file will not be created! Note that you generally do not want this file under version control.
Now that this is setup, you can finally open the project in Visual Studio. You should see a configuration named “conan-release” already available and CMake should run without errors. After this point, you can let conan add new configurations and Visual Studio should automatically pick them up through the CMake user presets.
CLion
The process is essentially the same for CLion, except that the profile will probably look different, depending on the platform. Switching the generator to Ninja is not as essential, but I still like to do it for the speed advantages.
Again, make sure you let conan setup the initial build folders and CMakeUserPresets.json and not the IDE. CLion will then pick them up and work with them like Visual Studio does.
Additional thoughts
I like to create additional script files that I use to setup/update the dependencies. For example, in windows, I create a conan_install.bat file like this:
We have a long history of maintaining quite a large grails application since Grails 1.0. Over the first few major versions upgrading was a real pain.
The situation changed dramatically after Grails 3 as you can see in our former blog posts and and the upgrade from 3 to 4. Going from 4 to 5 was so smooth that I did not even dedicate a blog post to it.
A few weeks ago we decided to upgrade from version 5 to 6 and here is a short summary of our experiences. Things fortunately went quite smooth again:
The changes
The new major version 6 contains mostly dependency upgrades and official support for Java 17 which is probably the biggest selling point.
Some other minor things to note are without any particular order:
The logback configuration file name has changed from logback.groovy to logback-config.groovy
The pathing-jar is already setup for you, so you can remove the directive from your build files if you had it in
The build uses the standard gradle-application plugin allowing some more simplifications in your build files and infrastructure
Other noteworthy news
Object Computing stepped down as the steward of the grails framework and informed the community in an open letter. While there is still the grails foundation and the open source community we can expect the development and changes to slow down.
Whether this results in negative developer experience remains to be seen.
Conclusion
Using and maintaining a Grails application developed to a rather smooth ride and only poorly maintained plugins hurt your experience. The framework and its foundation have been pretty solid for some time now.
Regarding new projects you certainly have to evaluate if using grails is the best option. For an full stack framework the answer maybe yes, but if you only need a powerful API backend lighter and more modern frameworks like micronaut or javalin may be a better choice.
I recently implemented authentication and authorization via LDAP in my Javalin web server. I encountered a few pitfalls in the process. That is why I am sharing my experiences in this blog article.
Javalin
I used pac4j for the implementation. This is a modular library that allows you to replicate your own use case with different authenticators, clients and web server connection libraries. In this case I use “org.pac4j:pac4j-ldap” as authenticator, “org.pac4j:pac4j-http” as client and “org.pac4j:javalin-pac4j” as web server.
In combination with Javalin, pac4j independently manages the session and forwards it for authentication if you try to access a protected path.
var config = new LdapConfigFactory().build();
var callback = new CallbackHandler(config, null, true);

Javalin.create()
   .before("administration", new SecurityHandler(config, "FormClient", "admin"))
   .get("administration", ctx -> webappHandler.serveWebapp(ctx))
   .get("login", ctx -> webappHandler.serveWebapp(ctx))
   .get("forbidden", ctx -> webappHandler.serveWebapp(ctx))
   .get("callback", callback)
   .post("callback", callback)
   .start(7070);
In this example code the path to the administration is protected by the SecurityHandler. The “FormClient” indicates that in the event of missing authentication, the user is forwarded to a form for authentication. The specification “admin” defines that the user must also be authorized to the role “admin”.
LDAP Config Factory
I configured LDAP using my own ConfigFactory. Here, for example, I define the callback and login route. In addition, my self-written authorizer and http action adapter are assigned. I will go into these two areas in more detail below. The login form requires the authenticator here. For us, this is an LdapProfileService.
public class LdapConfigFactory implements ConfigFactory {
    @Override
    public Config build(Object... parameters) {
        var formClient = new FormClient("http://localhost:7070/login", createLdapProfileService());
        var clients = new Clients("http://localhost:7070/callback", formClient);
        var config = new Config(clients);

        config.setWebContextFactory(JEEContextFactory.INSTANCE);
        config.setSessionStoreFactory(JEESessionStoreFactory.INSTANCE);
        config.setProfileManagerFactory(ProfileManagerFactory.DEFAULT);
        config.addAuthorizer("admin", new LdapAuthorizer());
        config.setHttpActionAdapter(new HttpActionAdapter());

        return config;
    }
}
LDAP Profile Service
I implement a separate method for configure the service. The LDAP connection requires the url and a user for the connection and the query of the active directory. The LDAP connection is defined in the ConnectionConfig. It is also possible to activate TLS here, but in our case we use LDAPS.
The Distinguished Name must also be defined. Queries only search for users under this path.
private static LdapProfileService createLdapProfileService() {
    var url = "ldaps://test-ad.com";
    var baseDN = "OU=TEST,DC=schneide,DC=com";
    var user = "username";
    var password = "password";

    ConnectionConfig connConfig = ConnectionConfig.builder()
            .url(url)
            .connectionInitializers(new BindConnectionInitializer(user, new Credential(password)))
            .build();

    var connectionFactory = new DefaultConnectionFactory(connConfig);

    SearchDnResolver dnResolver = SearchDnResolver.builder()
            .factory(connectionFactory)
            .dn(baseDN)
            .filter("(displayName={user})")
            .subtreeSearch(true)
            .build();

    SimpleBindAuthenticationHandler authHandler = new SimpleBindAuthenticationHandler(connectionFactory);

    Authenticator authenticator = new Authenticator(dnResolver, authHandler);

    return new LdapProfileService(connectionFactory, authenticator, "memberOf,displayName,sAMAccountName", baseDN);
}
The SearchDNResolver is used to search for the user to be authenticated. A filter can be defined for the match with the user name. And, very importantly, the subtreeSearch must be activated. By default, it is set to false, which means that only users who appear exactly in the BaseDN are found.
The SimpleBindAuthenticationHandler can be used together with the Authenticator for authentication with user and password.
Finally, in the LdapProfileService, a comma-separated string can be used to define which attributes of a user should be queried after authentication and transferred to the user profile.
With all of these settings, you will be redirected to the login page when you try to accessing administration. The credentials is then matched against the active directory via LDAP and the user is authenticated. In addition, I want to check that the user is in the administrator group and therefore authorized. Unfortunately, pac4j cannot do this on its own because it cannot interpret the attributes as roles. That’s why I build my own authorizer.
Authorizer
public class LdapAuthorizer extends ProfileAuthorizer {
    @Override
    protected boolean isProfileAuthorized(WebContext context, SessionStore sessionStore, UserProfile profile) {
        var group = "CN=ADMIN_GROUP,OU=Groups,OU=TEST,DC=schneide,DC=com";
        var attribute = (List) profile.getAttribute("memberOf");
        return attribute.contains(group);
    }

    @Override
    public boolean isAuthorized(WebContext context, SessionStore sessionStore, List<UserProfile> profiles) {
        return isAnyAuthorized(context, sessionStore, profiles);
    }
}
The attributes defined in LdapProfileService can be found in the user profile. For authorization, I query the group memberships to check if the user is in the group. If the user has been successfully authorized, he is redirected to the administration page. Otherwise the http status code forbidden is returned.
Javalin Http Action Adapter
Since I want to display a separate page that shows the user the Forbidden, I build my own JavalinHttpActionAdapter.
public class HttpActionAdapter extends JavalinHttpActionAdapter {
    @Override
    public Void adapt(HttpAction action, WebContext webContext) {
        JavalinWebContext context = (JavalinWebContext) webContext;
        if(action.getCode() == HttpConstants.FORBIDDEN){
            context.getJavalinCtx().redirect("/forbidden");
            throw new RedirectResponse();
        }
        return super.adapt(action, context);
    }
}
This redirects the request to the Forbidden page instead of returning the status code.
Conclusion
Overall, the use of pac4j for authentication and authorization on javalin facilitates the work and works well. Unfortunately, the documentation is rather poor, especially for the LDAP module. So the setup was a bit of a journey of discovery and I had to spend a lot of time looking for the root cause of some problems like subtreeSearch.
Marching squares is an algorithm to find the contour of a scalar field. For example, that can be a height-map and the resulting contour would be lines of a specific height known as ‘isolines’.
At the core of the algorithm is a lookup table that says which line segments to generate for a specific ’tile’ configuration. To make sense of that, you start with a convention on how your tile configuration and the resulting lines are encoded. I typically add a small piece of ASCII-art to explain that:
// c3-e3-c2
// |      |
// e0    e2
// |      |
// c0-e1-c1
//
// c are corner bits, e the edge indices
The input of our lookup table is a bitmask of which of the corners c are ‘in’ or above our isolevel. The output is which tile edges e to connect with line segments. That is either 0, 1 or 2 line segments, so we need to encode that many pairs. You could easily pack that into a 32-bit, but I am using a std::vector<std::uint8_t> for simplicity. Here’s the whole thing:
I usually want to generate index meshes, so I can easily connect edges later without comparing the floating-point coordinates. So one design goal here was to generate each point only once. Here is the top-level algorithm:
using point_id = std::tuple<int, int, bool>;

std::vector<v2<float>> points;
// Maps construction parameters to existing entries in points
std::unordered_map<point_id, std::uint16_t, key_hash> point_cache;
// Index pairs for the constructed edges
std::vector<std::uint16_t> edges;

auto [ex, ey] = map.size();
auto hx = ex-1;
auto hy = ey-1;

// Construct inner edges
for (int cy = 0; cy < hy; ++cy)
for (int cx = 0; cx < hx; ++cx)
{
  std::uint32_t key = 0;
  if (map(cx, cy) > threshold)
    key |= 1;
  if (map(cx + 1, cy) > threshold)
    key |= 2;
  if (map(cx + 1, cy + 1) > threshold)
    key |= 4;
  if (map(cx, cy + 1) > threshold)
    key |= 8;

  auto const& geometry = LOOKUP[key];

  for (auto each : geometry)
  {
    auto normalized_id = normalize_point(cx, cy, each);
    auto found = point_cache.find(normalized_id);
    if (found != point_cache.end())
    {
      edges.push_back(found->second);
    }
    else
    {
      auto index = static_cast<std::uint16_t>(points.size());
      points.push_back(build_point(map, threshold, normalized_id));
      edges.push_back(index);
      point_cache.insert({ normalized_id, index });
    }
  }
}
For each tile, we first figure out the lookup input-key by testing the 4 corners. We then get-or-create the global point for each edge point from the lookup. Since each edge in a tile can be accessed from two sides, we first normalize it to have a unique key for our cache:
When we need to create a point an edge, we interpolate to estimate where exactly the isoline intersects our tile-edge:
v2<float> build_point(raster_adaptor const& map, float threshold, point_id const& p)
{
  auto [x0, y0, vertical] = p;
  int x1 = x0, y1 = y0;
  if (vertical)
    y1++;
  else
    x1++;

  const auto s = map.scale();
  float h0 = map(x0, y0);
  float h1 = map(x1, y1);
  float lambda = (threshold - h0) / (h1 - h0);

  auto result = v2{ x0 * s, y0 * s };
  auto shift = lambda * s;
  if (vertical)
    result[1] += shift;
  else
    result[0] += shift;
  return result;
}
For a height-map, that’s about as good as you can get.
You can, however, sample other scalar field functions with this as well, for example sums of distances. This is not the most sophisticated implementation of marching squares, but it is reasonably simple and can easily be adapted to your needs.
Last week, my colleague wrote about building blocks and how to achieve a higher-level language in your code by using them. Instead of talking about strings and files, you change your terms to things like coordinates and resources.
I want to elaborate on one aspect of this improvement, that aims at the separation of your intent from the current implementation. Your intent is what you want to achieve with the code you write. The current implementation is how you achieve it right now. I point out the transience of the implementation so clearly because it is most likely the first (and maybe even only) thing to change.
I have an example of this concept that is hopefully understandable enough. Let’s say that you build a system that gathers a lot of environmental data and stores it for later analysis and introspection. Don’t worry, the data consists mostly of things like air pressure, temperature and radioactive load. Totally harmless stuff – unless you find the wrong isotopes. In that case, you want to have a closer look and understand the situation. Most temporarily increased radioactivity in the air is caused by a normal thunderstorm. Most temporarily decreased radioactivity in the air is caused by a normal rain.
Storing all the data requires something like an archive. We want to store the data separated by the point of measurement (a “station”), the type of data (let’s call it “data entry type” because we aren’t very creative with names here) and by the exact point in time the measurement took place. To make matters a little bit more complicated, we might have more than one device in a station that captures a specific data entry type. Think about two thermometers on both sides of the station to make local heatup effects visible.
In order to reference a definite entry in our archive, we need a value for four aspects or dimensions :
The station
The data entry type
The device
The date and time
Thinking from the computer
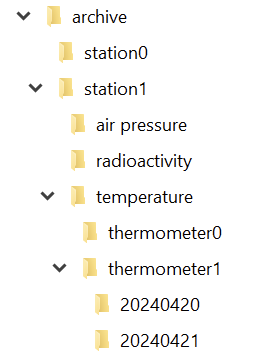
If you implement your archive in the file system, you can probably see the directory structure right before you:
And in each directory for the day, we have a file for each hour:
So we can just write a class that takes our four parameters and returns the corresponding file. That is a straighforward and correct implementation.
It is also one of the implementations that couples your intent (an archive with four dimensions of navigability) nearly inseparably with your decisions on how to use your computer’s basic resources.
Thinking from the algorithms point of view
In order to separate your intent from your current implementation, you need to specify your intent as unencumbered from details as possible. Let’s specify our 4-axis archive nagivation system as a coordinate:
public record ArchiveCoordinate(
    StationId station,
    DataEntryType type,
    DeviceId device,
    LocalDateTime measurementTime
) {
}
There is nothing in here that point towards file system things like directories or files. We might have a hunch of the actual hierarchy by looking at the order of the parameters, but it is easy to implement a hierarchy-free nagivation between coordinates:
public record ArchiveCoordinate([...]) {
    public ArchiveCoordinate withStationChangedTo(
        StationId newStation
    ) {
        [...]
    }

    public ArchiveCoordinate withTypeChangedTo(
        DataEntryType newType
    ) {
        [...]
    }

    public ArchiveCoordinate withDeviceChangedTo(
        DeviceId newDevice
    ) {
        [...]
    }

    public ArchiveCoordinate withMeasurementTimeChangedTo(
        LocalDateTime newMeasurementTime
    ) {
        [...]
    }
}
The concept is that if you know one coordinate, you can navigate relative to it through the archive, without knowingly changing the directory or whatever implementation structure lies beneath your model layer. Let’s say we have the coordinate of a particular measurement of one thermometer. How do we get the same measurement of the other thermometer?
ArchiveCoordinate measurementForThermometer0 = new ArchiveCoordinate([...]);
ArchiveCoordinate measurementForThermometer1 = measurementForThermometer0.withDeviceChangedTo(thermometer1);
We can provide methods that allow us to step forward and backward in time. We can provide our application code with everything it requires to implement clear and concise algorithms based on our model of the archive.
But there will be the moment where you want to “get real” and access the data. You might decide to let your current implementation shine through to your intent layer and provide an actual file:
public interface Archive {
    Optional<File> entryFor(ArchiveCoordinate coordinate);
}
That’s all you need from the archive to get your file. But you might also decide to prolong your intent layer and wrap the file in your own data type that provides everything your algorithms need without revealing that it is really a file that lies underneath:
public interface Archive {
    Optional<ArchiveResource> entryFor(ArchiveCoordinate coordinate);
}
The new ArchiveResource is a thin, but effective veneer (some might call it a wrapper or a facade) that gives us the required information:
public interface ArchiveResource {
    String name();
    long size();
    InputStream read();
}
Of course, we need to provide an implementation for all of this. But by staying vague in the intent layer, we open the door for an implementation that has nothing to do with files. Instead of a file system, there could be a relational database underneath and we wouldn’t notice. Our algorithms would still work the same way and read their data from ArchiveResources that aren’t FileArchiveResources anymore, but DatabaseArchiveResources.
You can probably imagine how you can provide the intent for data writing using the example above. If not, let me show you the necessary additions:
public interface ArchiveResource {
    String name();
    long size();
    InputStream read();
    OutputStream write();
}
Now you can store additional data to the archive without ever knowing if you write to a file or a database or something completely different.
Summary
By separating your intent from your current actual implementation, you gain at least three things for the cost of more work and some harder thinking:
Your algorithms only use your intent layer. You design it exclusively for your algorithms. It will fit like a glove.
The terms you use in your intent layer shape the algorithm metaphors way better than the terms of your current implementation. You can freely decide what terms you’ll use.
The algorithms and your intent layer are designed to last. Your current implementation can be swapped out without them noticing.
If this sounds familiar to you, it is a slightly different take on the “ports and adapters” architecture. The important thing is that by starting with the intent and naming it from the standpoint of your algorithms (application code), you are less prone to let your implementation shine through.
I have just completed my first own project. In this project I have a web server whose main task is to load files and return them as a stream. In the first version, there was a static handler for each file type, which loaded the file and sent it as a stream.
As part of a refactoring, I then built building blocks for various tasks and the handler changed fundamentally.
The initial code
Here you can see a part of my web server. It offers a path for both images and audio files. The real server has significantly more handlers and file types.
public class WebServer{
    public static void main(String[] args) {
        var app = Javalin.create()
            .get("api/audio/{root}/{path}/{number}", FileHandler::handleAudio)
            .get("api/img/{root}/{path}/{number}", FileHandler::handleImage)
            .start(7070);
    }
}
Below is a simplified illustration of the handlers. I have also shown the imports of the web server class and the web server technology, in this case Javalin. The imports are not complete. They are only intended to show these two dependencies.
import WebServer;
import io.javalin.http.Context;
// ...

public class FileHandler {

    public static void handleImage(Context ctx) throws IOException {
        var resource = Application.class.getClassLoader().getResourceAsStream(
            String.format(
                "file/%s/%s/%s.jpg",
                ctx.pathParam("root"),
                ctx.pathParam("path"),
                ctx.pathParam("fileName")));
        String mimetyp= "image/jpg";

        if (resource != null) {
            ctx.writeSeekableStream(resource, mimetyp);
        }
    }

    public static void handleAudio(Context ctx) {
        var resource = Application.class.getClassLoader().getResourceAsStream(
            String.format(
                "file/%s/%s/%s.mp3",
                ctx.pathParam("root"),
                ctx.pathParam("path"),
                ctx.pathParam("fileName")));
        String mimetyp= "audio/mp3";

        if (resource == null) {
            resource = Application.class.getClassLoader().getResourceAsStream(
            String.format(
                "file/%s/%s/%s.mp4",
                ctx.pathParam("root"),
                ctx.pathParam("path"),
                ctx.pathParam("fileName")));
            mimetyp= "video/mp4";
        }

        if (resource != null) {
            ctx.writeSeekableStream(resource, mimetyp);
        }
    }
}
The handler methods each load the file and send it to the Javalin context. The audio handler first searches for an audio file and, if this is not available, for a video file. The duplication is easy to see. And with the static handler and Javalin dependencies, the code is not testable.
Refactoring
So first I build an interface, called a decorator, for the context to get the Javalin dependency out of the handlers. A nice bonus: I can manage the handling of not found files centrally. In the web server, I then inject the new WebContext instead of the Context.
public interface WebContext {
    String pathParameter(String key);
    void sendNotFound();
    void sendResourceAs(String type, InputStream resource);
    default void sendResourceAs(String type, Optional<InputStream> resource){
        if(resource.isEmpty()){
            sendNotFound();
            return;
        }
        sendResourceAs(type, resource.get());
    }
}

public class JavalinWebContext implements WebContext {
    private final Context context;

    public JavalinWebContext(Context context){
        this.context = context;
    }

    @Override
    public String pathParameter(String key) {
        return context.pathParam(key);
    }

    @Override
    public void sendNotFound() {
        context.status(HttpStatus.NOT_FOUND);
    }

    @Override
    public void sendResourceAs(String type, InputStream resource) {
        context.writeSeekableStream(resource, type);
    }
}
Then I write a method to load the file and send it as a stream.
The next step is to build a loader for the files, which I pass to the no longer static handler during initialization. Here I can run a quick check to see if anyone is trying to manipulate the specified path.
public class ResourceLoader {
    private final ClassLoader context;

    public ResourceLoader(ClassLoader context){
        this.context = context;
    }

    public Optional<InputStream> asStreamFrom(String path){
        if(path.contains("..")){
            return Optional.empty();
        }
        return Optional.ofNullable(this.context.getResourceAsStream(path));
    }
}
Finally, I build an extra class for the paths. The knowledge of where the files are located and how to determine the path from the context should not be duplicated everywhere.
public class FileCoordinate {
    private static final String FILE_CATEGORY = "file";
    private final String root;
    private final String path;
    private final String fileName;
    private final String extension;

    private FileCoordinate(String root, String path, String fileName, String extension){
        super();
        this.root = root;
        this.path = path;
        this.fileName = fileName;
        this.extension = extension;
    }

    private static FileCoordinate pathFromWebContext(WebContext context, String extension){
        return new FileCoordinate(
                context.pathParameter("root"),
                context.pathParameter("path"),
                context.pathParameter("fileName"),
                extension
        );
    }

    public static FileCoordinate toImageFile(WebContext context){
        return FileCoordinate.pathFromWebContext(context, "jpg");
    }

    public static FileCoordinate toAudioFile(WebContext context){
        return FileCoordinate.pathFromWebContext(context, "mp3");
    }

    public FileCoordinate asToVideoFile(){
        return new FileCoordinate(
                root,
                path,
                fileName,
                "mp4"
        );
    }

    public String asPath(){
        return String.format("%s/%s/%s/%s.%s", FILE_CATEGORY, root, path, fileName, extension);
    }
}
Result
My handler looks like this after refactoring:
public class FileHandler {
    private final ResourceLoader resource;

    public FileHandler(ResourceLoader resource){
        this.resource = resource;
    }

    public void handleImage(WebContext context) {
        var coordinate = FileCoordinate.toImageFile(context);
        sendResourceFor(coordinate, "image/jpg", context);
    }

    public void handleAudio(WebContext context) {
        var coordinate = FileCoordinate.toAudioFile(context);
        var found = sendResourceFor(coordinate, "audio/mp3", context);
        if(!found)
            sendResourceFor(coordinate.asToVideoFile(), "video/mp4", context);
    }

    private boolean sendResourceFor(FileCoordinate coordinate, String mimetype, WebContext context){
        var stream = resource.asStreamFrom(coordinate);
        context.sendResourceAs(mimetype, stream);
        return stream.isPresent();
    }
}
It is much shorter, easier to read and describes more what is done and not how it is technically done. Another advantage is that I can, for example, fully test my FileCoordinate and mock my WebContext.
For just these two handler methods, it still looks like a overkill. Overall, more code has been created than has disappeared and yes, a smaller modification would probably have been sufficient for this handler alone. But my application is not just this handler and most of them are much more complex. For example, I work a lot with json files, which are loaded and which my loader can now simply interpret using an additional function that return a JsonNode instead a stream. The conversion has significantly reduced the complexity of the application, avoided duplications and made the code more secure and testable.
The thing about the DOM is that it is one large, global block of information. In order to achieve loose coupling, you need to exert that discipline by yourself, using document.getElementById() and friends you can easily couple the furthestmost components, to their inner workings, together. Which can make it very insecure to change.
For that problem in Web Components, there is the Shadow DOM. I.e. if you define, as previously, your component as
class CustomIcon extends HTMLElement {
    connectedCallback() {
        this.innerHTML = `
            <svg id="icon">
                <!-- some content -->
            </div>
        `;
        element = document.getElementById("icon");
        element.addEventListener(...);
        // don't forget to removeEventListener(...) in disconnectedCallback()! - but that is not the point here
    }
}
it becomes possible to also document.getElementById("icon") from anywhere globally. Especially with such generic identifiers, you really do not want to leak your inner workings. (Yes, in a very custom application, there might be valid cases of desired behaviour, but then usually the IDs are named as e.g. __framework_global_timeout, custom--modal-dialog, … as to avoid accidental clashes).
This is done as easy as
class CustomIconim d extends HTMLElement {
    constructor() {
        super();
        this.attachShadow({ mode: 'open' });
  }

    connectedCallback() {
        this.shadowRoot.innerHTML = ... // your HTML ere
    }
}
Two points:
The attachShadow() can also be called in the connectedCallback(), even if usually not required. Generally, there is some debate between these two options, and I think I’ll write you another episode of this post when I have some further insight about that.
The {mode: 'open'} is what you actually use because ‘closed’ does not give you that much benefit, as outlined in this blog here. Just keep in mind that yes, it’s still JavaScript – you can access the shadowRoot object from the outside and then still do your shenanigans, but at least you can’t claim to have done so by accident.
This encapsulation makes it easier to write reusable code, i.e. decrease duplication.
As with my case of the MagicSparkles icon – I might want to implement some other (e.g. Font Awesome) icons and have all of these carry the same “size” attribute. It might look like:
export const addSvgPathAsShadow = (element: HTMLElement, { children, viewBox, defaultColor }: SvgIconProps) => {
    const shadow = element.attachShadow({ mode: "open" });
    const size = element.getAttribute("size") || 24;
    const color = defaultColor || "currentcolor";
    viewBox ||= `0 0 ${size} ${size}`;
    shadow.innerHTML = `
            <svg
                xmlns="http://www.w3.org/2000/svg"
                width="${size}"
                height="${size}"
                viewBox="${viewBox}"
                fill="${color}"
            >
                ${children}
            </svg>
        `;
};

export class PlayIcon extends HTMLElement {
    connectedCallback() {
        addSvgPathAsShadow(this, {
            viewBox: "0 0 24 24",
            children: "<path fill-rule=\"evenodd\" d=\"M4.5 5.653c0-1.427 1.529-2.33 2.779-1.643l11.54 6.347c1.295.712 1.295 2.573 0 3.286L7.28 19.99c-1.25.687-2.779-.217-2.779-1.643V5.653Z\" clip-rule=\"evenodd\" />"
        });
    }
}

// other elements can be defined similarly

// don't forget to actually define the element tag somewhere top-level, as with:
// customElements.define("play-icon", PlayIcon);
Note that
this way, children is required as a fixed string. My experiment didn’t work out yet how to use the "<slot></slot>" here (to pass the children given by e.g. <play-icon>Play!</play-icon>)
Also, I specifically use the || operator for the default values – not the ?? – as an attribute given as empty string would not be defaulted otherwise (?? only checks for undefined or null).
Conclusion
As concluded in my first post, we see that one tends to recreate the same patterns as already known from the existing frameworks, or software architecture in general. The tools are there to increase encapsulation, decrease coupling, decrease duplication, but there’s still no real reason why not just to use one of the frameworks.
There might be at some point, when framework fatigue is too much to bear, but try to decide wisely.
Just yesterday, I was working on the task of enabling gamepad navigation of a graphical UI. I had implemented this before in my game abstractanks but since forgotten how exactly I did it. So I opened the old code and tried to decipher it, and I figured that’d make a nice topic to write about.
Basic implementation
Let’s break down the simple version of the problem: You have a bunch of rectangular controls, and given a specific one, figure out the next one with an input of either left, up, right or down.
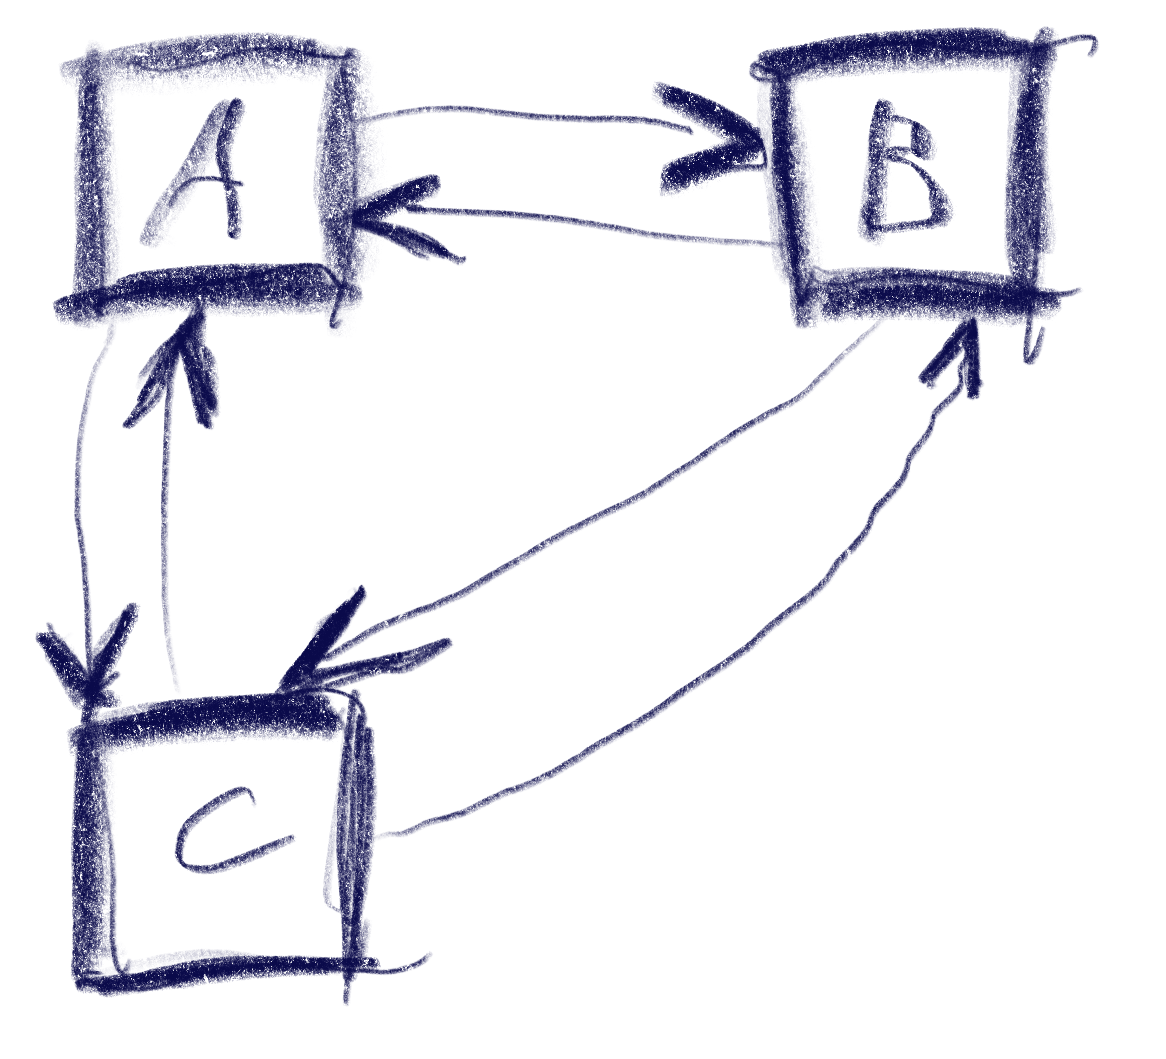
This sketch shows a control setup with a possible solution. It also contains an interesting situation: going ‘down’ from B box goes to C, but going up from there goes to A!
The key to creating this solution is a metric that weights the gap for a specific input direction, e.g. neighbor_metric( box<> const& from, box<> const& to, navigation_direction direction). To implement this, we need to convert this gap into numbers we can use. I’ve used a variant of Arvo’s algorithm for that: For both axes, get the difference of the rectangles’ intervals along that axis and store those in a 2d-vector. In code:
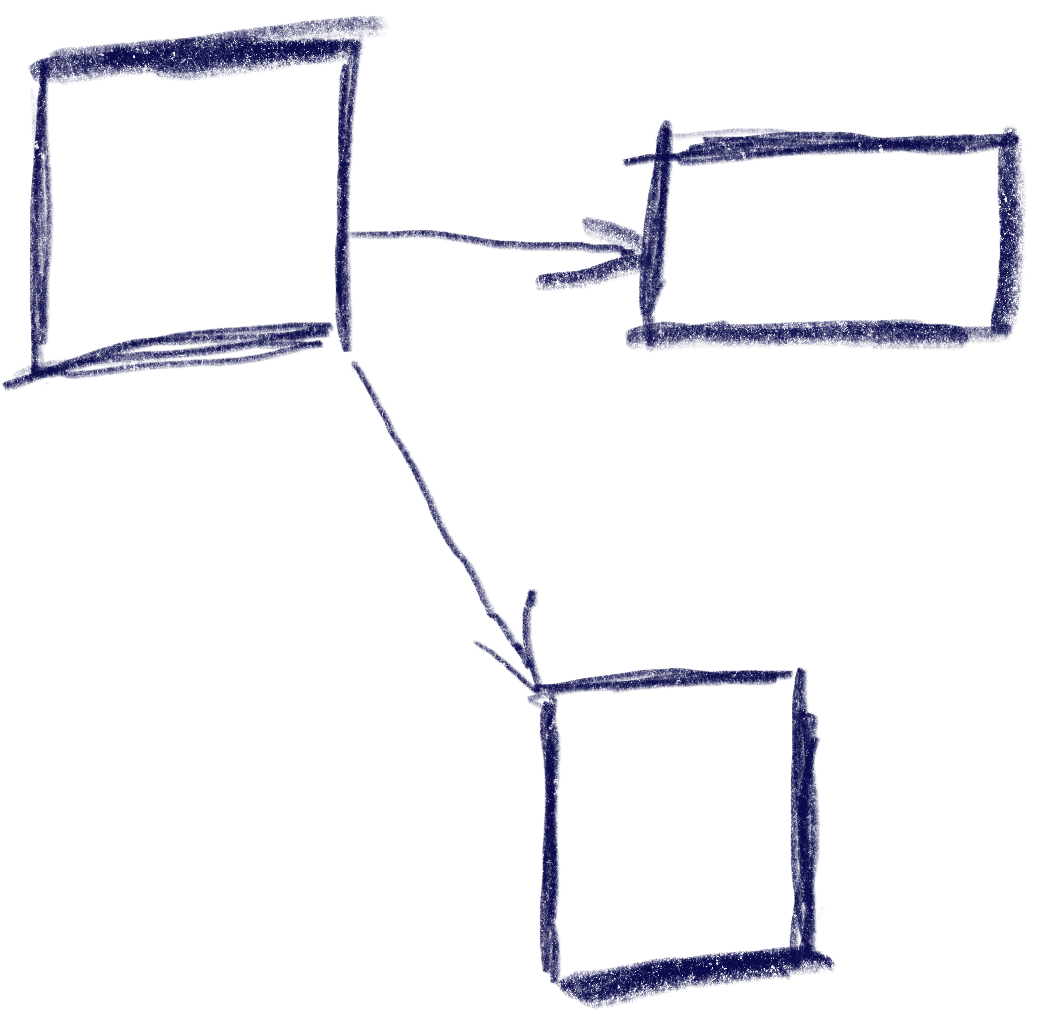
That sketch shows the resulting vectors from the box in the top-left going to two other boxes. Note that these vectors are quite different from the difference of the boxes’ centers. In the case of the two top boxes, the vector connecting the centers would tilt down slightly, while this one is completely parallel to the x axis.
Now armed with this vector, let’s look at the metric I was using. It results in a 2d ‘score’ that is later compared lexicographically to determine the best candidate: the first number determines the ‘angle’ with the selected axis, the other one the distance.
template <int axis> auto metric_on_axis(box<> const& from, box<> const& to) { auto delta = arvo_vector(from, to); delta[0] *= delta[0]; delta[1] *= delta[1]; auto square_distance = delta[0] + delta[1];
std::optional<std::pair<float, float>> neighbor_metric( box<> const& from, box<> const& to, navigation_direction direction) { switch (direction) { default: case navigation_direction::right: { if (from.max[0] >= to.max[0]) return {}; return metric_on_axis<0>(from, to); } case navigation_direction::left: { if (from.min[0] <= to.min[0]) return {}; return metric_on_axis<0>(from, to); } case navigation_direction::up: { if (from.max[1] >= to.max[1]) return {}; return metric_on_axis<1>(from, to); } case navigation_direction::down: { if (from.min[1] <= to.min[1]) return {}; return metric_on_axis<1>(from, to); } } }
In practice this means that the algorithm will favor connections that best align with the input direction, while ties resolved by using the closest candidate. The metric ‘disqualifies’ candidates going backward, e.g. when going right, the next box cannot start left of the from box.
Now we just need to loop through all candidates and the select the one with the lowest metric.
This algorithm does not make any guarantees that all controls will be accessible, but that is a property that can easily be tested by traversing the graph induced by this metric, and the UI can be designed appropriately. It also does not try to be symmetric, e.g. going down then up does not always result in going back to the previous control. As we can see in the first sketch, this is not always desirable. I think it’s nice to be able to go from B to C via ‘down’, but I’d be weird to go ‘up’ back there instead of A. Instead, going ‘right’ to B does make sense.
Hard cases
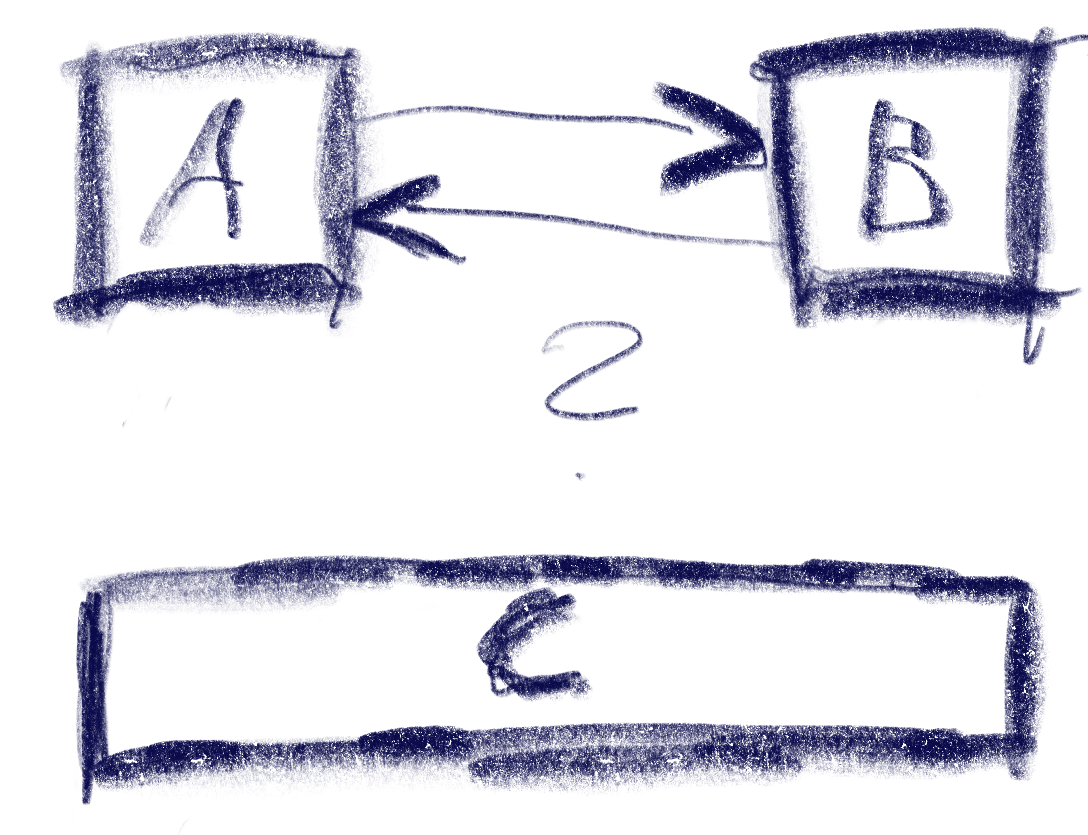
But there can be ambiguities that this algorithm does not quite solve. Consider the case were C is wider, so that is is also under B:
The algorithm will connect both A and B down to C, but the metric will be tied for A and B going up from C. The metric could be extended to also include the ‘cross’ axis min-point of the box, e.g. favoring left over right for westerners like me. But going from B down to C and then up to A would feel weird. One idea to resolve this is to use the history to break ties, e.g. when coming from B to C, going back up would go back to C.
Another hard case is scroll-views. In fact, they seem to change the problem domain. Instead of treating the inputs as boxes in a flat plane, navigating in a scroll view requires to navigate to potentially only partially visible or even invisible boxes and bringing them into view. I’ve previously solved this by treating every scroll-view as its own separate plane and navigating only within that if possible. Only when no target is found within the scroll-view, did the algorithm try to navigate to items outside.