
There is a classic book from 1998 about interaction design and user experience called “The Inmates Are Running the Asylum” by Alan Cooper. It essentially points out that technology that is too hard to understand or handle is a self-chosen burden. We humans decided that our technology should be the way it is. We are the inmates of our digital (or technological) asylum and we built it ourselves.
There is another classic law of software design and software evolution, called Zawinski’s law:
Every program attempts to expand until it can read mail. Those programs which cannot so expand are replaced by ones which can.
Jamie Zawinski, 1995
If you interpret the law with some degree of freedom, that might mean that e-mail client applications are the pinnacle of software evolution, because they are designed to perform the one task every other application sets out to achieve.
You might think that an e-mail client can lean back and relax, knowing that it won’t be replaced and doesn’t need to adapt. It can concentrate on the one task it is asked to do, provide the perfect service and be the most essential tool for any digital worker.
But, for reasons that baffle me, my e-mail client apparently has better things to do than to deal with those pesky mails that I receive or want to send.
Let me tell you about my e-mail client. It is a Thunderbird running on Windows. If you want to attribute all the problems I’m about to point out to these two decisions, you probably miss the greater point that I’m trying to make with this blog post. It isn’t about Thunderbird or e-mail clients, it is about a software ecosystem that strays from its original intent: To serve the human operator.
Every morning, I open my e-mail client and let it run on a secondary monitor, just visible in my peripheral vision. Most of the day, it has nothing to do. I suspect that this causes boredom, because sometimes, it shows this dialog window out of the blue:
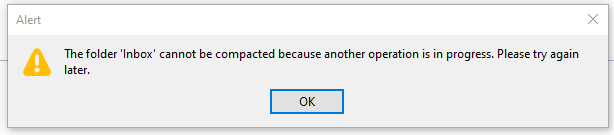
There are a few things wrong with this dialog:
- I didn’t ask for a folder compaction, so it is not necessary to tell me to “try again later”.
- Because I didn’t ask for anything, it surprises me that Thunderbird needs my interaction with a modal dialog in order to proceed with… doing nothing?
- If there is “another operation” that causes problems, I can only help if it has a name. Without more details given, I can only deduce that my Inbox is involved.
- My only choice is to close the modal dialog window. I cannot interact with Thunderbird until I dismiss the dialog. I cannot choose to “retry” or “view details”, even if I had resolved the unnamed problem outside of Thunderbird.
Think about what really happens here from an interaction design viewpoint: I command my e-mail client to stand ready to receive or send e-mails. It suddenly decides that something else is important, too. It does the thing and fails. It fails in such a grandiose manner that it needs to inform me about it and blocks all other interaction until I acknowledge its failure. It cannot fail silently and it cannot display the alert notification in a non-modal manner. My e-mail client suddenly commands me to click an arbitrary button or else… it won’t do my e-mail stuff anymore.
The digital asylum isn’t there to serve the inmates, the inmates are there to serve the asylum. Thunderbird doesn’t help me doing my e-maily things, I need to support Thunderbird to do its own things. The assistant involves the boss for secondary (or even less important) tasks.
The problem is that I recognize this inversion of involvement all the time:
- The windows operating system decides that it needs to update right now. My job is to keep the machine running under all circumstances. Once I ran from one train to the next with the updating notebook in my hands, carefully keeping the lid open and the updates running.
- My text editor might open the file I want to edit later, but first I need to decide if the latest update is more important right now. I cannot imagine the scenario when an update of a text editor is so crucial that it needs to happen before my work.
- My IDE is “reconstructing the skeletons” or “re-indexing the files” whenever it sees fit. My job is to wait until this clearly more important work is done. I can see that these things help me do my thing later. But I want to do my thing now, maybe with slightly less help for a while.
Sometimes, I feel more like a precatory guest than the root administrator on my own machine. I can use it in the gaps between computer stuff when all applications decide that they generously grant me some computation time.
It’s not that there aren’t clear rules how computers should behave towards users. The ISO norm 9241-110 is very on point about this:
Users should always be able to direct their interaction with the product. They retain control over when to begin, interrupt, or end actions.
https://www.usability.de/en/usability-user-experience/glossary/controllability.html
We just choose to ignore our own rules.
We build a digital asylum for ourselves that is complicated and hard to grasp. Then we demote ourselves to guests in the very same asylum that we built and after that, we let the asylum choose its own endeavors.
If you translate this behaviour in the real world, you would call it “not customer-centered”. It would be the barkeeper that cleans all the glasses before you can order your drink. It would be the teacher that delays all student questions to the end of the lecture. Or it would be the supermarket that you can only enter after they stored all the new products on the shelves, several hours after “being open”.
By the way, if you want to help me with my mutinous Thunderbird: The problem is already solved. It is just a striking example of the “controllability violations” that I wanted to describe.
You probably have another good example of “inversed involvement” that you can tell us in the comments.
