How to accidentally kill your CI build time

At one of our customers I do C++ consulting in a mid-sized project which uses cmake as build system. A clean build on our Jenkins CI server takes about 40 minutes (including unit tests) which is way too long to be considered “fast feedback” in an agile kind of way.

Because of that, we do clean builds only 2 times a day – some time during the night and during lunch break. The rest of the day the CI server only does a “svn update” and a normal “make”, which takes about 3-10 minutes depending on what files have been changed.

With C++ there are lots of ways to unnecessarily lengthen your build time. The most important factor is, of course, #include dependencies. One has to be very (very) disciplined in adding #include directives in header files. Otherwise, the whole world suddenly gets rebuild when some small header file somewhere in a little corner of the code has been changed.

And I have to say, for the most part, this project is in pretty good shape with regard to #include dependencies.

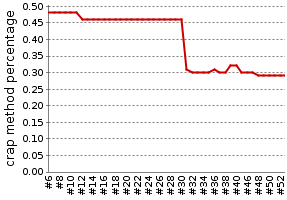
So what the hell has suddenly increased our build time from 3-10 minutes to 20-25 minutes? was what I was thinking some time last week while waiting for the CI server to spit out new latest and greatest rpm packages. For some reason, our normal, rest-of-the-day build started to compile what felt like everything in our main package even on the slightest code change in a remote .cpp file.

What happened?

In order to have the build time available (e.g. to show in an “about” box), we use a preprocessor symbol like REVISION_DATE which gets filled in a CMakeLists.txt file. The whole thing looks like this:

...
EXEC_PROGRAM(date ARGS '+%F_%T' OUTPUT_VARIABLE REVISION_DATE)
...
ADD_DEFINITIONS(-DREVISION_DATE=\"${REVISION_DATE}\")
...

Since the beginning of the time these lines of CMake code lived in a small sub-sub-..-directory with little to no incomming dependencies. Then, at some point, it became necessary to have the REVISION_DATE symbol at some other place, too, which led to a move of the above code into the CMakeLists.txt file of the main package.

The value of command date +%F_%T changes every second which leads to a changed REVISION_DATE on every build – which is what we initially intended. What changes, too, of course, is the value of the ADD_DEFINITIONS directive. And as CMake is very strict with the slightest change in this value, every make target below that line gets rebuild – which in our case was everything in the main package.

So there! Build time killing creatures are lurking everywhere in our C/C++ projects. Always be aware of them!

GORM-Performance with Collections

The other day I was looking to improve the performance of specific parts of our Grails application. I quickly found the typical bottleneck in database centric Grails apps: Too many queries were executed because GORM hides away database queries by its built-in persistence methods for domain objects and the extremely nice dynamic finders. In search for improvements and places to use GORM/Hibernate caching I stumbled upon a very good and helpful presentation on GORM-performance in general and especially collection usage. Burt Beckwith presents some common problems and good patterns to overcome them in his SpringOne 2GX talk. I highly recommend having a thorough look at his presentation.

Nevertheless, I want to summarize his bottom line here: GORM does provide a nice abstraction from relational databases but this abstraction is leaky at times. So you have to know exactly how the stuff in your domain classes is mapped. Be especially careful it collections tend to become “large” because performance will suffer extremely. We already observed a significant performance degradation for some dozen elements; your mileage may vary. For many simple modifications on a collection all its elements have to be loaded from the database!
Instead of using hasMany/belongsTo just add a back reference to the domain object your object belongs to. With the collection you lose cascading delete and some GORM functionality but you can still use dynamic finders and put the functionality to manage associations yourself into respective classes. This may be a large gain in specific cases!

Bear up against static code analysis

If you ever had the urge to switch off a rule in your static code analysis tool, this article tries to convince you not to do it. By accepting challenges presented by your tools, you become a better developer and clean up your code on the run.

One of the first things we do when we join a team on a new (or existing) project is to set up a whole barrage of static code analysis tools, like Findbugs, Checkstyle or PMD for java (or any other for virtually every language around). Most of these tools spit out tremendous amounts of numbers and violated rules, totally overwhelming the team. But the amount of violations, (nearly) regardless how high it might be, is not the problem. It’s the trend of the violation curve that shows the problem and its solution. If 2000 findbugs violations didn’t kill your project yet, they most likely won’t do it in the future, too. But if for every week of development there are another 50 violations added to the codebase, it will become a major problem, sooner or later.

Visibility is key

So the first step is always to gain visibility, no matter how painful the numbers are. After the initial shock, most teams accept the challenge and begin to resolve issues in their codebase as soon as they appear and slowly decrease the violation count by spending extra minutes with fixing old code. This is the most valuable phase of static code analysis tools: It enables developers to learn from their mistakes (or goofs) without being embarrassed by a colleague. The analysis tool acts like a very strict and nit-picking code review partner, revealing every flaw in the code. A developer that embraces the changes implied by static analysis tools will greatly accelerate his learning.

But then, after the euphoric initial challenges that improve the code without much hassle, there are some violations that seem hard, if not impossible to solve. The developer already sought out his journey to master the tool, he cannot turn around and just leave these violations in the code. Surely, the tool has flaws itself! The analysis brought up a false positive here! This isn’t faulty code at all, it’s just an overly pedantic algorithm without taste for style that doesn’t see the whole picture! Come to think about it, we have to turn off this rule!

Leave your comfort zone

When this stage is reached, the developers have a deep look into the tool’s configuration and adjust every nut and bolt to their immediate skill level. There’s nothing wrong with this approach if you want to stay on your skill level. But you’ll miss a chance to greatly improve your coding skills by allowing the ruleset to be harder than you can cope with now. Over time, you will come up with solutions you now thought are impossible. It’s like fitness training for your coding skills, you should raise the bar every now and then. Unlike fitness training, nobody gets hurt if the numbers of your code analysis show more violations than you can fix up right now. The violations are in the code, if you let them count or not.

Once, a fellow developer complained really loud about a specific rule in a code analysis tool. He was convinced that the rule was pointless and should be switched off. I asked about a specific example where this rule was violated in his code. When reviewing the code, I thought that applying the rule would improve the code’s internal structure (it was a rule dealing with collapsible conditional statements). In the discussion on how to implement the code block without violating the rule, the real problem showed up – my colleague couldn’t think about a solution to the challenge. So we proceeded to implement the code block in a dozen variations, each without breaking the rule. After the initial few attempts that I had to lead program for him, he suddenly came up with even more solutions. It was as if a switch snapped in his head, from “I’m unable to resolve this stupid rule” to “Hey, if we do it this way, we even can get rid of this local variable”.

Embrace challenges

Don’t trick yourself into thinking that just because your analysis tool doesn’t bring up these esoteric violations anymore after you switched off the rules, they are gone. They are still in your code, just hidden and without your awareness. Bear up against your analysis tool and fix every violation it brings you, one after the other. The tools aren’t there to annoy you, they want to help you stay clear of trouble by pointing out the flaws in a clear and precise manner. Once you meet the challenges the tool presents you with, your skill level will increase automatically. And as a side effect, your code becomes cleaner.

Beyond clean code

Even if every analysis tool approves your code as being clean, it can still be improved. You might have a look at Object Calisthenics or similar code training rulesets. They work the same way as the analysis tools, but without the automatic enforcement (yet). The goal is always cleaner code and higher skilled developers.

Looping in C++

What is “the best” way to loop over collections in C++?

One recurring discussion point in one of our customers C++ project team is the following:

What is “the best” way to loop over collections?

In a typical scenario there is a standard container like std::list, or some equivalent collection, and the task is to do something with every element in the collection. The straight forward way would be like this:

std::list<std::string> mylist;
for (std::list<std::string>::iterator iter = mylist.begin(); iter != mylist.end(); iter++)
{
   ...
}

This code is correct and readable. But my guess is that most of you instantly see at least two possible improvements:

  1. the call to mylist.end() occurs in every loop an can be expensive e.g. in case of long std::lists
  2. iter++ creates one unnecessary intermediate object on the stack

So this

for (std::list<std::string>::iterator iter = mylist.begin(), end = mylist.end(); iter != end; ++iter)
{
   ...
}

would be much better but can already be seen as a little less readable.

Using BOOST_FOREACH can save you much of this still tedious code but has one nasty pitfall when it comes to std::maps.

In some places of the code base std::for_each is used together with a function, or function object.  The downside of this is that the function/function object code is not located where the loop occurs. However, this can be made “readable enough” when the function, or function object does only one thing and has a telling name.

Looping is sometimes done to create other collections of objects for each element. What to do there? Define the new collection use a for-loop of BOOST_FOREACH like above, or use std::transform with the same downside as std::for_each?

The other day one team member suggested to use boost::lambda expressions in loops. The initial usage examples where very promising but let me tell you – readability can drop dramatically very fast if you don’t be careful. It is very easy to get carried away with boost’s lambdas. I happened that we found ourselves having spent the last hour to carve out a super crisp lambda expression that takes anybody else another hour to read.

So the initial question remains undecided and will most likely stay like that. As for everything else in programming, there doesn’t seem to be a silver bullet for this task.

How do you go about looping in C++? Do you have some kind of coding style in place? Do you use std::for_each, BOOST_FOREACH, or some other means?

Looking forward to some feedback.

Simple code, subtle bugs: write unit tests!

We developed an applet some years ago that was supposed to run 24/7. Basically, it fetches some values periodically and plots them in a chart. It always shows the last 24 hours. Everything seemed to work fine but every few weeks it crashed. The problems were clouded by hardware instabilities and the use of some obscure JVM. After quite a bit of analysis it became clear that it was a bug in our applet: a memory leak. Here is the troublemaker code:

for (int i = 0; i < dataSeries.getItemCount(); i++) {
    XYDataItem dataItem = dataSeries.getDataItem(i);
    if (dataItem.getX().longValue() < startDate.getTime().getTime()) {
        dataSeries.remove(i);
    } else {
        break;
    }
}
dataSeries.add(newDataPoint);

This simple and innocently looking piece of code essentially removes old items from a list by index. Many of you may already have spotted the main problem leading to the leak. Removing items by index means that following items shift one place towards the head of the list. As the index is incremented one element is skipped by the next iteration. This added up over time and lead to an OutOfMemoryError after some weeks.

Now, even if the code is not great it does relatively look straightforward on first sight, yet it is not and is contains errors. Making things worse, the code was buried somewhere in some tangled logic. This leads me to the point of my post:

Write unit tests even for relatively simple code.

Most likely writing a unit test for this cleanup work would have led to a class that manages the dataSeries and nothing more. Quite easy to understand and test in isolation. The problem would never have slipped into production and caused months of  investigating different stability problems.

The programmer may not have been aware of iterators but he should have made sure that this block works as intended. The best way to do this is automated unit tests. They make sure that your building blocks are as solid as you expect them to be. Use acceptance testing to make sure you have put your building blocks together the right way. Together unit and acceptance tests will save countless hours hunting regressions.

Clean code is not enough

Not only well-crafted software, but useable and delightful software.

I keep hearing stuff like:
“we as software developers are craftsmen and should honor our craft and write clean code”

Using the metaphor of a craftsman we should also realize that we are building software for people (to use) not for its own sake.
Imagine a chair which is perfectly crafted and beautiful to look at but you can’t sit on it?
It might be art but nobody can use it for its original purpose.

Most if not all of the software we write is for people to use, to be empowered and yes, to be delighted.
But to what use (besides art) is a software which is cleanly built but unusable?
We as software developers have shied away for too long from learning to craft useable interfaces.
I think we should not neglect that we develop software for others to use.
A program is not an island, it only excels when it interacts with users or other programs.

Not only well-crafted software, but useable and delightful software.

Spice up your unit testing

Writing unit tests shouldn’t be a chore. This article presents six tools (with alternatives) that help to improve your developer experience.

Writing unit tests is an activity every reasonable developer does frequently. While it certainly is a useful thing to do, it shouldn’t be a chore. To help you with the process of creating, running and evaluating unit tests, there are numerous tools and add-ons for every programming language around. This article focusses on improving the developer experience (the counterpart of “user experience”) for Java, JUnit and the Eclipse IDE. I will introduce you to the toolset we are using, which might not be the complete range of tools available.

Creating unit tests

  • MoreUnit – This plugin for Eclipse helps you to organize your unit test classes by maintaining a connection between the test and the production class. This way you’ll always see which classes and methods still lack a corresponding test. You can take shortcuts in the navigation by jumping directly into the test class and back. And if you move one file, MoreUnit will move the other one alongside. It’s a swiss army knife for unit test writers and highly recommended.
  • EqualsVerifier – If you ever wrote a custom implementation of the equals()/hashcode() method pair, you’ll know that it’s not a triviality. What’s even more intimidating is that you probably got it wrong or at least not fully correct. The effects of a flawed equals() method aren’t easily determinable, so this is a uncomfortable situation. Luckily, there is a specialized tool to help you with this task exactly. The EqualsVerifier library tests your custom implementation against all aspects of the art of writing an equals() method with just one line of code.
  • Mockito (and EasyMock) – When dealing with dependencies of classes under test, mock objects can come in handy. But writing them by hand is tedious, boring and error-prone. This is where mock frameworks can help by reducing the setup and verification of a mock object to just a few lines of code. EasyMock is the older of the two projects, but it manages to stay up-to-date by introducing new features and syntax with every release. Mockito has a very elegant and readable syntax and provides a rich feature set. There are other mock frameworks available, too.

Running unit tests

  • InfiniTest (and JUnit Max) – Normally, you have to run the unit tests in your IDE by manually clicking the “run” button or hitting some obscure keyboard shortcut. These two continuous testing tools will run your tests while you still type. This will shorten your test feedback loop to nearly milliseconds after each change. Your safety net was never closer. InfiniTest and JUnit Max are both Eclipse plugins, but the latter costs a small annual fee. It’s written by Kent Beck himself, though.

Evaluating unit tests

  • EclEmma (and Cobertura) – If you want to know about the scope or “coverage” of your tests, you should consult a code coverage tool. Cobertura produces really nice HTML reports for all your statistical needs. EclEmma is an Eclipse plugin that integrates the code coverage tool Emma with Eclipse in the finest way possible. Simply run “coverage as” instead of “run as” and you are done. All the hassle with instrumenting your classes and setting up the classpath in the right order (major hurdles when using cobertura) is dealt with behind the scenes.
  • Jester (and Jumble) – The question “who tests my tests?” is totally legit. And it has an answer: Every mutation testing tool around. For Java and JUnit, there are at least two that do their job properly: Jester works on the source code while Jumble uses the bytecode. Mutation testing injects little changes into your production code to test if your tests catch them. This is a different approach on test coverage that can detect code that is executed but not pinned down by an assertion. While Jester has a great success story to tell, Jumble tends to produce similar results as cobertura’s condition coverage report, at least in my experience.

Summary

As you can see, there is a wide range of tools available to improve your efforts to write well-tested software. This list is in no way comprehensive. If you know about a tool that should be mentioned, we would love to read your comment.

CMakeBuilder Version 1.9

Introducing CMakeBuilder plugin version 1.9.

Today, I want to announce version 1.9 of the CMakeBuilder plugin for Jenkins (formerly known as Hudson). Concluding from the user feedback, there are no major missing features – at least for the moment.

So for this version, I implemented only one visible enhancement: It is now possible to use environment variables in every configuration setting. Even settings like “Preload Script” “Make Command” or “Install Command” can now be configured with the support of environment variables.

The major invisible change I did was the migration to the Jenkins development infrastructure using this very helpful guide. Moving the whole thing to git will be next.

Check it out!

Reversing an array in Java

Reversing an array is a popular interview question especially in languages like C. Some days ago I faced the problem in a Java legacy project I was maintaining. As a Java guy I did not want to fiddle with a for-loop and indexes. So I looked for another solution. Besides showing the one-liner I want to give some insights which some might not be aware of. Here is my solution:

public static <T> T[] reverse(T[] array) {
    Collections.reverse(Arrays.asList(array));
    return array;
}
  1. This approach works, because the ArrayList implementation Arrays.asList() returns a specially tailored ArrayList which writes the changes right through to the backing array. It is not a java.util.ArrayList!
  2. The above means that the array is changed in-place and no array copying is involved. The approach thus has good performance it that matters.
  3. My solution directly changes the given array. To make it free of side-effects you could create a new array and copy the original one into it before converting to a list and reversing.

Side note regarding Arrays.asList()

Arrays.asList() is nice for bridging to old code and APIs. It has to be used with caution though: If you read the API documentation and keep 1.) in mind you will notice, that the returned list is fixed size. So calls to add() and remove() will fail with an UnsupportedOperationException! Passing such lists around in your system using the java.util.List interface may lead to unexpected behaviour since most people expect lists to be of variable sized in Java. In our use case we do not return the resulting list to the caller but only use it temporarily and locally. So this is no problem here.

Conclusion

Reversing an array can be a nice interview question for Java candidates too as you can discuss about in-place reversing, memory and time complexity and different approaches. It may show their knowledge of the collection API and the utility classes. If the above approach is discovered there is also something to discuss as depicted in this article.

Grails: The good, the bad, the ugly

(Opinion!) After 3 years of Grails development it is time to take a step back and look how well we went.

After 3 years of Grails development it is time to take a step back and look how well we went.
(Info: we made several Grails apps ranging from small (<15 domain classes) to medium sized (50-70 domain classes) using front ends like Flex/Flash and AJAX)

The good parts

Always start with praise. So I tell you what in my opinion was and is good about developing in Groovy and Grails.

Groovy is Java with sugar

The Groovy syntax and the type system are so close to Java, so that when you come from a Java background you feel right at home.

Standard web stack

If you are accustomed to standard technologies like Spring and Hibernate you see Grails as a vacation.

Sensible defaults aka Convention over configuration

Many of the configuration options are filled with sensible defaults.

Fast start

You get from 0 to 100 in almost no time.

The bad things

Things which are not easily avoided.

Bugs, bugs, bugs

Grails has many, many bugs, unfortunately even in such fundamental things such as data binding and validation. A comment from a previous blog post: “To me, developing with Grails always felt like walking on eggs.”

Regression

Some bugs sneak back in again or are even reopened. Note that this is not the same as bugs, bugs, bugs because fixed bugs should be secured by a test.

Leaky abstractions

You have to know the underlying technologies especially Hibernate and Spring to get a foot on the ground. The GORM layer inherits all the complexity from Hibernate.

Slow integration tests

The ramp up time is 45 s on a decent build/development machine and then the first test hasn’t even started.

Uses the Java way of solving problems

Got a problem? There’s a framework for that!

Abandoned or prototype like plugins

Take a look at the list of plugins like Autobase, Flex.

Problems with incremental compiling

Don’t know where the real cause is buried: but using IntelliJ for developing Grails projects results in comments like:
Not working? Have you cleaned, invalidated your caches, rebuilt your project, deleted the .grails directory?

The ugly things

Things which are easily avoided or just a minor issue.

Groovys use of == and equals

Inherited from Java and made even worse: compare two numbers or a String and a GString

Groovys definition for the boolean truth

0, [], “”, null, false are all false

Groovys use of the NullObject and the plus operator

Puzzler: what is null + null ?

Uses unsupported/discontinued technologies

Hibernates SchemaExport comes to mind.

Mix of technology and intention

hasMany, hasOne, belongsTo have not only an intention revealing function but also determine how cascading works and the schema is generated.

Summary, opinionated

Grails has deficits and is bug ridden. But this will be better in the future (hopefully).
When you compare Grails with standard web stacks in the Java world you can gain a lot from it.
So if you want to know if you should use Grails in your next project ask yourself:

  • do you have or want to use Spring and Hibernate?
  • can you live without static typing? (remember: with freedom comes responsibility)
  • are you ready to work around or even fix an issue or bug?
  • is Java your home?

If you can answer all those questions with Yes, then Grails is for you. But beware: no silver bullets!