Four-way Navigation in UIs

Just yesterday, I was working on the task of enabling gamepad navigation of a graphical UI. I had implemented this before in my game abstractanks but since forgotten how exactly I did it. So I opened the old code and tried to decipher it, and I figured that’d make a nice topic to write about.

Basic implementation

Let’s break down the simple version of the problem: You have a bunch of rectangular controls, and given a specific one, figure out the next one with an input of either left, up, right or down.

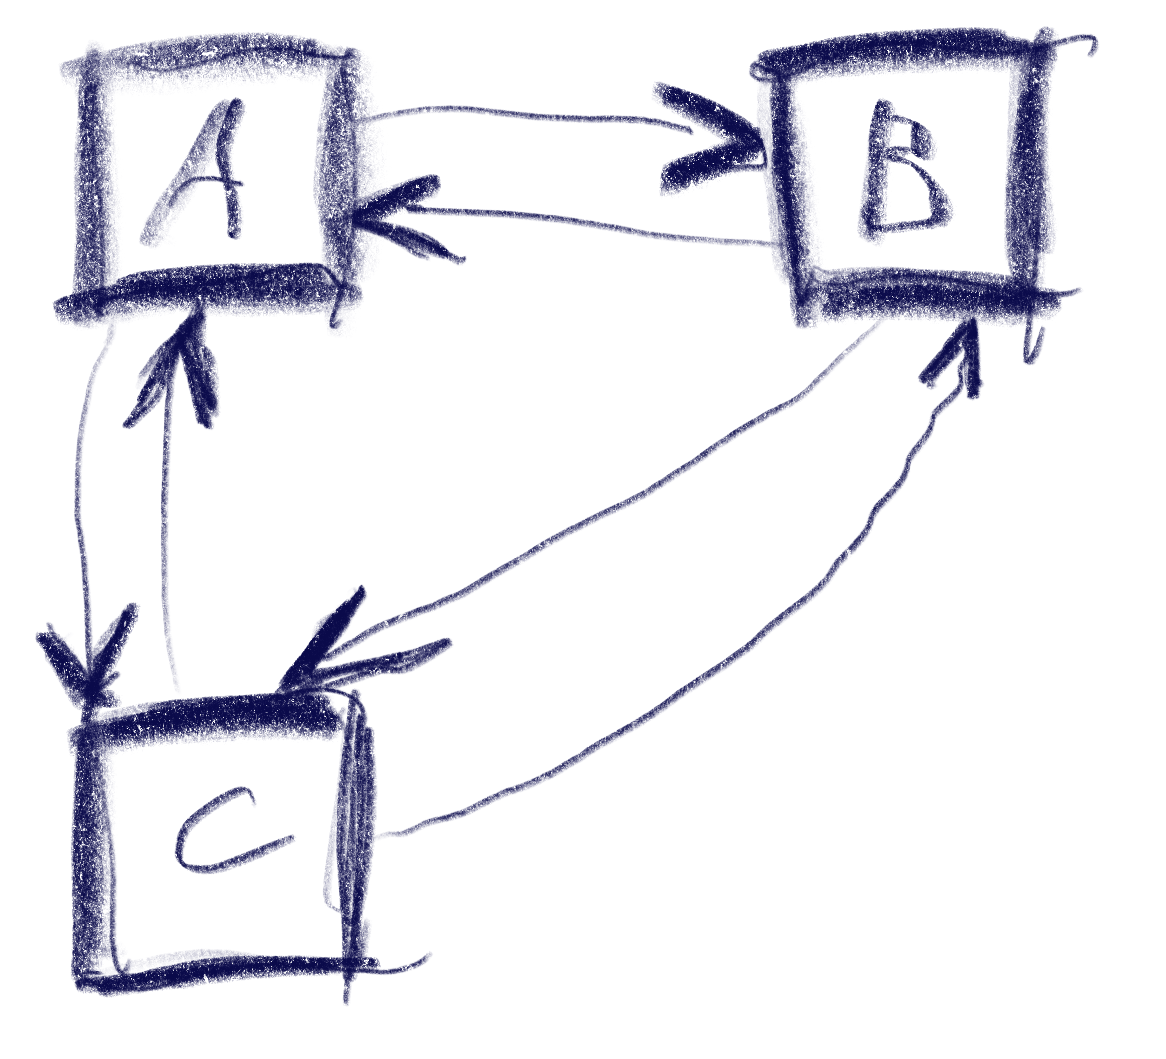
This sketch shows a control setup with a possible solution. It also contains an interesting situation: going ‘down’ from B box goes to C, but going up from there goes to A!

The key to creating this solution is a metric that weights the gap for a specific input direction, e.g. neighbor_metric(
box<> const& from, box<> const& to, navigation_direction direction)
. To implement this, we need to convert this gap into numbers we can use. I’ve used a variant of Arvo’s algorithm for that: For both axes, get the difference of the rectangles’ intervals along that axis and store those in a 2d-vector. In code:

template <int axis> inline float difference_on_axis(
box<> const& from, box<> const& to)
{
if (to.min[axis] > from.max[axis])
return to.min[axis] - from.max[axis];
else if (to.max[axis] < from.min[axis])
return to.max[axis] - from.min[axis];
return 0.f;
}

v2<> arvo_vector(box<> const& from, box<> const& to)
{
return {
difference_on_axis<0>(from, to),
difference_on_axis<1>(from, to) };
}

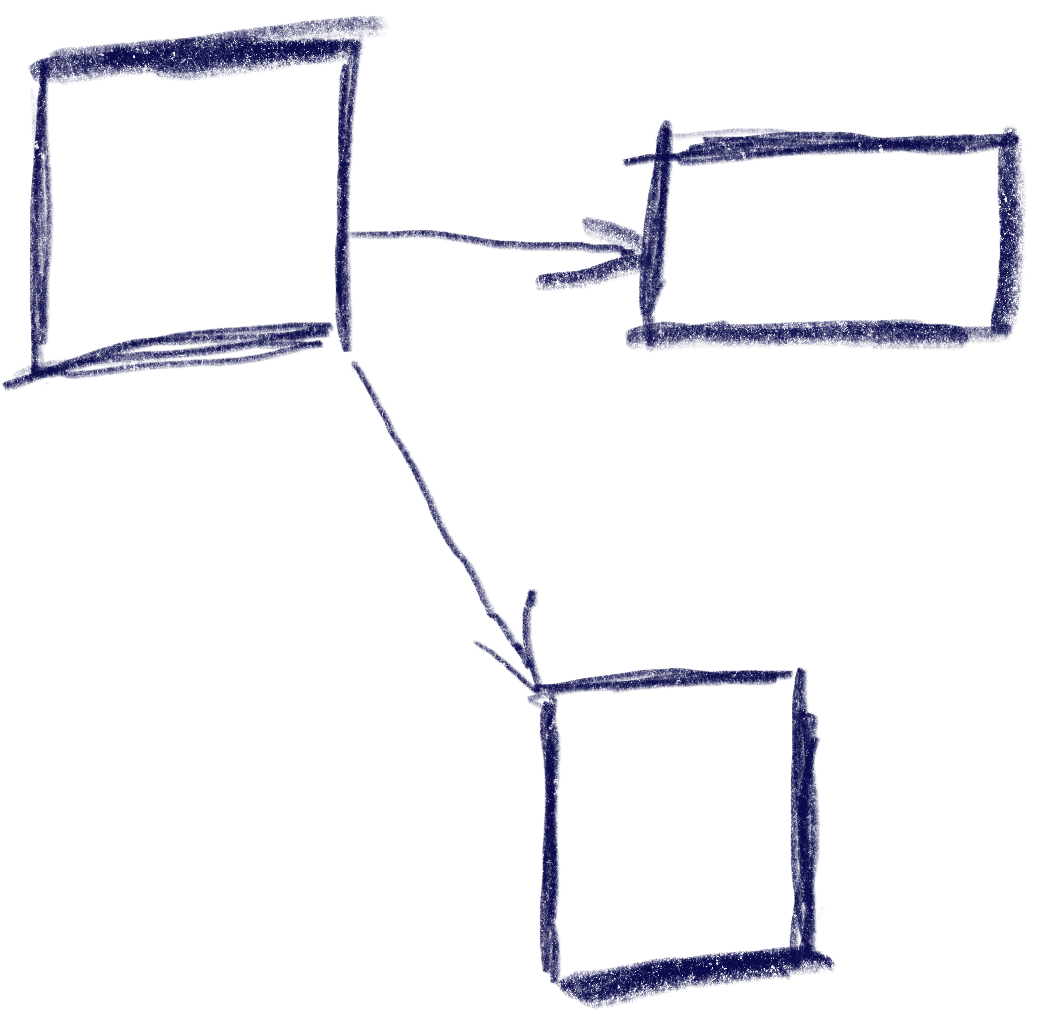
That sketch shows the resulting vectors from the box in the top-left going to two other boxes. Note that these vectors are quite different from the difference of the boxes’ centers. In the case of the two top boxes, the vector connecting the centers would tilt down slightly, while this one is completely parallel to the x axis.

Now armed with this vector, let’s look at the metric I was using. It results in a 2d ‘score’ that is later compared lexicographically to determine the best candidate: the first number determines the ‘angle’ with the selected axis, the other one the distance.

template <int axis> auto metric_on_axis(box<> const& from, box<> const& to)
{
auto delta = arvo_vector(from, to);
delta[0] *= delta[0];
delta[1] *= delta[1];
auto square_distance = delta[0] + delta[1];

float cosine_squared = delta[axis] / square_distance;
return std::make_pair(-cosine_squared, delta[axis]);
}

std::optional<std::pair<float, float>> neighbor_metric(
box<> const& from, box<> const& to, navigation_direction direction)
{
switch (direction)
{
default:
case navigation_direction::right:
{
if (from.max[0] >= to.max[0])
return {};
return metric_on_axis<0>(from, to);
}
case navigation_direction::left:
{
if (from.min[0] <= to.min[0])
return {};
return metric_on_axis<0>(from, to);
}
case navigation_direction::up:
{
if (from.max[1] >= to.max[1])
return {};
return metric_on_axis<1>(from, to);
}
case navigation_direction::down:
{
if (from.min[1] <= to.min[1])
return {};
return metric_on_axis<1>(from, to);
}
}
}

In practice this means that the algorithm will favor connections that best align with the input direction, while ties resolved by using the closest candidate. The metric ‘disqualifies’ candidates going backward, e.g. when going right, the next box cannot start left of the from box.

Now we just need to loop through all candidates and the select the one with the lowest metric.

This algorithm does not make any guarantees that all controls will be accessible, but that is a property that can easily be tested by traversing the graph induced by this metric, and the UI can be designed appropriately. It also does not try to be symmetric, e.g. going down then up does not always result in going back to the previous control. As we can see in the first sketch, this is not always desirable. I think it’s nice to be able to go from B to C via ‘down’, but I’d be weird to go ‘up’ back there instead of A. Instead, going ‘right’ to B does make sense.

Hard cases

But there can be ambiguities that this algorithm does not quite solve. Consider the case were C is wider, so that is is also under B:

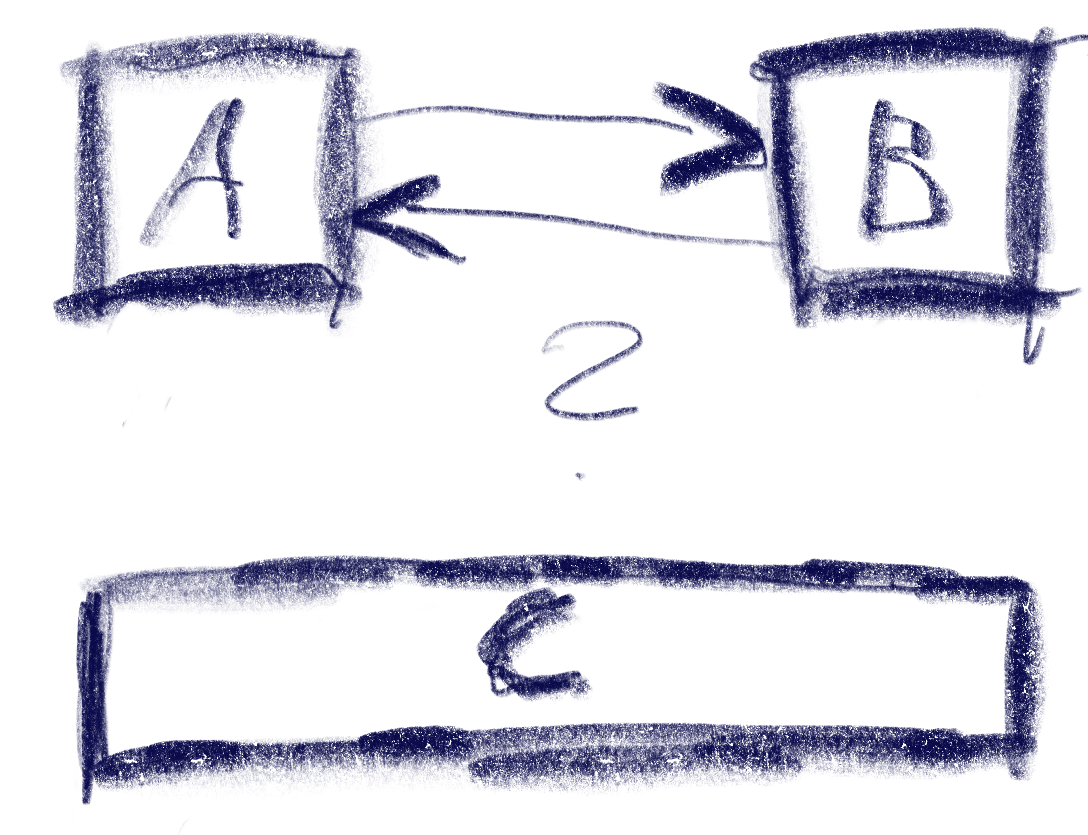
The algorithm will connect both A and B down to C, but the metric will be tied for A and B going up from C. The metric could be extended to also include the ‘cross’ axis min-point of the box, e.g. favoring left over right for westerners like me. But going from B down to C and then up to A would feel weird. One idea to resolve this is to use the history to break ties, e.g. when coming from B to C, going back up would go back to C.

Another hard case is scroll-views. In fact, they seem to change the problem domain. Instead of treating the inputs as boxes in a flat plane, navigating in a scroll view requires to navigate to potentially only partially visible or even invisible boxes and bringing them into view. I’ve previously solved this by treating every scroll-view as its own separate plane and navigating only within that if possible. Only when no target is found within the scroll-view, did the algorithm try to navigate to items outside.

Half table, half view: Generated Columns

Anyone familiar with SQL database basics knows the two fundamental structures of relational databases: tables and views. Data is stored in tables, while views are virtual tables calculated on-the-fly from a SQL query. Additionally, relational database management systems often support materialized views, which, like views, are based on a query from other tables, but their results are actually persisted and only recalculated as needed.

What many don’t know is that the most common SQL databases (PostgreSQL, MySQL, Oracle) nowadays also support something in between: we’re talking about Generated Columns, which will be introduced in this blog post.

So, what are Generated Columns? Generated Columns are columns within a normal database table. But unlike regular columns, their values are not stored as independent individual values; rather, they are computed from other values in the table.

Below is an example of how to define a Generated Column. The example is for PostgreSQL, but the syntax is similar in other popular relational database systems that support this feature.

CREATE TABLE products (
id SERIAL PRIMARY KEY,
name VARCHAR(100),
quantity INTEGER,
unit_price DECIMAL(10, 2),
total_price DECIMAL(10, 2) GENERATED ALWAYS
AS (quantity * unit_price) STORED
);

As seen above, a Generated Column is defined with the keywords GENERATED ALWAYS AS. The GENERATED ALWAYS is even optional (you could just write AS), but it clarifies what it’s about. Following AS is the expression that computes the value.

At the end of the column definition, either the keyword STORED or VIRTUAL can be used. In the example above, it says STORED, which means the computed value is physically stored on the disk. The value is recalculated and stored only after an INSERT or UPDATE. In contrast, with VIRTUAL, the value is not stored but always computed on-the-fly. Thus, virtual Generated Columns behave similarly to a view, while STORED is more comparable to a materialized view.

The choice between the two options depends on the specific requirements. Stored Generated Columns consume more disk space, while virtual Generated Columns save space at the expense of performance.

In the expression following AS, other columns of the table can be referenced. Even other Generated Columns can be referenced, as long as they are specified in the table definition before the current column. However, SQL subqueries cannot be used in the expression.

In conclusion, Generated Columns are a useful feature that combines parts of a table with the benefits of a view.

Swagger-ui for any JVM-based backend

We often implement web applications with a React frontend and one of a large pool of backend frameworks/technologies. These include Micronaut, .NET Framework, Javalin, Flask, Eclipse Jetty among others.

A documentation of the API that allows calling the endpoints can be very helpful even during development to illustrate the API usage. OpenAPI and implementations like Swagger and Swashbuckle fulfill this task quite well.

While many of the backend frameworks support documenting and calling the API using Swagger-UI out-of-the-box or using plugins some frameworks like Undertow do not have direct support for it. Nevertheless, it is relatively easy to add an OpenAPI documentation with a web interface to almost any backend. We demonstrate the setup here using Undertow because it is used in some of our projects.

Adding dependencies and build config

Since we mostly use Gradle for our JVM-based backends we will highlight the additions to build.gradle to make to generate the OpenAPI definition. It consists of the following steps:

  • Adding the Swagger gradle plugin
  • Adding dependencies for the required annotations
  • Configuring the resolve-task of the gradle plugin

Here is an example exerpt of our build.gradle:

plugins {
  id 'java'
  id 'application'
// ...
  id "io.swagger.core.v3.swagger-gradle-plugin" version "2.2.20"
}

dependencies {
// ...
    implementation 'io.undertow:undertow-core:2.3.12.Final'
    implementation 'io.undertow:undertow-servlet:2.3.12.Final'
    implementation 'io.swagger.core.v3:swagger-annotations:2.2.20'
    implementation 'org.jboss.resteasy:jaxrs-api:3.0.12.Final'
}

resolve {
    outputFileName = 'demo-server'
    outputFormat = 'JSON'
    prettyPrint = 'TRUE'
    classpath = sourceSets.main.runtimeClasspath
    resourcePackages = ['com.schneide.demo.server', 'com.schneide.demo.server.api']
    outputDir = layout.buildDirectory.dir('resources/main/swagger').get().asFile
}

Adding the annotations

We need to add some annotations to our code so that the OpenAPI JSON (or YAML) file will be generated.

The API root class looks like below:

@OpenAPIDefinition(info =
@Info(
        title = "Demo Server Web-API",
        version = "0.11",
        description = "REST API for the demo web application..",
        contact = @Contact(
                url = "https://www.softwareschneiderei.de",
                name = "Softwareschneiderei GmbH",
                email = "kontakt@softwareschneiderei.de")
)
)
public class ApiHandler {
    public ApiHandler() {
        super();
    }

    /**
     *  Connect our handlers
     */
    public RoutingHandler createApiHandler() {
        final RoutingHandler api = new RoutingHandler();
        api.get("/demo", new DemoHandler());
        // ...
        return api;
    }
}

We also refactored our handlers to separate the business api and the Undertow handler interface methods to generate a expressive API.

The result looks something like this:

@Path("/api/demo")
public class DemoHandler implements HttpHandler {
    public DemoHandler() {
        super();
    }

    @Override
    public void handleRequest(HttpServerExchange exchange) throws Exception {
         exchange.getResponseHeaders().put(Headers.CONTENT_TYPE, "application/json");
            final Map<String, Deque<String>> params = exchange.getQueryParameters();
            final int month = Integer.parseInt(params.get("month").getFirst());
            final int year = Integer.parseInt(params.get("year").getFirst());
        exchange.getResponseSender().send(new Gson().toJson(getDaysIn(year, month)));
    }

    @GET
    @Operation(
            summary = "Get number of days in the given month and year",
            responses = {
                    @ApiResponse(
                            responseCode = "200",
                            description = "A number of days in the given month and year",
                            content = @Content(mediaType = "application/json",
                                    schema = @Schema(implementation = Integer.class)
                            )
                    )
            }
    )
    public Integer getDaysIn(@QueryParam("year") int year, @QueryParam("year") int month) {
        return YearMonth.of(year, month).lengthOfMonth();
    }
}

When running the resolve task all of the above results in a OpenAPI definition file in build/resources/main/swagger/demo-server.json.

Swagger-UI for the API definition

Now that we have this API definition we can use it to generate clients and – more important to us – generate a web UI documenting the API and allowing to execute and demo the functionality. For this we simply download the Swagger-UI distribution and place the contents of the dist/ folder in src/main/resources/swagger-ui. We then have to let Undertow serve definition and UI like so:

class DemoServer {
    public DemoServer() {
        final GracefulShutdownHandler rootHandler = gracefulShutdown(createHandler());
        Undertow.builder().addHttpListener(8080, "localhost").setHandler(rootHandler).build().start();
    }

    private HttpHandler createHandler() {
        return path()
                .addPrefixPath("/api", new ApiHandler().createApiHandler())
                .addPrefixPath("/swagger-ui", resource(new ClassPathResourceManager(getClass().getClassLoader(), "swagger-ui/"))
                        .setWelcomeFiles("index.html"))
                .addPrefixPath("/swagger", resource(new ClassPathResourceManager(getClass().getClassLoader(), "swagger/")));
    }
}

Note: I tried using the swagger-ui webjar but was unable to configure the location (the URL) of my OpenAPI definition file. Therefore I used the plain swagger-ui download instead.

Wrapping it up

We have to do some setup work and potentially some refactorings to provide a meaninful API documentation for our backend. After this work it is mostly adding some Annotations to methods and types used in your web API.

Spicing up the Game of Life Kata – Part I

Conway’s Game of Life is a worthwhile coding kata that I’ve implemented probably hundreds of times. It is compact enough to be completed in 45 minutes, complex enough to benefit from Test First or Test Driven Development and still maintains a low entry barrier so that you can implement it in a foreign programming language without much of a struggle (except if the foreign language is APL).

And despite appearing to be a simple 0-player game with just a few rules, it can yield to deep theory, as John Conway explains nicely in this video. Oh, and it is turing complete, so you can replicate a Game of Life in Game of Life – of course.

But after a few dozen iterations on the kata, I decided to introduce some extra aspects to the challenge – with sometimes surprising results. This blog series talks about the additional requirements and what I learnt from them.

Additional requirement #1: Add color to the game

The low effort user interface of the Game of Life is a character-based console output of the game field for each generation. It is sufficient to prove that the game runs correctly and to watch some of the more advanced patterns form and evolve. But it is rather unpleasing to the human eye.

What if each living cell in the game is not only alive, but also has a color? The first generation on the game field will be very gaudy, but maybe we can think about “color inheritance” and have the reproducing cells define the color of their children. In theory, this should create areas of different colors that can be tracked back to a few or even just one ancestor.

Let’s think about it for a moment: When all parent cells are red, the child should be red, too. If a parent is yellow and another one is red, the child should have a color “on the spectrum” between yellow and red.

Learning about inheritance rules

One specific problem of reproduction in the Game of Life is that we don’t have two parents, we always have three of them:

Any dead cell with exactly three live neighbors becomes a live cell, as if by reproduction.

Rule #4 of Game of Life

We need to think about a color inheritance rule that incorporates three source colors and produces a target color that is somehow related to all three of them:

f(c1, c2, c3) → cn

A non-harebrained implementation of the function f is surprisingly difficult to come up with if you stay within your comfort zone regarding the representation of colors in programming languages. Typically, we represent colors in the RGB schema, with a number for the three color ingredients: red, green and blue. If the numbers range from zero to one (using floating-point values) or from zero to 255 (using integer values) or even some other value range doesn’t really matter here. Implementing the color inheritance function using RGB colors adds so many intricacies to the original problem that I consider this approach a mistake.

Learning about color representations

When we search around for alternative color representations, the “hue, saturation and brightness” or HSB approach might capture your interest. The interesting part is the first parameter: hue. It is a value between 0 and 360, with 0 and 360 being identically and meaning “red”. 360 is also the number of degrees in a full circle, so this color representation effectively describes a “color wheel” with one number.

This means that for our color inheritance function, the parameters c1, c2 and c3 are degrees beween 0 and 360. The whole input might look like this:

Just by looking at the graphics, you can probably already see the color spectrum that is suitable for the function’s result. Instead of complicated color calculations, we pick an angle somewhere between two angles (with the third angle defining the direction).

And this means that we have transformed our color calculation into a geometric formula using angles. We can now calculate the span between the “leftmost” and the “rightmost” angle that covers the “middle” angle. We determine a random angle in this span and use it as the color of the new cell.

Learning about implicit coupling

But there are three possibilities to calculate the span! Depending on what angle you assign the “middle” role, there are three spans that you can choose from. If you just take your parent cells in the order that is given by your data structure, you implement your algorithm in a manner that is implicitly coupled to your technical representation. Once you change the data structure ever so slightly (for example by updating your framework version), it might produce a different result regarding the colors for the exact same initial position of the game. That is a typical effect for hardware-tied software, as the first computer games were, but also a sign of poor abstraction and planning. If you are interested in exploring the effects of hardware implications, the game TIS-100 might be for you.

We want our implementation to be less coupled to hardware or data structures, so we define that we use the smallest span for our color calculation. That means that our available colors will rapidly drift towards a uniform color for every given isolated population on our game field.

Learning about long-term effects (drifts)

But that is not our only concern regarding drifts. Even if you calculate your color span correctly, you can still mess up the actual color pick without noticing it. The best indicator of this long-term effect is when every game you run ends in the green/cyan/blue-ish region of the color wheel (the 50 % area). This probably means that you didn’t implement the equivalence of 0° and 360° correctly. Or, in other words, that your color wheel isn’t a wheel, but a value range from 0 to 360, but without wrap-around:

You can easily write a test case that takes the wrap-around into account.

But there are other drifts that might effect your color outcomes and those are not as easily testable. One source of drift might be your random number generator. Every time you pick a random angle from your span, any small tendency of the random number generator influences your long-term results. I really don’t know how to test against these effects.

A more specific source of drift is your usage of the span (or interval). Is it closed (including the endpoints) or open (not including the endpoints)? Both options are possible and don’t introduce drift. But what if the interval is half-open? The most common mistake is to make it left-closed and right-open. This makes your colors drift “counter-clockwise”, but because you wrapped them correctly, you don’t notice from looking at the colors only.

I like to think about possible test cases and test strategies that uncover those mistakes. One “fun” approach is the “extreme values random number generator” that only returns the lowest or highest possible number.

Conclusion

Adding just one additional concept to a given coding kata opens up a multitude of questions and learnings. If you add inheritable colorization to your Game of Life, it not only looks cooler, but it also teaches you about how a problem can be solved easier with a suitable representation, given that you look out for typical pitfalls in the implementation.

Writing (unit) test cases for those pitfalls is one of my current kata training areas. Maybe you have an idea how to test against drifts? Write a comment or even a full blogpost about it! I would love to hear from you.

Data minimization

The European General Data Protection Regulation (GDPR) often refers to the principle of data minimization. But what does this mean, and how can it be applied in practice?

The EU website states the following: “The principle of “data minimisation” means that a data controller should limit the collection of personal information to what is directly relevant and necessary to accomplish a specified purpose. They should also retain the data only for as long as is necessary to fulfil that purpose. In other words, data controllers should collect only the personal data they really need, and should keep it only for as long as they need it.”

But what is necessary? In the following, I will give you an example of how I was able to implement data minimization in a new project.

Verification of training certificates

One of my customers has to train his employees so that they can use certain devices. The training certificates are printed out and kept. So if an employee wants to use the device, the employee has to look for the corresponding certificate at reception, and it cannot be verified whether the printout was really generated by the training system.

Now they wanted us to build an admin area in which the certificates are displayed so that reception can search for it in this area.

The first name, surname, birthday etc. of the employees should be saved with the certificate for a long time.

What does the GDPR say about this?
I need the data so that reception can see and check everything. It is necessary! Or is it not?

Let’s start with the purpose of the request. The customer wants to verify whether an employee has the certificate.

If I want to display a list of all employees in plain text, I need the data. But is this the only solution to achieve the purpose, or can I perhaps find a more data-minimizing option? The purpose says nothing about displaying the names in plain text. A hash comparison, for example, is sufficient for verification, as is usually done with passwords.

So, how do I implement the project? Whenever I issue a certificate, I hash the personal data. In the administration area, there is a dialog in which the recipient can enter the personal data to check whether a valid certificate is available. The data is also hashed, and a hash comparison is used to determine the match.
Instead of an application that juggles a large amount of personal data, my application no longer stores any personal data at all. And the purpose can still be achieved.

Conclusion

Data minimization is therefore not only to be considered in the direct implementation of a function. Data minimization starts with the design.

Web Components – Reusable HTML without any framework magic, Part 1

Lately, I decided to do the frontend for a very small web application while learning something new, and, for a while, tried doing everything without any framework at all.

This worked only for so long (not very), but along the way, I found some joy in figuring out sensible workflows without the well-worn standards that React, Svelte and the likes give you. See the last paragraph for a quick comment about some judgement.

Now many anything-web-dev-related people might have heard of Web Components, with their custom HTML elements that are mostly supported in the popular browsers.

Has anyone used them, though? I personally haven’t had, and now I did. My use case was pretty easy – I wanted several icons, and wanted to be able to style them in a unified fashion.

It shouldn’t be too ugly, so why not take something like Font Awesome or heroicons, these give you pure SVG elements but now I have the Font Awesmoe “Magic Sparkles Wand” like

<svg xmlns="http://www.w3.org/2000/svg" viewBox="0 0 576 512"><!--!Font Awesome Free 6.5.1 by @fontawesome - https://fontawesome.com License - https://fontawesome.com/license/free Copyright 2024 Fonticons, Inc.--><path d="M234.7 42.7L197 56.8c-3 1.1-5 4-5 7.2s2 6.1 5 7.2l37.7 14.1L248.8 123c1.1 3 4 5 7.2 5s6.1-2 7.2-5l14.1-37.7L315 71.2c3-1.1 5-4 5-7.2s-2-6.1-5-7.2L277.3 42.7 263.2 5c-1.1-3-4-5-7.2-5s-6.1 2-7.2 5L234.7 42.7zM46.1 395.4c-18.7 18.7-18.7 49.1 0 67.9l34.6 34.6c18.7 18.7 49.1 18.7 67.9 0L529.9 116.5c18.7-18.7 18.7-49.1 0-67.9L495.3 14.1c-18.7-18.7-49.1-18.7-67.9 0L46.1 395.4zM484.6 82.6l-105 105-23.3-23.3 105-105 23.3 23.3zM7.5 117.2C3 118.9 0 123.2 0 128s3 9.1 7.5 10.8L64 160l21.2 56.5c1.7 4.5 6 7.5 10.8 7.5s9.1-3 10.8-7.5L128 160l56.5-21.2c4.5-1.7 7.5-6 7.5-10.8s-3-9.1-7.5-10.8L128 96 106.8 39.5C105.1 35 100.8 32 96 32s-9.1 3-10.8 7.5L64 96 7.5 117.2zm352 256c-4.5 1.7-7.5 6-7.5 10.8s3 9.1 7.5 10.8L416 416l21.2 56.5c1.7 4.5 6 7.5 10.8 7.5s9.1-3 10.8-7.5L480 416l56.5-21.2c4.5-1.7 7.5-6 7.5-10.8s-3-9.1-7.5-10.8L480 352l-21.2-56.5c-1.7-4.5-6-7.5-10.8-7.5s-9.1 3-10.8 7.5L416 352l-56.5 21.2z"/></svg>

Say I want to have multiple of these and I want them to have different sizes. And I have no framework for that. I might, of course, write JavaScript functions that create a SVG element, equip it with the right attributes and children, and use that throughout my code, like

// HTML part
<div class="magic-sparkles-container">
</div>

// JS part
for (const element of [...document.getElementsByClassName("magic-sparkles-container")]) {
    elements.innerHTML = createMagicSparkelsWand({size: 24});
}

// note that you need the array destructuring [...] to convert the HTMLCollection to an Array

// also note that the JS part would need to be global, and to be executed each time a "magic-sparkles-container" gets constructed again

But one of the main advantages of React’s JSX is that it can give you a smooth look on your components, especially when the components have quite speaking names. And what I ended up to have is way smoother to read in the HTML itself

// HTML part
<magic-sparkles></magic-sparkles>
<magic-sparkles size="64"></magic-sparkles>

// global JS part (somewhere top-level)
customElements.define("magic-sparkles", MagicSparklesIcon);

// JS class definition
class MagicSparklesIcon extends HTMLElement {
    connectedCallback() {
        // take "size" attribute with default 24px
        const size = this.getAttribute("size") || 24;
        const path = `<path d="M234.7..."/>`;
        this.innerHTML = `
            <svg
                xmlns="http://www.w3.org/2000/svg"
                viewBox="0 0 576 512"
                width="${size}"
                height="${size}"
            >
                ${path}
            </svg>
        `;
    }
}

The customElements.define needs to be defined very top-level, once, and this thing can be improved, e.g. by using shadowRoot() and by implementing the attributesChangedCallback etc. but this is good enough for a start. I will return to some refinements in upcoming blog posts, but if you’re interested in details, just go ahead and ask 🙂

I figured out that there are some attribute names that cause problems, that I haven’t really found documented much yet. Don’t call your attributes “value”, for example, this gave me one hard to solve conflict.

But other than that, this gave my No-Framework-Application quite a good start with readable code for re-usable icons.

To be continued…

In the end – should you actually go framework-less?

In short, I wouldn’t ever do it for any customer project. The above was a hobby experience, just to have went down that road for once, but it feels there’s not much to gain in avoiding all frameworks.

I didn’t even have hard constraints like “performance”, “bundle size” or “memory usage”, but even if I did, there’s post like Framework Overhead is bikeshedding that might question the notion that something like React is inherently slower.

And you pay for such “lightweightness” dearly, in terms of readability, understandibility, code duplication, trouble with code separation, type checks, violation of Single-Level-of-Abstraction; not to mention that you make it harder for your IDE to actually help you.

Don’t reinvent the wheel more often than necessary. Not for a customer that just wants his/her product soon.

But it can be fun, for a while.

My Favorite Pattern

It has become somewhat of an internal meme that I do not like it when programmers use the word “wrapper”. When someone does say it, I usually get a cue from one of the others to start complaining about it. Do not get me wrong, though. I am very much in favor of wrapping things, but with purpose. And my favorite one is the façade.

When simple becomes complex

Many times, APIs start out simple and elegant. This usually works for a while and the API gets used a lot precisely because of its beauty and simplicity. But eventually, a new use case comes along that demands more of the API than it can currently serve. It has to be extended. This usually takes the form of an additional method or function parameter, or an additional function that needs to be called. Using the API now becomes more complex all its users.

Do not underestimate this effect. I have only anecdotal evidence, but in my experience, a lot of unnecessary software complexity can be attributed to this1. The Pareto-Principle applies here: A single use case causes all the users of the previously simple API to deal with new complexity (e.g. 10% of the use cases cause 90% of the complexity in the user-/call-sites).

Façades make it look beautiful

Luckily, it can be dealt with beautifully: using the façade pattern. This pattern abstracts a complex API behind a simple API. The trade-off, of course, is that it is less powerful than the “full API”. In our example though, all of the previous use-cases can keep using the simple API via a façade.

When to apply this

The aforementioned example, extending an API, is a very nice opportunity to apply the façade. Just keep the interface of the old API around, and re-implement it using the new, extended API, which is usually created by modifying the old API’s implementation. Now all the old call-sites can stay the same, yet you can have a more powerful API for those rare cases that need it.

Of course, you can also identify common usage patterns and refactor them using a façade, but that’s usually much harder to do.

What exactly are façades made of?

Façades do not hide the more complex API in the sense that the APIs users are not allowed to use it. Yes, façades make APIs look beautiful, but that is where the metaphor ends. You can still access what is behind the façade. You can even write more façades for the behind. Many APIs have multiple common cases and only very few complex ones.

So… Classes? Functions? Data? Any of those, in fact. Whenever you enable writing something in a simpler way for a common case, you have a façade . Very often, a small function with a simple signature is all the façade you need.

But it makes all the difference.

Now can someone please tell me what that little hook under the c is called?

  1. Façades can, of course, also contribute to creating complexity by growing the codebase and creating ‘variants’. But they rarely do. ↩︎

SQL Database Window Functions

Window functions allow users to perform calculations across a set of rows that are somehow related to the current row. This can include calculations like running totals, moving averages, and ranking without the need to group the entire query into one aggregate result.

Despite their flexibility, window functions are sometimes underutilised, either because users are unaware of them or because they’re considered too complex for everyday tasks. Learning how to effectively use window functions can improve the efficiency and readability of SQL queries, particularly for reporting and data analysis purposes. This article will explore several use cases.

Numbering Rows

The simplest application area for window functions is the numbering of rows. The ROW_NUMBER() function assigns a unique number to each row within the partition of a result set. The numbering is sequential and starts at 1. It’s useful for creating a unique identifier for rows within a partition, even when the rows are identical in terms of data.

Consider the following database table of library checkouts:

bookcheckout_datemember_id
The Great Adventure2024-02-15102
The Great Adventure2024-01-10105
Mystery of the Seas2024-01-20103
Mystery of the Seas2024-03-01101
Journey Through Time2024-02-01104
Journey Through Time2024-02-18102

We want to assign a unique row number to each checkout instance for every book, ordered by the checkout date to analyze the circulation trend:

SELECT
 book,
checkout_date,
member_id,
ROW_NUMBER() OVER (PARTITION BY book ORDER BY checkout_date) AS checkout_order
FROM library_checkouts;

The result:

bookcheckout_datemember_idcheckout_order
The Great Adventure2024-01-101051
The Great Adventure2024-02-151022
Mystery of the Seas2024-01-201031
Mystery of the Seas2024-03-011012
Journey Through Time2024-02-011041
Journey Through Time2024-02-181022

Ranking

In the context of SQL and specifically regarding window functions, “ranking” refers to the process of assigning a unique position or rank to each row within a partition of a result set based on a specified ordering.

The RANK() function provides a ranking for each row within a partition, with gaps in the ranking sequence when there are ties. It’s useful for ranking items that have the same value.

Consider the following database table of scores in a game tournament:

playergamescore
AliceSpace Invaders4200
BobSpace Invaders5700
CharlieSpace Invaders5700
DanaDonkey Kong6000
EveDonkey Kong4800
FrankDonkey Kong6000
AliceAsteroids8500
BobAsteroids9300
CharlieAsteroids7600

We want to rank the players within each game based on their score, with gaps in rank for ties:

SELECT
 player,
 game,
score,
RANK() OVER (PARTITION BY game ORDER BY score DESC) AS rank
FROM scores;

The result looks like this:

playergamescorerank
BobSpace Invaders57001
CharlieSpace Invaders57001
AliceSpace Invaders42003
DanaDonkey Kong60001
FrankDonkey Kong60001
EveDonkey Kong48003
BobAsteroids93001
AliceAsteroids85002
CharlieAsteroids76003

If you don’t want to have gaps in the ranking sequence when there are ties, you can substitute DENSE_RANK() for RANK().

Cumulative Sum

The SUM() function can be used as a window function to calculate the cumulative sum of a column over a partition of rows.

Example: We are tracking our garden’s vegetable harvest in a database table, and we want to calculate the cumulative yield for each type of vegetable over the harvesting season.

vegetableharvest_dateyield_kg
Carrots2024-06-1810
Carrots2024-07-1015
Tomatos2024-06-1520
Tomatos2024-07-0130
Tomatos2024-07-2025
Zucchini2024-06-2015
Zucchini2024-07-0520

We calculate the running total (cumulative yield) for each vegetable type as the season progresses, using the SUM() function:

SELECT
 vegetable,
harvest_date,
yield_kg,
SUM(yield_kg) OVER (PARTITION BY vegetable ORDER BY harvest_date ASC) AS cumulative_yield
FROM garden_harvest;

Now we can see which vegetables are most productive and how yield accumulates throughout the season:

vegetableharvest_dateyield_kgcumulative_yield
Carrots2024-06-181010
Carrots2024-07-101525
Tomatos2024-06-152020
Tomatos2024-07-013050
Tomatos2024-07-202575
Zucchini2024-06-201515
Zucchini2024-07-052035

Serving static files from a JAR with with Jetty

Web applications are often deployed into some kind of web server or web container like Wildfly, Tomcat, Apache or IIS. For single-instance services this can be overkill and serving requests can easily be done in-process without interfacing with some external web container or web server.

A proven and popular framework for an in-process web container and webserver is Eclipse Jetty for Java. For easy deployment and distribution you can build a single application archive containing everything: the static resources, web request handling, all your code and dependencies needed to run your application.

If you package your application that way there is one caveat when trying to serve static resources from this application archive. Let us have a look how to do it with Jetty.

Using the DefaultServlet for static resources on the file system

Jetty comes with a Servlet-Implementation for serving static resources out-of-the-box. It is called DefaultServlet and can be used like below:

Server server = new Server();
ServerConnector connector = new ServerConnector(server);
connector.setHost(listenAddress);
connector.setPort(listenPort);
server.addConnector(connector);
var context = new ServletContextHandler();
context.setContextPath("/");
var defaultServletHolder = context.addServlet(DefaultServlet.class, "/static/*");
defaultServletHolder.setInitParameter("resourceBase", "/var/www/static");
server.setHandler(context);
server.start();

This works great in the case of static resources available somewhere on the filesystem.

But how do we specify where the DefaultServlet can find the resources within our application archive?

Using the DefaultServlet for static in-JAR resources

The only thing that we need to change is the init-parameter called resourceBase from a normal file path to a path in the JAR. What does a path to the files inside a JAR look like and how do we construct it? It took me a while to figure it out, but here is what I came up with and it works perfectly in my use cases:

private String getResourceBase() throws MalformedURLException {
	URL resourceFile = getClass().getClassLoader().getResource("static/existing-file-inside-jar.txt");
    return new URL(Objects.requireNonNull(resourceFile).getProtocol(), resourceFile.getHost(), resourceFile.getPath()
        .substring(0, resourceFile.getPath().lastIndexOf("/")))
        .toString();
}

The method results in a string like jar:file:/path/to/application.jar!/static. Using such a path as the resourceBase for the DefaultServlet allows you to serve all the stuff from the /static directory inside your application (or any other) jar containing the class this method resides in.

A few notes on the code

Why don’t we just hardcode a path after the jar:-protocol? Well, the file path may chance in several scenarios:

  • Running the application on a different platform or operating system
  • Renaming the application archive – it could contain the version number for example…
  • Installing or copying the application archive to a different location on the file system

Using an existing resource and reusing the relevant parts of the URL-specification for the resource base directory solves all these issues because it is computed at runtime.

However, the code assumes that there is at least one resource available in the JAR and that its path is known at compile time.

In newer JDKs like 21 LTS constructing an URL using the constructor is deprecated but I did not bother to rewrite the code to use URI because of time constraints. That is left up to you or a future release…

As always I hope someone finds the code useful and drops a comment.

If You Teach It, Teach It Right

Recently, I gained a glimpse of source code that gets taught in beginner’s developer courses. There was one aspect that really irked me, because I think it is fundamentally wrong from the pedagogical point of view and disrespectful towards the students.

Let me start with an abbreviated example of the source code. It is written in Java and tries to exemplify for-loops and if-statements. I omitted the if-statements in my renarration:

Scanner scanner = new Scanner(System.in);

int[] operands = new int[2];
for (int i = 0; i < operands.length; i++) {
    System.out.println("Enter a number: ");
    operands[i] = Integer.parseInt(scanner.nextLine());
}
int sum = operands[0] + operands[1];
System.out.println("The sum of your numbers is " + sum);

scanner.close();

As you can see, the code opens a possibility to input characters in the first line, asks for a number twice and calculates the sum of both numbers. It then outputs the result on the console.

There are a lot of problems with this code. Some are just coding style level, like using an array instead of a list. Others are worrisome, like the lack of exception handling, especially in the Integer.parseInt() line. Well, we can tolerate cumbersome coding style. It’s not that the computer would care anyway. And we can look over the missing exception handling because it would be guaranteed to overwhelm beginning software developers. They will notice that things go wrong once they enter non-numbers.

But the last line of this code block is just an insult. It introduces the students to the concept of resources and teaches them the wrong way to deal with them.

Just a quick reminder why this line is so problematic: The java.util.Scanner is a resource, as indicated by the implementation of the interface java.io.Closeable (that is a subtype of java.lang.AutoCloseable, which will be important in a minute). Resources need to be relased, freed, disposed or closed after usage. In Java, this step is done by calling the close() method. If you somehow fail to close a resource, it stays open and hogs memory and other important things.

How can you fail to close the Scanner in our example? Simple, just provoke an exception between the first and the last line of the block. If you don’t see the output about “The sum of your number”, the resource is still open.

You can argue that in this case, because of the missing exception handling, the JVM exits and the resource gets released nonetheless. This is correct.

But I’m not worried about my System.in while I’m running this code. I’m worried about the perception of the students that they have dealt with the resource correctly by calling close() at the end.

They learn it the wrong way first and the correct way later – hopefully. During my education, nobody corrected me or my peers. We were taught the wrong way and then left in the belief that we know everything. And I’ve seen too many other developers making the same stupid mistakes to know that we weren’t the only ones.

What is the correct way to deal with the problem of resource disposal in Java (since 2011, at least)? There is an explicit statement that supports us with it: try-with-resources, which leads to the following code:

try (
    Scanner scanner = new Scanner(System.in);
) {
int[] operands = new int[2];
for (int i = 0; i < operands.length; i++) {
        System.out.println("Enter a number: ");
        operands[i] = Integer.parseInt(scanner.nextLine());
}
int sum = operands[0] + operands[1];
System.out.println("The sum of your numbers is " + sum);
}

I know that the code looks a lot more intimidating at the beginning now, but it is correct from a resource safety point of view. And for a beginning developer, the first lines of the full example already look dreading enough:

import java.util.Scanner;

public class Main {

    public static void main(String[] arguments) {
        // our code from above
    }
}

Trying to explain to an absolute beginner why the “public class” or the “String[] arguments” are necessary is already hard. Saying once more that “this is how you do it, the full explanation follows” is doing less damage on the long run than teaching a concept wrong and then correcting it afterwards, in my opinion.

If you don’t want to deal with the complexity of those puzzling lines, maybe Java, or at least the “full-blown” Java isn’t the right choice for your course? Use a less complex language or at least the scripting ability of the language of your choice. If you want to concentrate on for-loops and if-statements, maybe the Java REPL, called JShell, is the better suited medium? C# has the neat feature of “top-level statements” that gets rid of most ritual around your code. C# also calls the try-with-resources just “using”, which is a lot more inviting than the peculiar “try”.

But if you show the complexity to your students, don’t skimp on overall correctness. Way too much bad code got written with incomplete knowledge from beginners that were never taught the correct way. And the correct way is so much easier today than 25 years ago, when I and my generation of developers scratched their heads why their programs wouldn’t run as stable and problem-free as anticipated.

So, let me reiterate my point: There is no harm in simplification, as long as it doesn’t compromise correctness. Teaching incorrect or even unsafe solutions is unfair for the students.